Showing posts with label vintage pattern. Show all posts

Tuesday, 24 May 2022

graceful enthusiasm

Pin It now!

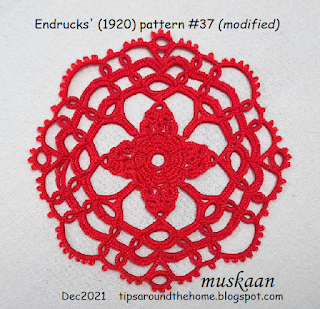
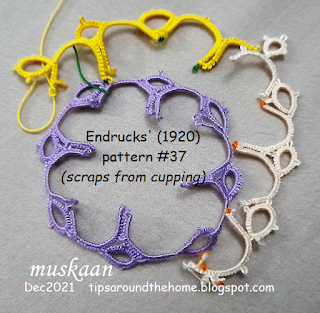
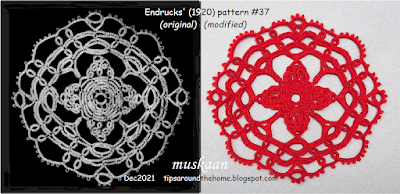
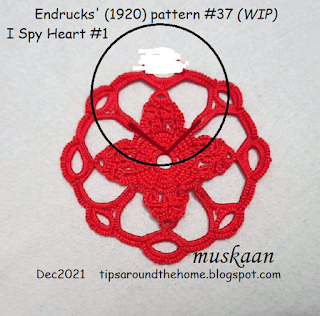
Reworked pattern from Frau Eleonore Endrucks-Leichtenstern’s ‘Die Schiffchen-Spitzen’, 1920, for Endrucks 1920 Project.

When enthusiasm wanes in one person, its flame may shift to another – that is what being in a group is all about! Somebody else carries the torch. It is what happened with pattern #41 after enthusisam was interrupted.
Since the diagram and text was already done, Ninetta and I decided to ask for a volunteer to tat the sampler. Gracie Chung stepped up and worked this beautiful lace.

Gracie sewed in beads and has pinned this sampler up on her office board. She wanted to tat a much longer length and had something more in mind. However tax season rolled in and she’s had to pause for a few months to focus on her job.
With these gems, the edging could easily be adapted into a crown or tiara!

 
Imagine my pleasant surprise when Anita Barry sent in her secretly tatted sampler in 2 colours as a back-up, just in case this pattern was jinxed, LOL and got left in the lurch again! 

And this sampler is on display, too, sewed to the ribbon on her straw hat!
Isn't it wonderful when tatted lace can be seen in public as in both these cases.

In the end, the pattern pdf for #41 combines the work, tips, and ideas of 5 tatters. Hope you like the confluence.
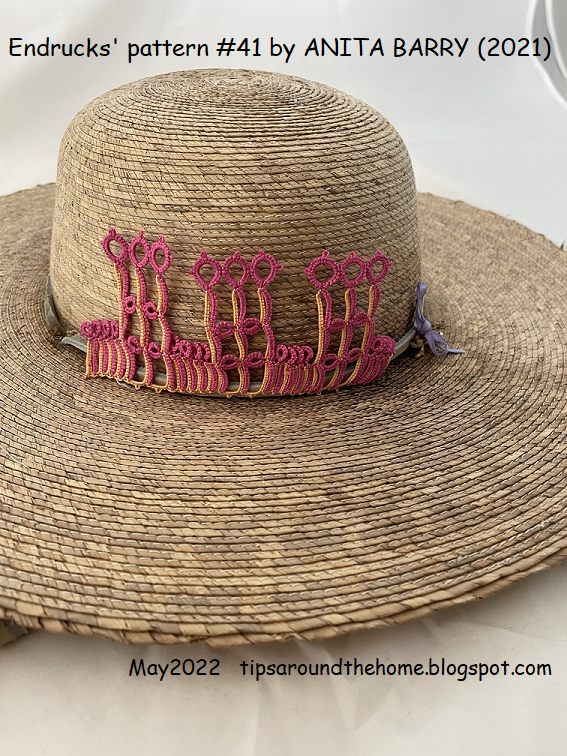
Endrucks’ Pattern #41 pdf in modern style (click link to download) 

Gracie Chung sportingly shared something about herself.  In her own words –

I didn't grow up with the possibility to ever learning about tatting. No one in my family knows about it (I think). It's not until 2007 I chance finding shuttles in Joann's Fabric that I got curious about what shuttles were for that I googled it when I got home. The more YouTube videos I watched, the more interested I became and I decided to go back to Joann's to buy my first pair of the Clover Shuttles. And the rest is history.


I basically learned everything online, from Karen Cabrera videos, Jane Eborall's patterns and techniques, and then from your blog too.


My other hobby is reading. Mystery, cozy mystery most of the time. They don't clash, tatting while listening to audio-books is my ultimate relaxing method.


I think that's it. That's how I discovered the joy of tatting and trying to be more involved in the tatting world.

She also gave us permission to share her tatted lace pictures from her FB timeline. Here’s a glimpse into her range of colourful projects, starting with necklaces, bracelets, earrings, adorable butterfly hair clips, snowflakes and doilies, and flowers - both 2D and 3D!
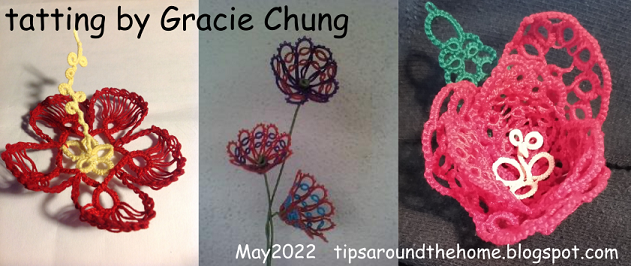

I’m sure we can all recognise several of these designs and designers. It also showcases the diversity in Gracie’s tatting choice, though her preference appears to be jewellery.

And to gaze at some of Anita’s tatting- https://tipsaroundthehome.blogspot.com/2021/09/700-and-promises-still-to-keep.html

Ninetta says:

“I join Muskaan in thanking Gracie and Anita, and take this opportunity to thank all generous tatters who share their knowledge online. A lot of tatters have self-learned online like Gracie did! I am thinking of Marina Madzar, Pina Pinto, just to name 2 of our other contributors. A great reason for loving this project is that we are getting to know each other and have discovered that we are not lonely tatters, there’s always another enthusiastic tatter just round the (Internet’s) corner willing to help!”

With love and gratitude,
muskaan & Ninetta

Related posts –
https://tipsaroundthehome.blogspot.com/2022/05/enthusiasm-interrupted.html - #41 candle edging sampler using BDS
https://tipsaroundthehome.blogspot.com/2021/09/700-and-promises-still-to-keep.html - thanking Anita Barry

*********************
Endrucks 1920 Project is a community project, where patterns from Endrucks’ German book of 1920 were converted to modern-style presentations and pdfs. We welcome you to join our Facebook group “Endrucks 1920 Project” (please read the group’s description and rules before joining : 
https://www.facebook.com/groups/1235560633606162) where the fun continues with derivative tatting, new variations, activities, etc. all within the gamut of Endrucks’ patterns.

Using the hashtag 
#Endrucks1920Project when posting in FB or Instagram, ensures that your pic will show up in a search.

If you enjoy sharing and experimenting, or even test-tatting, the group is waiting for you! All info and links to patterns (original and modern), including model images, are in the Endrucks 1920 Project Document, here 
https://docs.google.com/document/d/17LEVftXweztBIOWh4sL4BB7bX65ssoOsOn4oXIgCepY/view There is still a lot to explore and extract, derive and apply and scrolling through this document will give you an idea of the possibilities and beyond.

*********************

Sunday, 17 April 2022

Deaconess Butterfly 1916

Pin It now!

Back in 2019, I had tremendous fun tatting the Deaconess Butterfly (from 1916) using beads to pretty it up. Recently Cross-eyed Tatter left a comment asking for help. (https://tipsaroundthehome.blogspot.com/2019/10/beady-eyed.html). 

After reading up my notes as well as the rewritten pattern by Carolyn Groves (in 2002) to refresh my memory, and being in a diagramming mode, I decided it would be better to share a diagram than simply notate the model. So here it is ---


And here is the pdf link (click to download) - https://drive.google.com/file/d/1gDRWAwqyN7f6kdsu9yybtQj9-l_QpsFn/view

For the above beaded version refer to my detailed notes here - https://tipsaroundthehome.blogspot.com/2019/10/beady-eyed.html

It took me a while to do the diagram to my satisfaction since parts of the pattern can be a bit confusing especially if one is a visual tatter. 
Pay close attention to the sequence. 
TIP: There are multiple joins between the head and body, and body and tail. Hence make sure the picot is sufficiently accommodative. 

Cross-eyed Tatter already figured it out and was tatting it based on her last comment. For what it's worth, I hope this diagram helps tatters in future. I will also send it to The Online Tatting Class, since that's where I first tatted it as homework. 

UPDATE: Thanks to some good sleuthing by Gloria Nelson and Wally Sosa, the original source of the pattern is as follows: 'Butterfly Motif' by The Deaconess in 'Practical Tatting Book No.1', 1916. (Reprinted in the book, 'Tatting- A Potpourri of Patterns' by Handy Hands). The pdf and image above have been updated with this info.

That's it for now. Butterflies never go out of season! So, let's enjoy 🦋🦋🦋
And if you find a mistake, please holler!

Tuesday, 28 December 2021

cupping hearts

Pin It now!

Over a year back, I struggled with cupping in this doily pattern and expert tatters offered several solutions and valuable advice. But I left it on the sidelines and only took it up again a week or so back. This is pattern #37 from Eleonore Endrucks-Leichtenstern’s German book ‘Die Schiffchen-Spitzen’,1920.

After tweaking some of the stitch counts in outer chains, it finally lays flat.... 
....but above is the fallout of my several attempts, without including all the retro-tatting and indecision that went on.
This was the crucial round (Round 4) which I just Had to get right and others would fall into place more easily. While weighing the numerous options, I hit upon my own solution which I bet you won't be able to identify! 
The above combo shows Endrucks' original model with my modified one. Can you guess the difference? 
HINT: It lies within the square/diamond motif.

Now I have tons to share about that motif, some of which is already written about/hinted at here - https://tipsaroundthehome.blogspot.com/2020/11/arranging-motifs.html
I had started to diagram the motifs to show the different paths, but this last week I haven't been able to allot time or focus to anything other than some actual tatting for an hour or 2 daily. So the pattern itself will also take time to be presented. My apologies for this inordinate delay, that will spill into 2022.

So what do you think? does the modified model look okay? I tried to keep the tweaks minimal, without disturbing the original shape as far as possible.

The doily is worked in Anchor pearl cotton, size 8 and measures just under 10.5 cms across from the extreme tips. Perle cotton is flexible to work with. But would the tweaks hold up in mercerised cotton? Only one way to find out - tat one more doily in size 40. 

But look what I discovered ... 3 possible heart patterns!  I Spy Hearts, as Anita would say! Here's what she wrote when I showed these to her - “Each heart design can be an individual heart, a row of hearts made into an edging, implemented into a design, etc. So much fun.”

Heart #1 - after round 5 ;

Heart #2 - after round 6 ; and,

Heart #3 - after round 8. the final round. I figured out a way to work it in one pass through a rough sketch.
Something to look forward to for the 2022 heart season in February ;-D


All links and details, including all modernised patterns can be found in the Endrucks 1920 Project document here -

Thursday, 9 September 2021

700 and promises still to keep

Pin It now!

7-year itch? What’s that? Almost 30 years into marriage and over 7 years into blogging and still scratching the surface of goodness. 400 weeks, 2800 days, and 700 posts - 1 every 4 days?!

But these numbers hide the other equally good spin-offs from my hobby – the company of good friends in cyberspace. Yeah, I don’t need a shuttle to travel into outer space – the shuttle in my hand does the trick right in the comfy of my home!

LacingLOVE Program (article published in IOLI Bulletin, Spring 2021)

And one such friend with whom I soar is Anita Barry. Her middle name could well be Anita ‘Cool’ Barry! See what she says about herself here. Her smile translates into messages, never failing to brigthen my day!
When we started the Endrucks 1920 Project, I asked if she would like to participate. I strongly suspect she said yes only as my buddy otherwise she would not have given it a 2nd glance. She chose and immediately worked on pattern #3 straight from the model image before discovering the diagram and written pattern pdf. And her reaction –
”Wow! What different paths I took and Endrucks took! Oh! She’s a clever girl! She took a much easier path. I so admire her (Endrucks’) creative mind!”
And soon after …. “Enlightening! Truly enlightening to work this.
I’d love to use it as a teaching aid. It’s been really fun for me!!!
Discovering Endrucks is heartwarming.”


Anita did just that and taught pattern #3 at the recent Palmetto Tat Days. Here's her feedback -
“Students thought Eleonore Endrucks was clever! ... All were interested in seeing and printing her book with the diagram & instructions and seeing your revised shorthand/diagrammed online site. All were excited. All were grateful to you for your extreme efforts with E’s pattern and Martha Ess."   
And we cannot forget my partner in crime Ninetta Caruso, without whom this project would have remained a personal endeavour instead of involving the community! We have worked together through the year to see this project through.

Anita had the pattern test-tatted by no less than Martha Ess, to who we owe our thanks for scanning and putting the book in public domain!
“Martha test-tatted different versions of what Endrucks may have wanted depending on following her picture or following her diagram, or using RW or using SS, etc. Very interesting."

We have been discovering that Endrucks’ model, diagram and text sometimes vary slightly from each other and the tatter has to make an educated guess. Further, she focuses only on switching the shuttle in hand, and reverse or turn work is implied. Linguistic barrier plays it’s role and we have to turn to the model picture to decide which path to take depending on where the chains face.
"There are several ways of interpreting this pattern. All good. None that are wrong. Just different from one another.
Exactly! A tatter always has options to create the effect they desire - be it with colours or direction. Most of these options are covered in Lock Join Plus series and in the Thrown Ring Methods and more can arise by combining them.

Anyway, moving back to November 2020. Within days of working on #3, Anita was interested enough to move aside all her other projects and ask for pattern #27.
She felt "happily blessed to get" it on her first attempt, choosing “to tat it in contrasting colors so tatters can see where the threads are in the project.”

In order to avoid frequent reverse work (RW), her blue version uses shoelace trick (SLT) and switch shuttle (SS) to work mainly from the front, and the chains are mirror-imaged. Another option is to use direct tatting (reverse or unflipped stitches) as in one form of block tatting. 
Endrucks' modified #27 as a bracelet
I love the accordion effect of those ‘block tatting’ chains. Endrucks has created many interesting effects using chains and lock joins! This is one of the few patterns that has ‘onion rings’.
NOTE : None of these terms are used in the 1920 book – they are simply chains and rings made with 2 shuttles and the 2 basic joins.


One of a handful to complete both the Tatters Across Time (TAT) and IOLI proficiency programs, she is now an evaluator and has been teaching at Palmetto Tat Days for several years. She also volunteered at the Lace Museum when in Virginia. Having shifted to Florida recently, we can expect more ocean-themed designs such as these ….
 
Moby-D, the Tatted Whale, spectacular minimalistic tatted Flamingo, Painting and tatting by Anita Barry  

Anita is an accomplished tatter, sewer, handcrafter and ideator, and enjoys learning new stuff, including bobbin lace.
   

Pin cushion with varied thread crafts, bobbin lace, hand-painted shuttles, lavender-based items for the farmers’ market

She is also a rescuer of vintage items, lace, and tools/machines/accessories, donating/auctioning items to raise scholarship funds at the Tat Days.
  
Vintage hanky pouch, Rejuvenated vintage butterfly, Vintage shuttles rescued

The following is a another tiny selection of her diverse designing skills in tatted lace.
   
Bettina Triangle (simple tatted quilt block using thread she dyed herself),
The Corn Harvest Basket (a tatted transformation from crochet), Miniature Hand-Tatted Baby Items, an artistic necklace.

Tatted Lavender Heart on a Card
She frequently sends me patterns she’s working on preferring to use simple elements (as in the heart above) and methods to create quick and beautiful patterns. I tatted and shared a few, but there are still many that need uploading or tatting. You might remember our joint Buddy Hearts where we followed different designing paths. She initiated and encouraged me to send articles/patterns to the International Organization of Lace bulletin and Chapter gift CD. I have often relied on her professional expertise for diligent proofreading!

At the recent IOLI UnCon 2.0 Anita did a table talk titled “Fear Knot? Fear Not” based on our experience with Carin Jansen’s Angel Choir doily tat-along sharing numerous fixes.
"At the end of the talk I spoke about your Endruck’s 1920 Project. People were intrigued & interested! They asked quite a few questions."
Anita, you have become a true ambassador for this Project, besides being an enthusiastic and valued contributor and reliably fun friend. Ninetta joins me in thanking you for all your contribution!

With love and gratitude
muskaan & Ninetta


Ninetta reminds us this 100 year old book by Frau Endrucks has brought us so much pleasure, taking us on diverse paths, making us reach for the stars .... with the promise of still more to come! And hopefully I will continue to tat and blog, fulfilling my past promises and 'miles to go before I sleep ....  '
 
**********************
Endrucks 1920 Project is a community project, we welcome every one of you to join in! Please let us know where we can find your renditions and derivative tatting!
We created the hashtag #Endrucks1920Project, so please use it!
We all enjoy sharing and the project is awaiting every one of you!
All info and links (original and modern) are in the Endrucks 1920 Project Document, here:
https://docs.google.com/document/d/17LEVftXweztBIOWh4sL4BB7bX65ssoOsOn4oXIgCepY/view
*********************
 

Friday, 23 July 2021

superimposed excitement

Pin It now!

 I couldn't wait to share what I've been tatting with all my wonderful readers (thank you all for your kind thoughts 💝). Although my pace was slow, I finished this square edged frame today and am excited for you to see it, too.

Recognise the motifs from my recent posts - the block tatting question and the extracted earrings

I chose the easy path following Frau Endrucks' practicality and working the blocks on either side 'normally' with no mind to directional symmetry.

Here you can see the adaptation to turn a 90° corner, which inspired those earrings. Removing a few elements and joining at the base, brought the 2 enr together.

Continuing Row 1 working with 2 shuttles, CTM. There are a couple of inward picots that I used a paper clip to hold till joining.

Row 1 complete. I like how this looks! Each side is a single repeat; by adding more repeats along opposite sides it can become a rectangle or a larger square.
In Anchor size 40 (shade 00352), this row is 3½ broad and 13 cms length of side.

After continuing to the next round (all tatted in one pass, and both rounds move clockwise), this is how the final frame/edging looks. I think the inner edge makes an elegant statement, too.
The side now measures 17 cms at the extremities.

Don't these look like 2 different squares superimposed and well-synced? Eyes seem to be drawn first to one square and then to the other. 
The only change I made to this round was adding a few decorative picots, including above a lock join.

Laid over this truffle box which is my current project box with all essentials inside. It makes a nice tatted frame ...

UPDATE: the pattern is included in the main pdf here - (click for pattern)  https://drive.google.com/file/d/1sStHg5IQmuwizC7QcKRaX951CvVoURbn/view

If you visit the Endrucks 1920 Project doc here, you will see the talented Reiko Akamatsu has already made another square adaptation from this same edging. She has introduced more changes and it will be an interesting study to compare these 2 versions.

One very interesting feature of this pattern (and most of Frau Endrucks' patterns) is that the entire pattern is worked with 3ds or 6ds between picots or between joins. The only exception is the 1ds she uses to rise to next level of each block. 

I will share this pattern in due course and hope you like it enough to give it a try. 
In fact I have 2 more narrower edgings in mind but tatting might have to wait. But I am willing to share a diagram if anybody wishes to give it a go. 


Monday, 5 July 2021

continuous paths

Pin It now!

There are some lovely doilies in Endrucks' book, all worked in one pass. What I find, though, is that unlike her straight lace patterns, the circular doilies tend to either ruffle or cup, and some tweaking of count is required. I think it is a matter of individual tatting tension?

Another thing I've noticed is that perle cotton (as in the one above) is more forgiving than mercerised cotton which makes sense due to the difference in their twist. The tight twist of mercerised cotton thread tends to keep the lace stiffer and less flexible. 
Despite all the colours in the mandala, false CTM gave me a sense of continuous tatting. However, for the Endrucks 1920 Project, I needed to tat a model that could be more easily shared in modern style which is why I chose this pistachio green in Anchor size 20. It is tatted in one pass using mock picots, split chains, and split rings to climb out. 
Above I have traced the 'modern' path of climbing out of rounds (in blue). For this to work smoothly, I had to work a couple of rounds counterclockwise. The orange path shows how Frau Endrucks moved to the next round - simply add another chain(s) till you reach the point where you can climb out! 
UPDATE: I  have coined the term 'SHADOW CHAIN' for this extra chain(s) used to climb out to the next round, row, or motif, thus enabling continuous tatting.
No need to learn any techniques, and the direction of each round remains unchanged. But as seen above, it does add extra chains along the path....something which 21st century tatters may not like. Although in fine threads, it may pass inspection, and clearly speed up tatting.

UPDATE: Pattern for this doily is uploaded, showing both methods of climbing out - https://drive.google.com/file/d/1vG2g0JCVsy8cy2DfGKHEhxleq_7Rveba/view

 
Since the first few rounds can be worked off a shuttle and ball, I used my earlier tip about extending the thread between 2 shuttles. All the extra thread in left pic was wound on to the ball temporarily, till it got used up and the 2nd shuttle was needed.
Of course, one can simply keep shuttle 1 and ball thread continuous and tat till the 2nd shuttle is needed. At that point, pull out the length required, cut from ball, and wind up shuttle2.

There was a lot of ruffling in the green model, despite adding a few stitches to a later round. So I started another in tinted Anchor size 20, with modified stitch count. Worked beautifully and lay flat. The 3rd round does ruffle till the 4th round is added, but this is a structural problem.
Ran out of thread after 5 rounds, hence added a bold violet shade to add a spot of colour. I kinda like it - what do you think?
I am busy with pattern #17, hence this pattern pdf will have to wait a bit. However, for those who'd like to try it right away, you can find the written instructions and tips by Georgia here.

This is Pattern #28 from Schiffchen-Spitzen 1920 by Eleonore Endrucks-Leichtenstern. You can find all the links in the Endrucks 1920 Project doc here along with all other patterns in modern format. We are hoping to have all of Endrucks' patterns in modern format by this November - a year from when we started.