Showing posts with label mandala. Show all posts

Monday, 25 October 2021

bagatelle to bagaball

Pin It now!

Reworked patterns from Frau Eleonore Endrucks-Leichtenstern’s ‘Die Schiffchen-Spitzen’, 1920, for Endrucks 1920 Project.

Am I getting too OC in my tatting? I can’t seem to stop tatting, telling myself ‘just one more repeat’ or ‘one more tweak’ or ‘now let’s place this colour there’ to see what comes up - to upload the best possible for the pdf. But despite the time constraint I cannot stop enjoying the tatting play – way cooler and way more exciting than bagatelle! 

Above are 5 pieces of pattern #28, no two identical. The ruffling settles in later rounds but each piece needed some tweaking of chains.

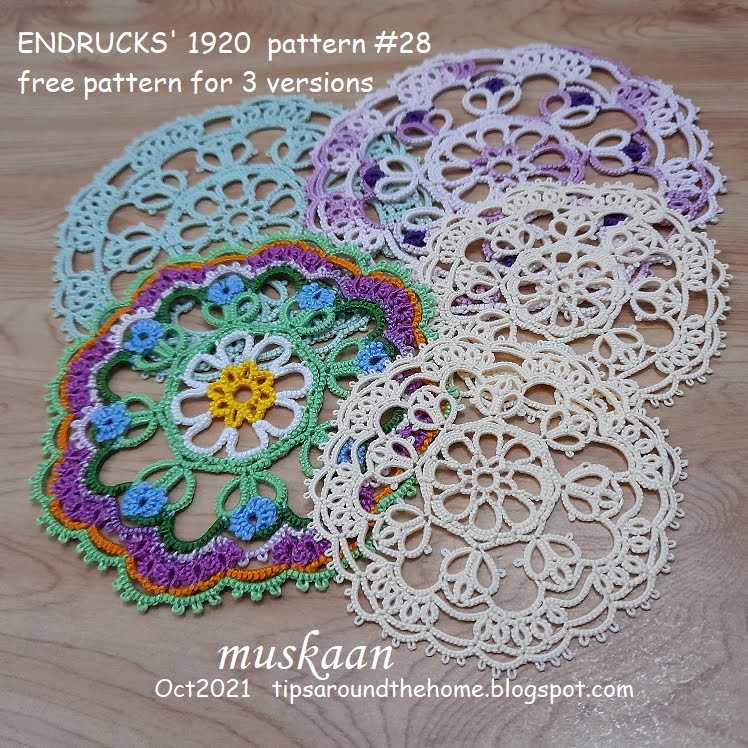
This time, though, I am very proud of my diagramming skill! In one single diagram I have managed to incorporate 3 versions of the pattern! To see it you will have to click on the pdf url - https://drive.google.com/file/d/1vG2g0JCVsy8cy2DfGKHEhxleq_7Rveba/view

These 5 pieces were tatted in a different sequence, spanning 2 years, to the one presented in the pdf. Here, I’d like to stick to my chronological timeline.

The Valley of Flowers mandala version from June 2019. 
https://tipsaroundthehome.blogspot.com/2019/06/valley-of-flowers.html
In order to incorporate the colour palette, lot of false CTM is used to transition to the next round instead of cutting both threads each time. And the thrown rings in one round were shifted to the next round and worked as regular rings.
This pattern modification is included in the diagram.

This is from June 2021 tatted for the current project using single colour and climbing out using split rings and split chains. I even took round-wise pics for the pdf but did not find it necessary to include them, especially since I later tweaked the count some more.

You can find Georgia Seitz’s written transcript and tips here - https://www.bellaonline.com/articles/art304446.asp

Since the previous piece encountered cupping and ruffling in some rounds, I decided another tweaked piece was essential for the pdf. Much better result as regards laying flat, though a bit of simple blocking along the way helps too.
The count used in this piece is presented in the pdf in written format as well as in the diagram.

Empty 'hands' are a devil’s workshop ;-P I got to thinking that so far none of us has used Endrucks’ method of climbing out and was curious to see how it would look and compare! (I discovered only last week that Marina Mad Jar had already used it in pattern #34 - https://tipsaroundthehome.blogspot.com/2021/10/when-time-flies.html). 
Sep 2021 This is as close to the original count as possible, but using extra chains (shadow chains) to climb out à la Endrucks’.
 https://tipsaroundthehome.blogspot.com/2021/07/continuous-paths.html The octagonal shape is lost a bit because of the extra stitches added in every 3rd chain. This is an unfortunate feature of all my versions unless the tatting tension was loosened.
The original pattern brings up the last 3rd of the diagram.

Sep 2021. This is the final piece where the chain arch above the 3-ring cluster is pulled out unlike the flat-line of the previous.
Can you detect the Shadow chains used for continuous tatting? I deliberately chose ecru in size 40 trying to go for 'vintage'. If one uses 2 colours, some juggling might be called for, but in single colour it is easy-peasy! So, here’s an easy alternate for those who find split chains and split rings difficult to work.
 
All 5 together for size comparison. Details of thread and measurements are included in the pdf.
Pattern #28 (3 versions) pdfhttps://drive.google.com/file/d/1vG2g0JCVsy8cy2DfGKHEhxleq_7Rveba/view


When Anita saw what I was tatting, she immediately pointed out that these would make a great little baggie, and even sent me a pic! How exciting! My limited imagination only had me thinking of using them as coasters. So here’s what came of my attempt …

Lining it with fabric would enhance the durability.
Choice of fabric colour will also help highlight each side. Different sides means the bag is easier to mix and match with your outfit, besides using up spare tatted lace. It can also be an exciting gift purse for a little girl!
As a reflection of Endrucks’ stacked chains (block tatting), I connected the 2 pieces using simple chains. By working alternate chains in direct tatting (reverse or unflipped stitches), it was a matter of one shuttle and ball, working continuously. Longer chains will obviously increase the capacity.
Lined the edges with beaded chain tatting for some bling. A large teardrop with beaded loop closes the opening, ....
....while those solid cylindrical beads finish off the handle. Good to hold a ball or 2 and shuttles for a project on the go!

Although there's many a slip 'twixt the cup and the lip, ‘twixt my conception and execution, and nowhere as elaborate as Anita’s, I am happy with my first such bag-a-ball baggie! 


**********************
Endrucks 1920 Project is a community project, we welcome every one of you to join in! Please let us know where we can find your renditions and derivative tatting!
We created the hashtag #Endrucks1920Project, so please use it for your version to show up in a search.
We all enjoy sharing and the project is awaiting every one of you!
All info and links (original and modern) are in the Endrucks 1920 Project Document, here:
https://docs.google.com/document/d/17LEVftXweztBIOWh4sL4BB7bX65ssoOsOn4oXIgCepY/view
Remember there are many more modernised patterns, derived and extracted patterns/ideas, already listed in the project document, with more still to come! So, do visit and scroll through.

*********************

Monday, 5 July 2021

continuous paths

Pin It now!

There are some lovely doilies in Endrucks' book, all worked in one pass. What I find, though, is that unlike her straight lace patterns, the circular doilies tend to either ruffle or cup, and some tweaking of count is required. I think it is a matter of individual tatting tension?

Another thing I've noticed is that perle cotton (as in the one above) is more forgiving than mercerised cotton which makes sense due to the difference in their twist. The tight twist of mercerised cotton thread tends to keep the lace stiffer and less flexible. 
Despite all the colours in the mandala, false CTM gave me a sense of continuous tatting. However, for the Endrucks 1920 Project, I needed to tat a model that could be more easily shared in modern style which is why I chose this pistachio green in Anchor size 20. It is tatted in one pass using mock picots, split chains, and split rings to climb out. 
Above I have traced the 'modern' path of climbing out of rounds (in blue). For this to work smoothly, I had to work a couple of rounds counterclockwise. The orange path shows how Frau Endrucks moved to the next round - simply add another chain(s) till you reach the point where you can climb out! 
UPDATE: I  have coined the term 'SHADOW CHAIN' for this extra chain(s) used to climb out to the next round, row, or motif, thus enabling continuous tatting.
No need to learn any techniques, and the direction of each round remains unchanged. But as seen above, it does add extra chains along the path....something which 21st century tatters may not like. Although in fine threads, it may pass inspection, and clearly speed up tatting.

UPDATE: Pattern for this doily is uploaded, showing both methods of climbing out - https://drive.google.com/file/d/1vG2g0JCVsy8cy2DfGKHEhxleq_7Rveba/view

 
Since the first few rounds can be worked off a shuttle and ball, I used my earlier tip about extending the thread between 2 shuttles. All the extra thread in left pic was wound on to the ball temporarily, till it got used up and the 2nd shuttle was needed.
Of course, one can simply keep shuttle 1 and ball thread continuous and tat till the 2nd shuttle is needed. At that point, pull out the length required, cut from ball, and wind up shuttle2.

There was a lot of ruffling in the green model, despite adding a few stitches to a later round. So I started another in tinted Anchor size 20, with modified stitch count. Worked beautifully and lay flat. The 3rd round does ruffle till the 4th round is added, but this is a structural problem.
Ran out of thread after 5 rounds, hence added a bold violet shade to add a spot of colour. I kinda like it - what do you think?
I am busy with pattern #17, hence this pattern pdf will have to wait a bit. However, for those who'd like to try it right away, you can find the written instructions and tips by Georgia here.

This is Pattern #28 from Schiffchen-Spitzen 1920 by Eleonore Endrucks-Leichtenstern. You can find all the links in the Endrucks 1920 Project doc here along with all other patterns in modern format. We are hoping to have all of Endrucks' patterns in modern format by this November - a year from when we started. 

Saturday, 1 June 2019

valley of flowers

Pin It now!
Valley of Flowers mandala doily/coaster
Eleonore Endrucks Leichtenstern  
Pattern #28 from Schiffchen-Spitzen 1920 
UPDATE: 

Starting in 2015, as a summer holiday project for the Online Tatting Class, I have been converting many of Endrucks’ patterns to modern notation in English. These are (mostly) still only on paper as I didn’t get around to actually tatting a sample. The ones I tatted still need a proper presentation. So besides the angel lace and angelette, I haven't shared anything since. I've also come across a couple of errors.

When Georgia shared pattern #28 in this Bellaonline article, I had already written out my own notations. It is such a pretty pattern that I was eager to convert it into thread. 


I took a few little liberties especially with picots to highlight flowers.
The entire book can be downloaded from Georgia Seitz’s Archive (Endrucks 1920 & Endrucks 1920 diagrams insert).

There is some beautifully natural ruffling after some of the rounds, eg. the one above. However I kept tatting and it lays flat easily after blocking with the rolling pin. 
The magenta rings were supposed to be thrown rings on the previous round. Instead I shifted the rings to this outer round and the previous is chains only, so that I could play with  colours easily.


You can see I’ve gone to town with the palette. I had a floral theme (perhaps I was inspired by Jane McLellan’s doily?) and though some colours were changed as I went along, it turned out fine. 

The chains in Endrucks’ tatted model are pretty loose (see last pic below) whereas my tendency is to pull the stitches close. Hence a few stitches had to be added on some chains - starting with the ones under blue flowers, and the 3 corresponding ones in later rounds.

Just shy of 4” in Anchor pearl Cotton which is equivalent to Lizbeth size 20.


I’m calling it Valley of Flowers Mandala – it does have the mandala look about it, right? And I need a Zen-like state to tolerate these soaring summer temperatures of 45+ degree Celsius with no respite for yet another week.

Now for the eye-opener .... 
What I missed while converting the pattern, Georgia Seitz's experienced eye caught!!! Although she wrote in the article, it still took me some time to locate!!
CLIMBING OUT WITH CHAINS : Endrucks worked all 9 rounds continuously WITHOUT any split rings or split chains to climb out. She used simple chains!!! Can you trace these?

Not acceptable by modern standards, yet I think this is a great way to climb out especially when we are doing trials of possible designs – quick and easy and obviously lazy ;-D

Hope you are enjoying much better weather and lots of tatting creativity :-)

UPDATE: For all links and pattern pdfs in modern style scroll through Endrucks 1920 Project document - https://docs.google.com/document/d/17LEVftXweztBIOWh4sL4BB7bX65ssoOsOn4oXIgCepY/view