Showing posts with label cupping. Show all posts

Tuesday, 18 November 2025

EP medley 2

Pin It now!

 What was supposed to be one post now has to be done in two parts because blogger has a new rule - only 20 tags allowed. Earlier the limit was 200 letters. All I can ask is that you bear with me and return to see the beauties in the next post as well.

Back in April 2022, it was my intention to share a mix of Endrucksian models from our members, showcasing the different effects, applications, adaptations, etc. as inspiration. Along the way there was so much to share from our games, and the burst of pattern PDFs that this fell by the wayside. Now I am trying to revive it whenever possible .... 

E28 & E39 combo adaptation : 

This is the E28 Gift Box with E39 Rose by Daniela Galli (March2022)
Daniela said - 
I try number 28 but I pull, I tighten the bows (chains) too much and the result is a little hat... I decide not to throw it away, this is the result .. I made a mini box
Although I cannot be certain, I think instead of 8 repeats she made only 5 (or is it 6?) repeats around; which is why there was so much cupping, LOL.
She repeated the cupped doily for the base and lid getting a nice box.

The box showing a partially open lid.

  
And she went on to decorate the lid with an adaptation of the E39 motif into a 3D rose, adding layers to the rose, and then some random tatted foliage and flowers. She has already adapted other Endrucks' patterns for 2D and 3D roses! Like the rose below ...

E42 application : 
pattern E42 Roses by Daniela Galli: 
Roberta Porati (June2025) tatted up some of the E42 roses along with some foliage-type fillers to decorate a comb! One can see blocks, rings, chains, and even some Cluny tallies interspersed around the roses. Although at the time this is what she said - 
I'm undecided whether to stick it on the comb or on 1 headband,....

E5 adaptation :
Debbie L Fister (May2025) extracted a motif from the E5 edging and adapted it for bookmarks, adding long tails. This is what she said -
The first 2 tatted as written version 1. # 3 tatted beginning at top & made in 1 pass. I think version 2 would have been the better choice. I never got the hang of tatting an anticlockwise ring.

E12 application :
pattern E12 Bat by Krystyna Mura:  
https://drive.google.com/file/d/1E26K3FFgHygdkEKUvVHn-f0MFlENDsqA/view

Cynthia Dooley (Oct2025), a needle tatter, worked up this flock of bats to brighten up a T-shirt! And  she chirps -
Daddy bat, Mommy bat, Baby bat on flight for Halloween. Sewn on to T-shirt. ... What fun.

Ideas spark when tatters come together to inspire with their tatted realisations! Ninetta joins me in thanking all of you and look forward to many more ...

Saturday, 3 May 2025

comfort tatting

Pin It now!

 Wonder why I find this my go-to for comfort?! Is it because it increases in girth so fast, the knitting cotton being a size 10? Perhaps, because it is easy on my eyes when working late into the night and secondly I have been so involved with sample tatting that I couldn't take time out to tat larger doilies. And since my resolution is to keep the design simple, each round tats up real quick.

This is how I started Round 5, but noticed that the previous round started to cup. Tried tugging on the new round, but realised it wouldn't work and the stitch count needed to be modified.

Snipped off the core thread in each chain but left the rings there. Two advantages - 
1. I saved the knotting thread (maroon) [Jane McLellan's tip - https://janemactats.blogspot.com/2015/03/snip-rings-not-chains.html ]
 and more importantly
2. when flattened, it was easier to work out the increase in stitches to avoid cupping.

And here's the pattern inked on the pic! Another scroll round.
Round 5 of the Just So Coaster
There are enough picots in this round to add a 6th round when I need some comfort tatting ;-D I have no idea how it will progress though. I only know that the cream will be back! 

It measures 12.5 cms across BUT remember I am tatting with thick thread (Anchor knitting cotton, size 10). Your model might be much smaller in tatting cotton. Nevertheless, feel free to design your own next round and share.

Pattern for the previous 4 rounds is shared here - https://tipsaroundthehome.blogspot.com/2025/04/just-so-tatting.html

TIP: If you wish to work the coaster in one pass, ensure the last chain in Round 4 is worked as a split chain, followed by a mock or false picot and then a split ring.

Thursday, 21 September 2023

happy Endrucks 1

Pin It now!

 Frau Endrucks would certainly have been a happy, satisfied designer to see what one tatter has done with merely one pattern from her collection of 44! Following is only part 1 showcasing what Krystyna Mura has accomplished with pattern #31 from the German book ‘Die Schiffchen-Spitzen’,1920, by Frau Eleonore Endrucks-Leichtenstern. 

Krystyna worked on the doilies and numerous derivatives from 2021 to 2023. Since the original pattern tended to cup, she worked on alternatives to flatten out the doily. All these patterns are now compiled in the following pdf - 
Endrucks' pattern #31 in modern format by Krystyna Mura - Doily of Modest Hearts - https://drive.google.com/file/d/1lcQrl0f6PdLYApe4YVM2ZVorLsHToAm1/view

The cupped original pattern was turned into a parasol for a doll. It also works well as a bowl or a basket! https://drive.google.com/file/d/1I7EEuylPwp5pqIvgI1yAUYlULukV0D8Z/view
Or even a lantern or lamp shade!

Krystna shares her thoughts and options to make the doily lay flat without compromising on the pattern per se. Above is Option 1,

Option 2, and
Option 3.
As you can see in her pdf, there are even more doilies she tatted than the 6 shown in the collage!

Further play with sequence and colours resulted in the above version. The possibilities are endless!

Of the 6 rounds, working only the first two rounds gives this cute motif.

Rounds 1 to 3 result in this gorgeous rendition, and

Rounds 1 to 4 result in another decorative motif or coaster.

Rounds 1 and 2 covering a cabochon.

And finally a heavily embellished doily as a window decoration which she calls Stained Glass Rosette.


Following the theme of this post, we would like to inform you that we have renamed our Coasters and Doilies directory to Circles and Doilies in order to cover all circular motifs and medallions alongside larger models. (https://docs.google.com/document/d/1Xc1hiwrg5yPEvi77jj2uxWqlkECuyZjFjuCJ08VcoLA/view)

So, please stick around for the next two posts showcasing more derivatives and applications of pattern #31 by Krystyna Mura!
...... to be continued .....

Monday, 14 August 2023

almost 3 years

Pin It now!

 That's how long it has taken me to complete the pdf presentation of pattern #37 from Eleonore Endrucks' 1920 book! I started tatting it in Nov 2020 (when we first invited volunteers) but encountered cupping issues. However as the list of posts at the end shows, it was never quite forgotten. I do so love the square/diamond motif in the center.

Anyways, so there were only two patterns of the original 44 left to be reworked and uploaded to the Endrucks 1920 Project. One was this and the other was by Krystyna. We gave ourselves an ultimatum to finish by July-end and also a bit of a competition to see who finishes 'first', LOL. Well, I finished last. I will share her work in the near future - it will require two or more posts!

Pattern #37 from Eleonore Endrucks' German book ‘Die Schiffchen-Spitzen’,1920, in modern and modified reworking (click to download) - https://drive.google.com/file/d/180COMwnzgXXm_PphjUCD_qmq7xLMg4Pz/view

What I found truly fascinating was how we could play with the sequence of tatting and thence the direction of rings and the colour of elements in the central motif! These are all shown here in an earlier pdf      Square Diamond Motif from E37 pattern and options (click to download)-  - https://drive.google.com/file/d/1wqAPnOUZwLJ9tEUk55wDZhAMw2qCNFSj/view

Cupping: To solve the cupping issue, I did not want to stray too far from the original. Change one element and you might encounter a cascading effect! Hence little tweaks like one less round in the rosette, longer and false picots (which increase the span or width of that round) and longer chains, a couple of larger rings, seemed to suffice in keeping the essence of the original design intact yet laying flat. And catering to modern sensibilities, the climbing out pathway includes split chains and split rings. Although Endrucks' original stitch count and continuous path involving shadow chains is also indicated in a separate diagram. 

Cupping is a common problem we faced with Endrucks' doily patterns. Ninetta wrote a nice post on the issue - https://ninettacaruso.blogspot.com/2020/11/renewed-on-third-try.html

Anchor 20 (¬Lizbeth 10) June2022- 14 cms diameter

Pattern presentation and especially diagramming was quite a challenge. I kept having to retrace my steps. For one, it is never a good idea to have huge time gaps when working on a pattern or on it's presentation. Finally it evolved into something I felt comfortable with, using a different colour  for each round; bright pink for the climb-out path/element; etc. 

Anchor perle 8 (¬Lizbeth 20) Dec2021- 10 cms diameter

Test-Tatting: In mid-May 2022, when Sue Fuller was updating the Endrucks' Project page -  https://www.theonlinetattingclass.com/endrucks-class-project in their new site, I saw Vicki Clarke's beautiful model that she had worked somewhere around 2015-16. While her notes and presentation haven't been found, she graciously accepted to test tat the count I provided. More on her enthusiastic and systematic journey, with pics, in another post soon.  

Anchor 40 (¬Lizbeth 40) May2022- 9.5 cms diameter
Two-Part Tatting: This was yet another tweak I tried on Round 4, but not very happy with the result. Hence I haven't shared it. However, in this, I kept to the original in the number of rounds in the rosette. 
Both the red above, and this blue one are worked in two parts - cutting off after the diamond motif. It is good for trial purposes when only the in-progress round can be snipped off if it does not work (as seen in the trial pic) or if you wish to avoid the long split chain segment.

Just a few derivatives
Derivatives: As with most of Frau Endrucks' patterns, this one turned out to be quite rich in derivatives! Besides what could be done with the Square Diamond Motifs - applique, charms, earrings/brooch/pendant ; arranged or tessellated into bookmark, bracelet, cross, mat ; or joined into a 3D tree ornament, gift bag, and box; there were Heart motifs that arose, too! The hearts could be lined into a bookmark or edging, or used individually as motifs or jewellery or applique. Margaret Davies enlarged one of the hearts and even created an angel and bell from it. She recently used the hearts to make earrings for our game (https://tipsaroundthehome.blogspot.com/2023/07/wear-me-roundup-2.html). The angel was used in a previous game (#TagMeEndrucks Nov2022 ; TagMe roundup 1 ; TagMe roundup 2 ; TagMe roundup 3)
More future derivatives, variations, and applications will be found in the respective Directories!

E37 Patterns: Here are all the pattern pdfs we have from #37 so far - 
Doily - https://drive.google.com/file/d/180COMwnzgXXm_PphjUCD_qmq7xLMg4Pz/view
Square Diamond Motif (and Mat pattern) - https://drive.google.com/file/d/1wqAPnOUZwLJ9tEUk55wDZhAMw2qCNFSj/view
Eye Spy Heart #1 https://drive.google.com/file/d/1Auf-CIZYLUQdkA6jalQR4hkS7Ah-Deld/view
Eye Spy Heart #2 https://tipsaroundthehome.blogspot.com/2022/07/heart-pattern.html
Enlarged Heart https://drive.google.com/file/d/1G2AboS4amzg5HgLGKoZ6X-bGNrLZBLCt/view
Angel/Bell https://drive.google.com/file/d/1aq202-ESOzP_DLlA1bQ1mz3unyTTrpwr/view
SOUPy Vine bookmark https://tipsaroundthehome.blogspot.com/2023/07/soupy-vine.html

EP Doc: And as you well know by now, you can find all 44 patterns here in the Endrucks 1920 Project document here - https://docs.google.com/document/d/17LEVftXweztBIOWh4sL4BB7bX65ssoOsOn4oXIgCepY/view 

My sincere thanks to all my friendly and helpful tatters mentioned in this post.
It underlines the community effort - the hallmark of Endrucks 1920 Project!

Related Posts (chronologically) -

Thursday, 27 January 2022

bridging gaps

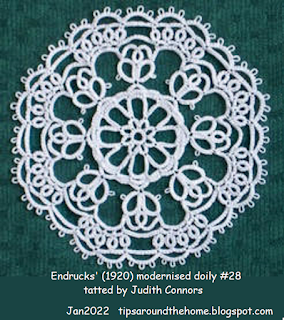
Pin It now! I have some great news! Our Endrucks 1920 Project will be featured in the February issue of ‘Talking Tatting’ issue 50! Along with a short bio of Frau Endrucks and the doily E28 pattern (modernised version), all by Judith Connors. This is a quarterly newsletter of Queensland Tatters, Australia.
 
[E28 pattern PDF: https://drive.google.com/file/d/1vG2g0JCVsy8cy2DfGKHEhxleq_7Rveba/view]

While this doily has already been tatted by several others, they referred to the diagram rather than the text. Hence it was left to Judith to point out a couple of errors, which are now corrected in an updated pdf.

Impeccable tatting from the inspiring teacher, researcher, and historian who was honoured with the Order of Australia Medal last year! And as you can see, she has managed to retain the octagonal shape of the doily after blocking.

We discovered that my tatting tension is way too tight! Worked in Coats No 40 cotton, Judith’s doily is 9cms in diameter to my 7cms in Anchor No 40 (which is also a Coats subsidiary).

“My tension varied from yours in places. I managed the fluting, and when I blocked the mat it turned out to be quite octagonal.” – Judith

Alternate Path: “I worked it completely from the front side, not as you have suggested for Rounds 5 and 6. This means that the small rings of Round 5 were tatted in RODS (with a posting of the shuttle before closure).” – Judith

While enlarging the pic for posting, I noticed another thing about Round 5 in Judith’s doily. It appears the chains on either side of the ring are 8ds each instead of 5ds, creating a graceful arch instead of a flattish line.

Bridging/Mock Chain and Split Chain: Several ways to climb out of rounds for continuous tatting are indicated in this pattern pdf. However, Judith pointed out that what I termed split chain to climb out of round 4 is actually a bridging chain (b-Ch) and I should use this as a “teachable moment”. Got me thinking and this is how I see it:

The technique was invented by Dora Young for rings and then applied to chains – the knotless method (km or KM). Decades later, the term split chain caught on and became more popular. But the stitch and movements are the same in both – mock stitches or tied/manoeuvred stitches.

A Bridging or Mock Chain is functionally and structurally the same as a Split Chain. Each chain spans a space and emerges at a point to the left instead of the far right, and is made over a bridging or foundation thread. 

The difference lies in the Where the threads emerge/exit or where the point of climbing out is. A bridging chain is made completely of mock stitches and threads emerge at the ‘beginning’ of the chain. A split chain, as the name suggests, is split - partially made of double stitches and partially of mock stitches. Thus, the threads in this ‘hybrid’ chain exit somewhere along the length of the chain, not at the start.

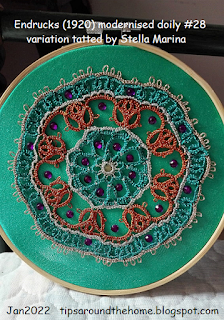
Among the several beautiful versions of this doily tatted by enthusiastic lacers, I would like to show Stella Marina’s version in lovely metallic threads because it is yet another example of how we can alter our path. In a moment of distraction, Stella forgot to tat the 2 large twin thrown rings in Round 3. Instead of cutting back, she continued. She then tatted them as normal rings, facing inward, in Round 4! This happened by accident, but could easily have been a deliberate choice to make the rings red instead of silver. Planning ahead gives us so many bridges to cross smoothly!

Now I want to tat the doily again and bridge all my gaps!

UPDATE (Nov2025): In Mar2022, Daniela Galli mistakenly tatted only 5 repeats of the E28 doily leading to a lot of cupping, which she converted into a cute little gift box. More pics and details - https://tipsaroundthehome.blogspot.com/2025/11/ep-medley-2.html


Many many thanks to Judith and Stella & Daniela - keep inspiring!

Related Posts/Resources –
For more tutorials and details scroll down to Techniques & Effects » CHAINS » Split Chain/Dora Young Knotless/Bridging https://tipsaroundthehome.blogspot.com/p/tatting-resources.html
Knotless Method in split SCMR - https://tipsaroundthehome.blogspot.com/2018/10/scrappy-doily-and-scmr.html
https://tipsaroundthehome.blogspot.com/2021/07/continuous-paths.html

Tuesday, 28 December 2021

cupping hearts

Pin It now!

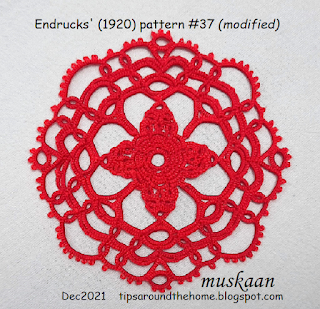
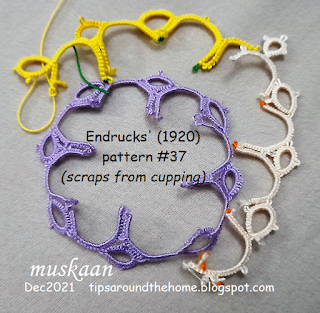
Over a year back, I struggled with cupping in this doily pattern and expert tatters offered several solutions and valuable advice. But I left it on the sidelines and only took it up again a week or so back. This is pattern #37 from Eleonore Endrucks-Leichtenstern’s German book ‘Die Schiffchen-Spitzen’,1920.

After tweaking some of the stitch counts in outer chains, it finally lays flat.... 
....but above is the fallout of my several attempts, without including all the retro-tatting and indecision that went on.
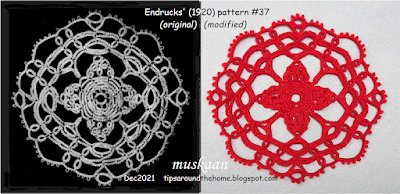
This was the crucial round (Round 4) which I just Had to get right and others would fall into place more easily. While weighing the numerous options, I hit upon my own solution which I bet you won't be able to identify! 
The above combo shows Endrucks' original model with my modified one. Can you guess the difference? 
HINT: It lies within the square/diamond motif.

Now I have tons to share about that motif, some of which is already written about/hinted at here - https://tipsaroundthehome.blogspot.com/2020/11/arranging-motifs.html
I had started to diagram the motifs to show the different paths, but this last week I haven't been able to allot time or focus to anything other than some actual tatting for an hour or 2 daily. So the pattern itself will also take time to be presented. My apologies for this inordinate delay, that will spill into 2022.

So what do you think? does the modified model look okay? I tried to keep the tweaks minimal, without disturbing the original shape as far as possible.

The doily is worked in Anchor pearl cotton, size 8 and measures just under 10.5 cms across from the extreme tips. Perle cotton is flexible to work with. But would the tweaks hold up in mercerised cotton? Only one way to find out - tat one more doily in size 40. 

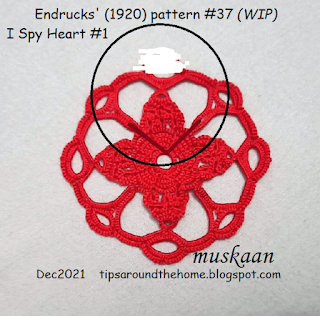
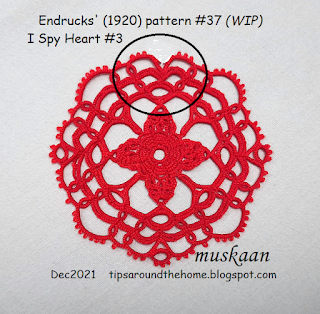
But look what I discovered ... 3 possible heart patterns!  I Spy Hearts, as Anita would say! Here's what she wrote when I showed these to her - “Each heart design can be an individual heart, a row of hearts made into an edging, implemented into a design, etc. So much fun.”
Heart #1 - after round 5 ;

Heart #2 - after round 6 ; and,

Heart #3 - after round 8. the final round. I figured out a way to work it in one pass through a rough sketch.
Something to look forward to for the 2022 heart season in February ;-D


All links and details, including all modernised patterns can be found in the Endrucks 1920 Project document here -