Showing posts with label hand embroidery. Show all posts

Wednesday, 16 June 2021

using silk thread

Pin It now!

Melanie wished for some details on how to put silk threads to use, and this post is a short compilation of my projects showcasing some of the ways I've used them along with my thoughts/tips. But first step over to see the silk project she's working on here.

1. Embroidery on paper - 

So my very first project with silk thread, for which I specifically bought a spool, was for embroidery on greeting cards in 1986-87. These are some of the many I and my sis made together. Except for the towers on the left which used 2 strands, the rest all use only one thread.

2. Hand embroidery (single thread) - 

These next 3 are hand-embroidered on handkerchiefs, using only one thread. 
I tried to use the thread for a picot edge but unless the tension is very precise, the silk thread tends to break. I finally settled on coloured sewing thread for the edges.
I've posted details about this here. The sheen and colour choices are amazing! However, ironing needs to be done by placing a damp fabric over the embroidery. Otherwise the threads may singe and fray.
Another hanky where I used single silk thread. These are all old well-used hankies, hence the fraying is visible. For really long-lasting embroidery, I recommend Anchor embroidery thread/floss.
TIP: One tip when using silk for hand embroidery - Use short lengths. Long threads tend to unravel or knot. More importantly, the thread frays due to friction with the needle eye. My solution is to keep moving the needle along the thread so that it does not cut through the thread at one point. It works really well, as in the next project ... 

3. Hand embroidery (multiple threads) -
Here I used 3 strands of silk (1 from each spool - yes, I bought several in the same colour, LOL). Working with multiple strands of silk is not an easy task since unlike embroidery thread, these are smooth and do not adhere together. But where there's a will, there's a way!

This is also the go-to thread for another form of hand embroidery - Phulkari, a traditional style with geometric designs that fills up the entire fabric from the front! The Punjabis use brilliant colours to fill up the spaces. I am not much into symmetrical patterns, hence have never tried this stitch/pattern.

4. Machine embroidery -
Above is my sole venture into machine embroidery. I deliberately went freeform with the neck coz I could not manage to 'stay within the lines' - my design choice, haha. It is for my MIL's nightie way back.
It took a lot of manoeuvring to get the tension right and avoid breaking thread midways. I managed successfully for the most part, but not always.
This is nothing compared to what my Mom could do, including using a horizontal needle to couch over. It was mesmerising to watch how she moved the hoop on the machine with one hand, while turning the hand wheel with the other, phew!

5. Tatting - 
Finally, tatting with silk. Above is my first venture with single silk thread tatting back in 2014. The sheen is not very clear here. I simply let my shuttles take the lead, belting out a freeform braid. As you can see, it has rings, chains, split rings, onion rings, floating rings.
I found it surprisingly easy to tat, except for the eye strain. Thread moves smoothly and surely, rings close neatly. There wasn't a single break throughout! And see how dainty it is.
TIP: Before closing the ring, if you post the other shuttle through the open ring, it creates an overlapping and enclosed effect!!!!
See how the threads seem to emerge from within the topmost ring? It happened when I posted the other shuttle through the ring before closing it. And the chain seems to emerge through the ring!
The flaws in tatting are purely my lack of skill at the time.

6. Tassels - 
Then of course, the common use for silk threads, as advertised when selling, is for tassels, as in the above bookmark. Long tassel earrings are a rage at present.

Silk thread brands in my stash - 
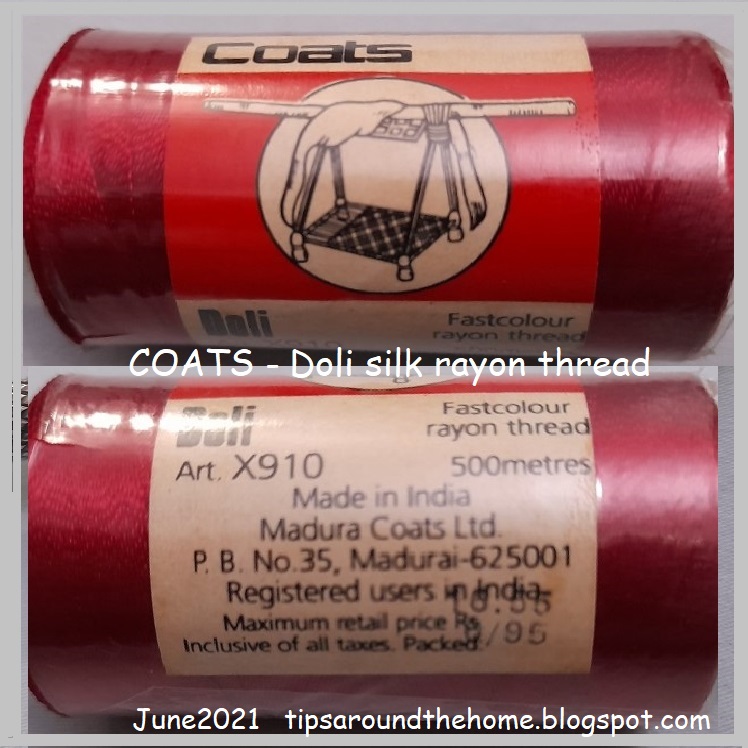
I was asked about the colour fastness & brands of these silk threads. Above are the 3 brands where the tags/sleeves are still intact. Below are each with clearer details ....
I like this Coats' Doli brand the best. The spool itself is tightly wound, as is the thread. I prefer this for machine embroidery.
Besto is another I have several spools of. Both the thread and the spool are not as tightly wound as Coats. But colours are gorgeous - lots of pastel shades.
Codak is from my MIL's leftover stash. I have 3 or 4 colours in this brand, which appears similar to Besto, except that the spool is smaller. No thread details on the sleeve, except for colour fastness.

I have a few twisted strands of silk thread as well, but forgot to take a pic. Maybe I'll add a pic tomorrow. So do check in tomorrow ....
UPDATE - Here's my complete silk thread stash -
The 5 wooden spools are vintage pure silk threads (at least 60-70 years old) as I'd mentioned in my earlier post. 
On the left are some skeins of Opella brand silk threads. Some have been used, others are still intact after decades! The tag says 'Fast to Bleach' (does that mean it is bleach-proof?), and it has the shade number as well, unlike the other spools.

UPDATE - This is what Kathleen Minniti says in her comment below - NO CHEMICAL BLEACH EVER ON SILK! It will literally dissolve silk to nothing. The label may be referring to fading from sunlight; laying garments out in the sun to "bleach" has been a time-honored method of lightening cotton and linen fabrics.

On the cards below Opella, are leftover lengths from projects.
And under that is my new metallic thread stash that I will show you once I've tatted with it!

Monday, 21 December 2020

embroidered motifs

Pin It now!

This is from another lifetime...so long back that I cannot remember exactly when. All I know for certain is I started embroidering these hankies in 1996. Yup, a lifetime back!

These are not my original patterns, though I might've adapted them a bit here and there. I've given them names just for fun ;-P

Orange Pansy

Hand-embroidered in single strand of vintage silk thread.
Stem stitch, blanket stitch for filling the leaves and flower, long and short stitches for center of flower, and buttonhole around eyelet.
For hanky edges I used regular sewing thread and machine-hemmed with decorative zigzags. 
This is an older image to show the sheen of silk threads.

The wear and tear is clearly visible. While the sheen does not wear off, the vintage silk thread can fray.

Blossoms' Corner
This is the only pic I have. One of my favourite hankies, I think got misplaced a few years back. I Love how even the tiny stitches are. 
Hand-embroidered in single strand of Anchor embroidery thread.
Stem stitch, satin stitch for red center, chain stitch for petal outlines, and either satin or fishbone stitch for the leaves.
This hanky had a violet hem.

Flowery Perch
This was my least favourite of the lot. Again, it's the only pic I have of it since the hanky is no longer with me.
Hand-embroidered in 1 and 2 strands of Anchor embroidery threads.
I chose to do shadow work (closed herringbone stitch) because of the parallel lines throughout the motif. Which is why it was done in 2 threads hoping for some little colour to show through. Too much work, but not the result I was hoping for.
It also has satin stitch for the bird and back stitch for center of flowers and beak.
The hanky edging was in green.

Hope you enjoyed this little foray into something other than tatting ;-P Embroidery was my first love, especially single-stranded. 

Related Posts

Sunday, 3 December 2017

lazy or smart?

Pin It now!
When was the last time I posted something unrelated to tatting? Hmmm, probably a year back for the Pinterest Challenge in December – that cute little bird. It still sits on my bedside cabinet with pins stuck in it!

This time I'm sharing a very quick mixed media project involving painting and embroidery, done sometime around mid-2000.
These pics were taken quite a while back, hence not as sharp, bright, rich and clear as I’d like them to be. Apologies for the poor quality.
The background is a light yellow but not as washed out as it looks here.

I’d wanted to embroider a bedsheet for ages, but was fearful of it becoming an UFO. Once during our summer vacation we forced our Mom to give us separate bedsheets to embroider and she succumbed despite her valid fears of us not completing them. The sheets did get finished but only after she sat alongside and embroidered the remaining motifs over the months following the vacation ;-P

Going by that experience, I decided to do something quick but covering a large area. After scouring through my pattern collection, I zeroed in on my favorite book – Creative Stitchcraft. It has a beautiful Bouquet of Roses Quilt – red stem-stitch embroidery on white background.

I went for colours, but a mere stem-stitch outline would look too barren. So after I had enlarged the template – drawing manually, since I was excited to start immediately – and transferred it to the cloth I looked in my fabric paints box – I use Fevicryl acrylics.
I had a few left over from painting a free-hand saree border for my MIL earlier.

Diluted them and did a quick wash. A thicker coat of paint could've caused some stiffening of the fabric making it difficult to embroider, and taken longer to dry obviously.
There’s a bit of yellow paint in the rose petals, too.

I deliberately didn’t ‘stay within the lines’, keeping it a bit random with some unwashed areas or some overlapping of colours, to give it a natural shading.

Then simple stem-stitch along all the outlines.
I kept the stitches very short, using 2 strands of Anchor embroidery threads throughout.
Manoeuvering becomes easier when stitches are short. Abrupt curves, sharp ends, pointed ends, etc. can b e neatly managed. 
Mary Corbet has some excellent tips & tutorials which I had already figured out on my own. 

There is also a lovely Morning Glory border in the original pattern which I did not use here. This seemed fine on its own. 
Yay, it was all over within a week – from enlarging to the very last knot! 
Is this multimedia project smart or sheer lazy? You decide :-D

Bouquet of Roses pattern from the book "Creative Stitchcraft". (Better Homes and Gardens) Murdoch Books. 1991.


Sunday, 19 April 2015

Embroidery 2 : Shadow Work

Pin It now!
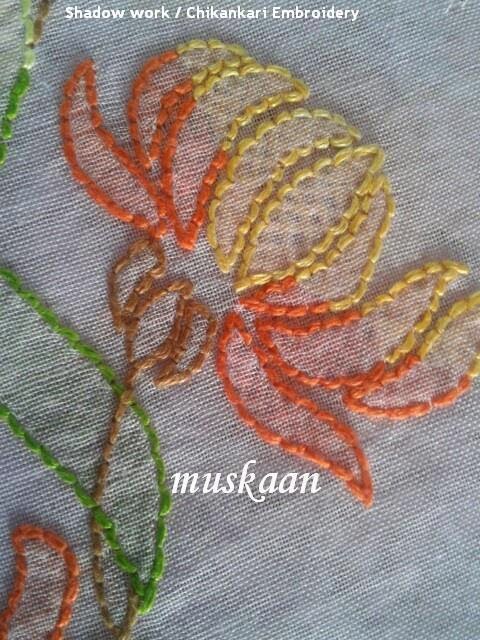
Shadow Work / Chikankari Embroidery 
on Organdy Saree

Extreme Close-up of  part of  motif
Time to take a mini break from blogging about tatting :-p 
Please excuse the poor quality of photos. These were taken 2 years back when my photography skills were worse.

Pattern : Original Source unknown. Modified patt C from Plate #56 below (my own collection).
Fabric : Plain Lilac coloured Organdy saree 6 yards (bought from Hyderabad, India. Semi-stiff quality)
Thread used : Anchor Embroidery Threads (Anchor cotton floss) in brown, dark purple, & 2 shades each of green, yellow, orange, blue.
Strands used : 2 strands.
Stitches used : This is in the style of Lucknow Chikan embroidery or Chikankari, also called Shadow work or Shadow stitch. It appears like a parallel row of Back Stitch (or Double Back Stitch) in the front, & Closed Herringbone Stitch when seen from the reverse side.
Back stitch
Eyelet Stitch / cutwork (with couching) 

Single Motifs

I altered the original pattern just a tad, moving & realigning the lower left flower to the top, so as to get a continuous trellis when repeated. 
Thus each motif consists of 4 flowers lined up in decreasing size.


In the pallu area, each motif is used separately, with a different colour (yellow, orange, blue), 
in sequence. (This sequence was maintained throughout the saree)
I think I did 3 motifs per row, with a phase shift between rows, & 4 rows in all.   
For the pallu edging, I added a very simple scalloped braid using purple shadow work


For some shading, since there was no variegated or shaded thread, I used 2 solid colour shades (light & dark) in some petals.

Trellis

The same motif was mirror-imaged & alternated to create a long trellis of 4 repeats. 
Flower colours are alternately used, within each repeat (yellow, orange, blue).
  
Flower colours also alternated between trellises. So if one trellis started with a yellow flower at base, the next trellis started with an orange & the 3rd with a blue, repeating this sequence. I made 7 or 8 such trellises, with these motifs climbing up to ¾th the width of saree, at a slight angle .

TIP While embroidering a colorful pattern/design, use multiple needles, each with required colour, for quicker & easier work.
I even separate the skeins & cut out the desired lengths beforehand, knotting them at one end & winding them around a piece of cardboard/bookmark with a slot at one end to keep the threads from flopping around & getting all entangled !
Stitches
Added a tiny cutwork area in centre of large bottom ring, surrounded by purple thread. I did this in the Lucknow Chikankari style/stitch or the Eyelet Stitch, not blanket stitch, using only a single strand of thread here, with very close stitches couched over a running stitch.
Upper end of one Trellis
I used Back stitch, instead of Stem stitch for the stems, to keep the work in sync 
with the shadow work (double back stitch) outlines.
Everything was embroidered from the front side .

View from the Rear !
Extreme close-up of reverse side
I actually prefer the reverse side of shadow work to the front side ! As it is, if asked to choose a single favorite, my all-time go-to filler stitch would be the closed Herringbone stitch.
Pics from reverse side show how I went about the 'shaded' effect. using only single-shade threads. 
And I like to keep everything neat - front & back ;-) 
After each knot, I tuck/weave the thread under some of the stitches to keep it neat And durable.......
Even after 2-3 years’ usage, none of the thread ends have slipped out. Neither are the thread ends & knots visible.
 
I tried to avoid long crossing-over threads for fear they might show on the right side, 
as well as to prevent accidental snagging. 
If it was necessary, then usually the thread was woven back through stitches, 
to a point where the ‘carryover’ would be a much shorter distance. 
This can be accomplished easily enough : study the motif carefully & decide on the best place 
to start with minimal carry-over threads & smooth flow of embroidery between petals.

Thread
What I could not capture in my limited prowess with photography, was the pale purple/lilac of the saree & the rich elegance of the thread.
I love Anchor threads ! These are colourfast, retain their elegant, understated sheen even after long usage & many washes (these pics are after 2-3 years’ usage), easy to work with. Have been using them since the day I learned to embroider, with no complaints whatsoever !

This sari, a gift to my MIL, was embroidered almost 5 years back when I still had normal vision ! 


Monday, 17 March 2014

Vintage Embroidery Patterns I

Pin It now!

Abstract Floral Motifs 


Over the decades, I've collected a number of embroidery patterns from various sources & people. Some of these probably date back to the 19th century or very early 20th century ! I have a magazine page cutting dating back to 1934!  Hence, I trust there will be no copyright issues. I will provide the Exact source wherever possible, and will willingly include sources, if anyone can direct me to them.

At the turn of the millennium, I painstakingly carbon-copied each pattern on to notebooks/pads with grids. Then I went over the carbon lines with gel pen. I used a grid background in order to be able to enlarge a pattern easily. However, now technology has made it so much easier & quicker :-)

Here's sharing my first pattern sheet, along with my own embroidery samples ....


Circle o' Blooms


Pattern A from Plate #4 (scroll down to end of page)
Thread used : Silk thread 
Number of strands used : Single / one strand.
Hand embroidery stitches used
Buttonhole stitch for flowers ; 
a tiny Daisy stitch in black for center.
I added a few single satin stitches in between some buttonhole stitches wherever there was a larger gap.

This pattern is hand-embroidered on a handkerchief corner.
I machine-hemmed the hanky with decorative zig-zag in orange.

TIP : Making the blanket stitch lines of 'uneven' length, creates a nice, more 'naturalized' effect, besides filling up the area.


 Clematis 


Pattern E from Plate #4 (pattern below)
Thread used : Anchor Embroidery thread
Number of strands used : Single / one strand.
Hand embroidery stitches used :
Romanian embroidery stitch for petals ;
Satin stitch filling for center ;
Stem stitch for stems & vines ;
Fishbone stitch for leaves .

This is also a handkerchief corner, with zigzag machine hemming in purple.


Pattern Chart # 4

Abstract Floral Motifs 

These 6 vintage motif patterns are ideal for decorating corners for handkerchiefs, napkins, pillow cases, towels, etc.
One can also use them in bunches or spread in repetition to cover a large fabric.
Another use is in decorating quilt blocks.

I've embroidered patterns C, D, & F each, on corners of a table napkin set. No longer with me...

Vintage Floral Motifs


Have a nice day :-)
For more patterns, check out my pinterest board