Showing posts with label Mel. Show all posts

Wednesday, 16 June 2021

using silk thread

Pin It now!

Melanie wished for some details on how to put silk threads to use, and this post is a short compilation of my projects showcasing some of the ways I've used them along with my thoughts/tips. But first step over to see the silk project she's working on here.

1. Embroidery on paper - 

So my very first project with silk thread, for which I specifically bought a spool, was for embroidery on greeting cards in 1986-87. These are some of the many I and my sis made together. Except for the towers on the left which used 2 strands, the rest all use only one thread.

2. Hand embroidery (single thread) - 

These next 3 are hand-embroidered on handkerchiefs, using only one thread. 
I tried to use the thread for a picot edge but unless the tension is very precise, the silk thread tends to break. I finally settled on coloured sewing thread for the edges.
I've posted details about this here. The sheen and colour choices are amazing! However, ironing needs to be done by placing a damp fabric over the embroidery. Otherwise the threads may singe and fray.
Another hanky where I used single silk thread. These are all old well-used hankies, hence the fraying is visible. For really long-lasting embroidery, I recommend Anchor embroidery thread/floss.
TIP: One tip when using silk for hand embroidery - Use short lengths. Long threads tend to unravel or knot. More importantly, the thread frays due to friction with the needle eye. My solution is to keep moving the needle along the thread so that it does not cut through the thread at one point. It works really well, as in the next project ... 

3. Hand embroidery (multiple threads) -
Here I used 3 strands of silk (1 from each spool - yes, I bought several in the same colour, LOL). Working with multiple strands of silk is not an easy task since unlike embroidery thread, these are smooth and do not adhere together. But where there's a will, there's a way!

This is also the go-to thread for another form of hand embroidery - Phulkari, a traditional style with geometric designs that fills up the entire fabric from the front! The Punjabis use brilliant colours to fill up the spaces. I am not much into symmetrical patterns, hence have never tried this stitch/pattern.

4. Machine embroidery -
Above is my sole venture into machine embroidery. I deliberately went freeform with the neck coz I could not manage to 'stay within the lines' - my design choice, haha. It is for my MIL's nightie way back.
It took a lot of manoeuvring to get the tension right and avoid breaking thread midways. I managed successfully for the most part, but not always.
This is nothing compared to what my Mom could do, including using a horizontal needle to couch over. It was mesmerising to watch how she moved the hoop on the machine with one hand, while turning the hand wheel with the other, phew!

5. Tatting - 
Finally, tatting with silk. Above is my first venture with single silk thread tatting back in 2014. The sheen is not very clear here. I simply let my shuttles take the lead, belting out a freeform braid. As you can see, it has rings, chains, split rings, onion rings, floating rings.
I found it surprisingly easy to tat, except for the eye strain. Thread moves smoothly and surely, rings close neatly. There wasn't a single break throughout! And see how dainty it is.
TIP: Before closing the ring, if you post the other shuttle through the open ring, it creates an overlapping and enclosed effect!!!!
See how the threads seem to emerge from within the topmost ring? It happened when I posted the other shuttle through the ring before closing it. And the chain seems to emerge through the ring!
The flaws in tatting are purely my lack of skill at the time.

6. Tassels - 
Then of course, the common use for silk threads, as advertised when selling, is for tassels, as in the above bookmark. Long tassel earrings are a rage at present.

Silk thread brands in my stash - 
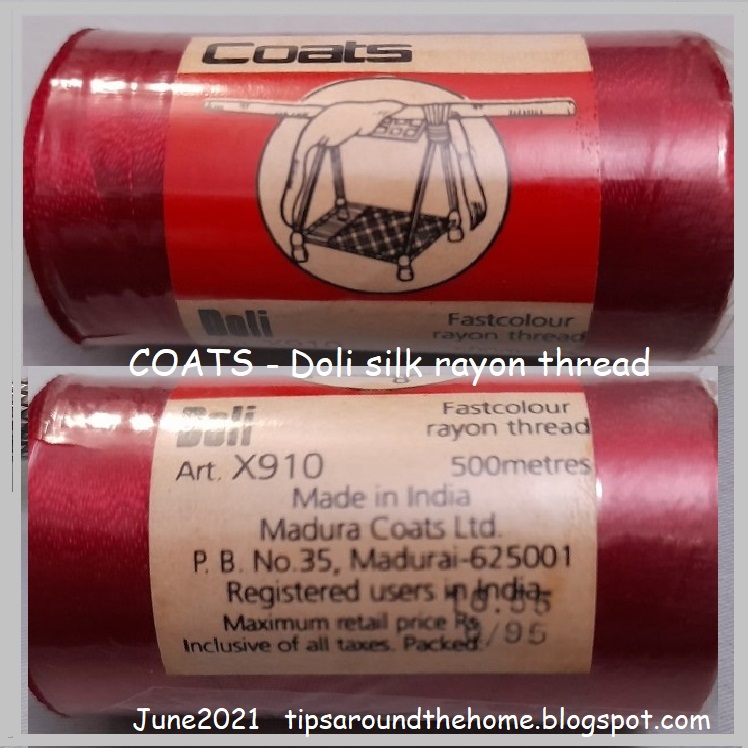
I was asked about the colour fastness & brands of these silk threads. Above are the 3 brands where the tags/sleeves are still intact. Below are each with clearer details ....
I like this Coats' Doli brand the best. The spool itself is tightly wound, as is the thread. I prefer this for machine embroidery.
Besto is another I have several spools of. Both the thread and the spool are not as tightly wound as Coats. But colours are gorgeous - lots of pastel shades.
Codak is from my MIL's leftover stash. I have 3 or 4 colours in this brand, which appears similar to Besto, except that the spool is smaller. No thread details on the sleeve, except for colour fastness.

I have a few twisted strands of silk thread as well, but forgot to take a pic. Maybe I'll add a pic tomorrow. So do check in tomorrow ....
UPDATE - Here's my complete silk thread stash -
The 5 wooden spools are vintage pure silk threads (at least 60-70 years old) as I'd mentioned in my earlier post. 
On the left are some skeins of Opella brand silk threads. Some have been used, others are still intact after decades! The tag says 'Fast to Bleach' (does that mean it is bleach-proof?), and it has the shade number as well, unlike the other spools.

UPDATE - This is what Kathleen Minniti says in her comment below - NO CHEMICAL BLEACH EVER ON SILK! It will literally dissolve silk to nothing. The label may be referring to fading from sunlight; laying garments out in the sun to "bleach" has been a time-honored method of lightening cotton and linen fabrics.

On the cards below Opella, are leftover lengths from projects.
And under that is my new metallic thread stash that I will show you once I've tatted with it!

Thursday, 14 January 2021

hidden pathway

Pin It now!

I know many of you must feel that the hidden rose should stay hidden and not be seen so frequently, but what can I do when hidden assets keep surfacing?! How many secrets are hidden in this little snowflake? 

This time it is yet another pathway discovered by Melanie Cervi (or Mel as we fondly know her) who was put off by the paperclips required in my original instructions. So she set off into the woods, clearing away the trees in her path (thankfully, not literally) to leave a trail without clips!!! 

Sequence notated

When she emailed me a month back, I honestly could not figure out how she did it. Clearly my mind was blocked: any which way I went, at least one clip was required. It was only when she posted her instructions here, that I was amazed and amused ;-D In the above model (tatted by Mel), I have inked the sequence. Tatting progresses in clockwise direction and is made in one serpentine pass. 

So this takes the sequence toll to FOUR! We have 4 ways to work this snowflake ... so far ;-P 

You can find links to the pdfs and posts, as well as the rose, ice drop, and heart adaptations in my Snowflake doc here.

Don't forget to skip over to Mel's blog to read her instructions as well as ideas for future experiments and trials - http://picotsnkeys.blogspot.com/2020/12/year-muskaan-floated-idea-of-hidden.html . I've put it on my to-tat list.

UPDATE: Mel made a tatted biscornu using the snowflake patttern! Check it out here - http://picotsnkeys.blogspot.com/2021/06/biscornu-finished.html


But before I leave, here's another lovely pair tatted by the talented Anna Tedesco and shared on facebook. Sorry for poaching the image, Anna, but it is just too cute! Anna has a facebook group - Tatting Art where you can scroll through all her gorgeous projects.


Many thanks, Mel and Anna - keep the spring of inspiration alive 💖

Friday, 22 September 2017

so far

Pin It now!
How far can I go with designing my first ‘doily’, I’d asked last time?
Here's how far I've come, so far ...


a snowflake ….
The first 3 rounds with picots and only 6 rings in the central rosette could masquerade as a snowflake, right? But the rosette needs some decorative picots I think.
The 3rd round here completely flattens out even without any blocking ! The initial ruffling is a design characteristic - I won't call it a flaw.

a possible motif ….
These 3 round medallions can probably be joined as motifs for a larger fabric.

After tweaking, ruffling was tamed, and with light blocking it stays flat.
One of the tweaks was to add some bare thread space between central rings. Unfortunately the compactness and slimmer teardrop shape of rings (as in the bronze one) got lost. Should I give it another go ?

To maintain the radiating look I nixed any thought of inward facing rings in later rounds.

Also realised that for a larger project, it is not enough to design the immediate next round. One has to think ahead to the round after that as well, in order to determine the placement of joining picots in next round. Doesn't mean I can transfer the “think ahead” to real life ;-P

and 5 (4 tatted) rounds….
I used Sketcher Guru app on my tablet to draw rounds 4 & 5, and a rough 6.
Have I ever crossed 3 rounds/rows in any of my designs ? Doubt it.
So I’ve decided to christen this ‘Aspiration’. It kind of suits the ever-widening radiating look, too – like widening my horizons, moving beyond my comfort zone, yada yada yada …
My intention is for rounds 4 & 5 to reflect rounds2 & 3. Let’s see.

Does the design resemble any snowflake or doily? I haven't copied any pattern, but who knows what's stored in the recesses of my cluttered brain! It’s such a simple pattern after all.
I used to dissuade myself from creating a simple pattern especially for a larger piece. But baby steps are important. I’m really excited about this now that it is laying flat.


Almost forgot – the tiny little leaf is Simple Shamrock earrings pattern is by Stephanie Wilson from the 52 Earrings Project (does this count, Mel ;-D). I made it in size 40 'coz she loves tiny thread (hey, I’m Not going beyond 40, Steph !). We’ve decided to sit side by side and tat ‘n’ chat, pretending we’re at the Fringe Elements ;-P Vicki’s posted another charade with simple rules … Join us ? I didn’t get to see what others had made last time, but as long as one is tatting, game on J
And this is my answer to the question in the Shamrocks pattern.  
#fringetatdays  #Tatting 

here’s to another round, ahem, of tatting !å


Saturday, 28 May 2016

making her teachers proud !

Pin It now!

Meet Annie Sukanto from Indonesia . She is a member of Cyn's Beginners Class & Georgia’s Online Tatting Class. She is a relative beginner in tatting but her tatting is so beautiful & precise, so patient & perseverant. I don't think our paths have crossed in class, but we have communicated via email.

I often get emails asking for help with my tatting patterns or tutorials. And I always give them top-priority, answering back immediately, even on my tablet. You know that feeling of getting stuck mid-way – it can be so frustrating to have to leave off when one has just settled down to start a project, or when in the mood ! So as soon as I come across a tatting-related question, whether in my inbox or on Craftree, I try to answer as best I can.

Sometimes one hears back from the asker, sometimes not. I enjoy the entire process anyways :-D Teaching aids and consolidates my own learning. 
Tatting and teaching - my two passions coming together, what more can I ask ?

Imagine my immense surprise when I downloaded Annie's tatting pics on the desktop & saw some writing on them . I am truly humbled. This is so sweet and kind of her.
Click on picture to enlarge


Now you can understand why I continue to grind out tutorials and other tips/details, despite the drawbacks of lengthy and repetitive posts , and some advanced tatters feeling bored ;-)

In fact if this return to Ikuta’s Picots with tat-along exercises helps somebody, we can thank Annie for it. A few weeks back I had notated & sent some of my old pics (which were in the pictorial pdf) to explain each step to her. Moreover, individual pics were larger, unlike the reduced collaged ones in the pdf. She successfully completed the loops. So when Georgia again mentioned some confusion about them in class, I offered to write another post, and upload the pics since they were already notated.  

But then the teacher in me took charge. What started as a mere re-upload, turned into a full-blown project – if I was going to revisit the topic, why not do it systematically ?! Specific point(s) of confusion had not been identified, but I had gained some more clarity, having tried it on the chain. So I re-photographed everything, and laid it out in an easily-followed format. I am so happy with the effort, and am so thankful to Georgia who has made it possible for so many of us to get acquainted with the old and new, to keep learning, sharing, evolving.

 
Isn't that just sweet ?!
Thank you, Annie. You are very kind. Your work is lovely and your progress is truly inspiring :-)

Wonderful teachers on InTatters/Craftree initiated my own transfer from traditional to 'modern' tatting 2½ years back, and bloggers & OTC have built on it.
All this has been made possible by the power of the web ! It is amazing how the internet master weaves us all within it's web, linking us to each other across time & space zones, allowing like minds and creative hands to congregate virtually, to help & share, to support & inspire.
We are all trying to pass it forward....

For more of Annie's tatting, please do visit her album (slideshow) at the Tatting Homework blog, hosted by Mel.

A few more of her Super 17 butterfly, with which she had needed a spot of help  ...
I can never decide which pics to pick - they all look lovely :-)

 
“He who can, does. He who cannot, teaches.” I really believe this applies to me and I am a very proud ‘teacher’, but will forever remain a learner.

Don’t you just love it when your ‘student’ outshines you !  
((( Hugs, Annie :-)))

happy tatting with a muskaan* :-)

* muskaan means smile :-) 

Related Posts : Super 17 Butterfly patterns
Ikuta's Picots pictorial pdf and related post, tat-along Part 1 and Part 2


Wednesday, 27 April 2016

trials and tribulations

Pin It now!

WARNING : Dear seekers of beauty & tatting purists, peruse at own risk. The blogger takes no responsibility for hurt eyes & sentiments.

My tatting is not always up to the mark. But even I am ashamed to show these pictures in public. Yet it is all part of the learning process, and each step helps as we comprehend & practice a new technique.


These are Ninetta’s latest Alternate Method of Curling Rings, especially small rings. I had the good fortune of getting first peek into her brilliant tatting brain. However, when Georgia announced the class for April 25, I scrambled to try them all out during the weekend. This time, curling the small rings were a bit tougher than when I did the Curled Rings series. Curling itself is easy. It’s just that I could not always get them to face in the right direction :-( . So I stopped jotting down notes & focused on the why & why not. You can see all the failed as well as successful attempts interspersed throughout the chains.

Trial 1: My first mistake was to try to tat the chains from frontside going in clockwise direction, thus keeping the curled rings in front.
In clockwise direction : 1st chain has the FR & CR,
2nd  chain - half moon curls,
3rd chain - heart curls ,
4th chain - button curls
Some ‘succeeded’ in wrong direction, some failed, some simply twisted around & curled over the chain refusing to budge !!!
Lesson – apply scientific method and change only one factor at a time. Also, use a size 10 thread when learning (Thanks, Mel)!

Trial 2 : Much better , yet many were still ashamed to face me ;-p. Ninetta came to the rescue & sent me this video and Then it Finally clicked !!! An Important point, which is clear in the stepwise tutorial pics, but didn’t register in my dense brain : turn the small ring at an angle of 180° before pulling the encapsulated thread to curl !!! The curling picot/space in the small ring should face down. Now I get it ! I was more focused on the instructions & not enough on the pics.
Lesson – read & look, look, look, and follow !!! That is what pictures are there for.  

Small Curled Rings (sCR) on Ring
Besides sCR on a chain, there are numerous ways to curl small rings on/through/over rings ! These are also included in the same pdf.
These Curled Onion Rings were made way back when Ninetta sent me her very first draft. I was very happy with the way the second one turned out.

Now I felt confident enough to tackle her beautiful bracelets, which incorporate many of curling effects of small rings.
I opted to do all 4 in one continuous braid, with about 4 repeats each.
Anchor size 20 thread used (SH1- brown; SH2- cream) & wooden beads.

1. Version with balanced sCR
I reduced the stitch count here, to better enclose the bead. But more practice needed. Ninetta shared this video in class.

2. Version with unbalanced sCR
I like this pattern the best.

3. Version with sCR over a chain
The second  brown chain & sCR turned/twisted for some reason ; the cream ones came out fine. But I should've reduced the stitchcount for chains.

4. Version with CR
First ring came out wrong. Thought & thought, then pulled a down loop through the CR from below the split ring to curl it. It worked (this was my AHA moment). But Ninetta demonstrates a better method of pulling the to-be-curled ring through the split ring and then securing it with a picot join.


I still have a lot of practice to do on these whimsical curls, but am more confident now. This exercise & interaction, and then the videos, also taught me how a set of instructions &/or format can be read/understood/perceived differently by individual tatters because each of us has a different way of tatting – slight nuances in ways of holding, making the formations, tensioning, and myriad other details. What seems ‘easy’ to a writer or designer may be very difficult to a reader. I will no longer call any of my patterns or tutorials ‘easy’. Major lesson learned.

UPDATE : All videos have been uploaded to Georgia Seitz's Online Advanced Class videos

Many thanks, Ninetta, for sharing your immense talent . 
Hopefully goofs in my trials will be rectified in future :-)
*************************************

Practice Doodle – What technique ?!
And to end on another note of whimsy – here’s a doodle I made a year back while learning another new technique. Using 2 shuttles, I went where my shuttles took me. Can you guess which technique I was practicing (there is a ‘tell’ if you look closely)? Can you trace the path ? 
And a lucky coincidence - in the left Ninetta’s Quad 13 I made just before.


happy tatting and curling :-))


Related posts : What are Curled Rings