Showing posts with label serpentine. Show all posts

Sunday, 13 October 2024

off the deep end

Pin It now!

 Well, kind of! I'm certainly mad to have succumbed to temptation when there are already so many huge pies baking in my tiny oven. The heat quotient is out of the world! Yet it has been a decade-old wish to tat the beautiful Mystery Doily. I've actually been compiling resources and versions for a decade whenever I came across something .... And so can you blame me if I joined Jon Yusoff's tat-along on FB intending to tat just 2 or 3 rounds for now.

Pattern Links to the Mystery Doily Project first shared by Georgia Seitz -https://www.theonlinetattingclass.com/doilies-mug-rug-etc

I roped in my tatting buddy, Anita Barry, and she readily agreed. To date, she has Never refused me anything!!! We've been exchanging note, thoughts, angst, and progress these last few days. While I was thinking of size 80, she suggested size 40 since she wanted to use up some of her stash. It was absolutely fine by me, or so I thought!

Yes, angst. My story starts with several discards. Don't remember why I cut off the one in orange. Was it a change of colour decision? I think I decided to use it for the next round and start the first with yellow.
The rings are tiny - only 8 stitches. And while closing that last ring the tread snapped! Better to discard since the thread (Gopal) is not mercerized.
 
Wound new shuttle with Anchor size 40. Now the inner scallop of first repeat looks very different since it is unattached. I got all muddled up thinking I had made a mistake and snipped it off. Turns out it was correct, sigh.

4th start with lighter shade of Anchor yellow. While I was struggling with the chain directions (since I was shuttling between diagram and original doily pic) I thought I'd got it right. Till I uploaded the pic to a larger screen and found an error in one segment. Not a huge mistake, but still the dark brown wasn't helping my limited vision. Even managed to snag the thread at one stage and joined again. 
Overall, though, I wasn't enjoying the tat and decided it was time for course correction and snip off the size 40 altogether. 
Finally settles on Anchor Pearl Cotton size 8 (equivalent to Lizbeth size 20) and this is how far I reached after dinner last night. Tatting went smoothly and quickly, I enjoyed the thread (the shade appears darker here), and I have more of a choice of colours, too. Would've preferred a lighter brown, but turns out I am running out of greens and browns in perle cotton! Looks like some buying in on the cards ;-D
What also helped was that I sketched my own diagram and although I wrote my text version, too, I didn't need to consult it.

My visualization is to change the colour of the rings in each subsequent round, using darker shades or even different colours, to resemble a chrysanthemum or a blossoming flower. Brown remains constant throughout.

Okay, so that's the backstory. If it hadn't been for the FB tat-along and especially with my buddy, I might've discontinued the endeavour for the present. Somehow tatting with others felt like a commitment and something I needed to accomplish for myself, too. 

Now for my notes -

  1. Pattern - I referred mainly to Patty Dowden's instructions, starting with an outer ring, and also followed her count.
  2. FS/BS tatting here is in 'blocks' like in Mary Konior's Spinning Wheel Glass Mat where a set of motifs/repeats changes en bloc. So the outer scallop has frontside rings while the inner scallop has backside rings.
  3. I followed the original doily pic and Patty's Row 2 diagram for the 'S-chain' instead of her diagram for Row 1. Ultimately I drew my own sketch instead of shuttling back and forth.
  4. Direct Tatting - In such serpentine patterns (including magic squares), it is very practical to direct tat the chains instead of frequent reverse work. This also keeps the work mostly on the front side. Hence reverse stitch the chains, ensuring that you make adjustments for the sequence of the hitches when tatting backside chains.
  5. Joins - For symmetrical/mirror-image chains, including colour and direction, I used a reverse join on the right S chain and a downward picot (picot on core thread) on the left chains.
  6. Reposition - And before the picot on core thread (I wanted it to be yellow to mirror a ring picot), I used a TwW (a 2nd half-stitch which it turned to face the other way), reversed work, and then placed the paperclip on core (yellow) thread. 
  7. Colour - My first instinct was to follow Jon's variegated and solid combo scheme. However, seeing the tiny rings and my own stash, it just felt that a variegate would make the already dense design too busy. Hence I chose solid colours.
  8. Thread - Remember to use mercerized cotton for easy closure of the tiny rings.

As I mentioned above, here are some additional links


Can't say how far this doily will go at present reckoning, but I am committed to at least two rounds to get a good feel of this beauty! Jon has created a dedicated private group for this TAL, called Georgia's Mystery Doily Tat-Along. Join us if you can!
 
UPDATE
Reposition Methods (either after a lock join, a picot join, or free) to change the thread, shuttle, direction, or colour --- For convex/concave chains - https://drive.google.com/file/d/1JxcO-ubKP1KXb_CVAAfOMX6uBPkCy_gO/view 

And my completed Round 1 -
It's enticing And it's addictive!!!!!


Thursday, 14 January 2021

hidden pathway

Pin It now!

I know many of you must feel that the hidden rose should stay hidden and not be seen so frequently, but what can I do when hidden assets keep surfacing?! How many secrets are hidden in this little snowflake? 

This time it is yet another pathway discovered by Melanie Cervi (or Mel as we fondly know her) who was put off by the paperclips required in my original instructions. So she set off into the woods, clearing away the trees in her path (thankfully, not literally) to leave a trail without clips!!! 

Sequence notated

When she emailed me a month back, I honestly could not figure out how she did it. Clearly my mind was blocked: any which way I went, at least one clip was required. It was only when she posted her instructions here, that I was amazed and amused ;-D In the above model (tatted by Mel), I have inked the sequence. Tatting progresses in clockwise direction and is made in one serpentine pass. 

So this takes the sequence toll to FOUR! We have 4 ways to work this snowflake ... so far ;-P 

You can find links to the pdfs and posts, as well as the rose, ice drop, and heart adaptations in my Snowflake doc here.

Don't forget to skip over to Mel's blog to read her instructions as well as ideas for future experiments and trials - http://picotsnkeys.blogspot.com/2020/12/year-muskaan-floated-idea-of-hidden.html . I've put it on my to-tat list.

UPDATE: Mel made a tatted biscornu using the snowflake patttern! Check it out here - http://picotsnkeys.blogspot.com/2021/06/biscornu-finished.html


But before I leave, here's another lovely pair tatted by the talented Anna Tedesco and shared on facebook. Sorry for poaching the image, Anna, but it is just too cute! Anna has a facebook group - Tatting Art where you can scroll through all her gorgeous projects.


Many thanks, Mel and Anna - keep the spring of inspiration alive 💖

Saturday, 22 October 2016

fluorescent candy

Pin It now!

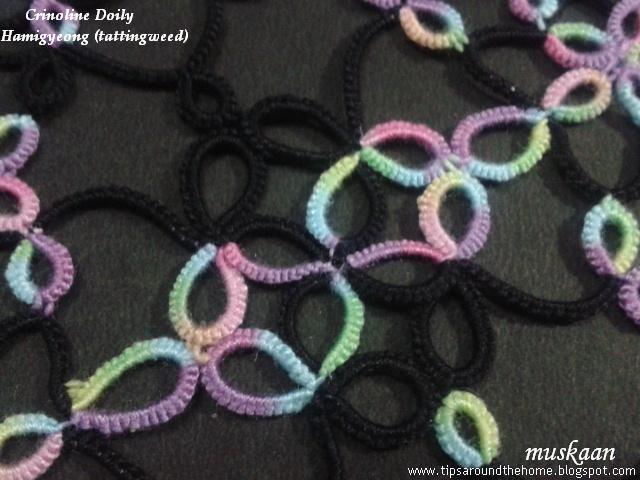
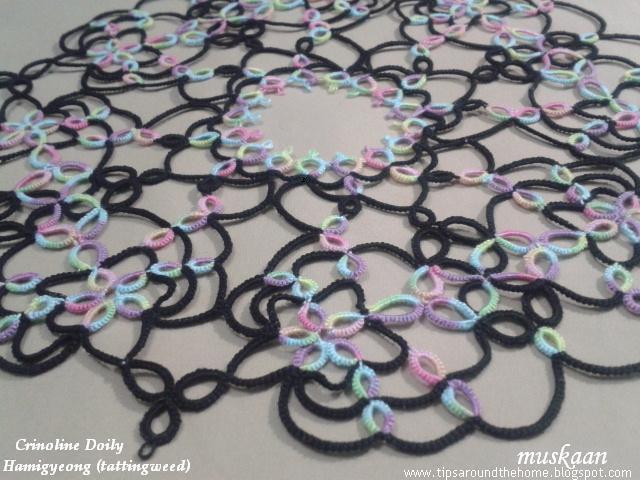
For all sweet-tooth tatters, my serving of a neon-isc candy treat. Hope you enjoy the slow release of flavors ;-p

Hamigyeong (tattingweed)

Most of the details have already been accounted for in the previous post, including graphics of how the work progresses, a few tips, and my working notes. Keeping my promise of few words ....
Love the multiple patterns and shapes that jump out ….

This is the same pic, with swirling wheel effect, as the lead in previous post, against a black background.

Finished size – 7½”. From clover point to point - 7¾” ALL IN ONE PASS !!!
Threads - Anchor crochet cotton size 50 black; Anchor Embroidery 4615 – 1335 2 strands.

Techniques I used : 2 shuttle tatting, directional tatting, reverse stitch, split rings, self-closing mock rings, thrown/floating rings, folded chain, reverse join, up & down picot joins, split ring join.
Personalized colour placement required some additional callisthenic  

If the graphics in my previous post scared anybody, Hamigyeong shares a simpler and smaller Little Butterflycoaster/doily with the pattern inked here. It is like a precursor to the larger and more complex Crinoline, both conforming to the same basic principles.
I don’t particularly like too much open space in a doily, preferring them a bit dense. And if the chains were shorter in this one, it might have been that much simpler to work with. But I enjoyed Every Single Moment of it. And I absolutely love the clean lines without picots ! 
How simple rings and chains can be meshed together ! Brilliant designing !!! Of course, one needs one’s wits around while working this. It is not your everyday relax-and-tat pattern, thus making it so much more special. It does, however, follow a logical sequence and stitch-count which becomes easier at the 3rd quadrant stage (for me).
I hadn’t realized that Hamigyeong (aka tattingweed) is the author of the currently popular book “Tatting Lace With Your Life” ! Check out her beautiful work on Instagram . She also goes by the name of  Fireweed Plains. This is her gorgeous working of the Crinoline doily that got me ‘shuttled’ immediately. (I didn’t have this link earlier). Of course the timing was just right - it has helped me further in my TWoT series.

 Many many thanks to Hamigyeong for sharing her brilliant design !

happy tatting :-)


Thursday, 20 October 2016

truly serpentine

Pin It now!
I had written this post some days back, while still less than halfway through the doily. Didn’t get a chance to either take pics or to notate them and post. Meanwhile, I completed tatting the entire doily a couple of days back. Life is a bit in the way, and that has forced me to break the presentation into 2 posts. Here, I will share my working notes (the Boring stew), giving me time to complete the presentation of the finished doily (the yummy candy).

My Working Notes
for
There is quite a bit of interest in this beautiful doily. Before I start to forget, I’d like to share my working and thoughts ….The doily is not blocked, so please excuse the pics

Abbreviations used (in order of appearance):
SCMR – self closing mock ring
DS – double stitch
RODS – reverse order DS
SLT – shoe lace trick/overhand tie
p – picot
shs – 2nd half stitch
fhs – 1st half stitch
RS – reverse stitch (unflipped)
RW – reverse work

1. Worked completely in one pass !!! Divided into 4 quadrants ; each further divided into 2 mirrored halves (thus we get 8 sectors or pizza slices). Each quadrant (made of 2 sectors) forms one complete repeat.

At this stage it looks like a bull’s head !!!!
2. When considered for the doily as a whole, the overall direction of work is counterclockwise. However, within each sector, we work in many different directions, including ‘up and down’, ‘in and out’. It’s serpentine movement reminds me of the magic square and Iris Niebach’s doilies. 


3. The pattern as such is simple, worked with two shuttles : Rings and chains with reverse work. 4 SCMRs, few split rings, and a few rings made with 2nd shuttle. That’s about it! What makes this doily an arguably advanced or skilled pattern is the movement of the elements and segments – not easy to memorize.

4. If one is doing directional (frontside/backside) tatting, then we encounter ‘blocks’ or segments that act as a “unit” – thus we start with a segment where rings are DS & chains are RODS; then switch to the next segment where rings are RODS and chains DS. Those who have tatted Mary Konior’s Spinning Wheel Glass Mat in directional tatting (or in 2 colours) will understand how one half of the wheel ‘spoke’ works as a unit/block/segment.

5. Exception to #4 : There are also what I consider ‘thrown’ rings (even though they may not strictly be on a chain) ie. rings made with the other/auxiliary/second shuttle. They, of course, will follow the order of the ‘chain’ (RODS or DS)
6. I did add some complexity of my own (yes, I can’t seem to leave well enough alone !) by customizing the placement of colour using Reverse Join or simply laying one thread over the other (instead of SLT. See, I’m not much of a stickler for rules, nor a lover of SLT ;-) ).

7. To turn direction, I used ‘folded chains’ ie., (p, 2shs) or (p, 2fhs). These were included in the stitchcount of the chain (1DS). The folded chain also helps to keep the colour of chain constant.

TIP : In order to fold the chain, I made a picot and continued with the Same half stitch twice, as the last half stitch ; thus there are 3 same half-stitches in a row.
Note that in directional tatting the order switches after folding, because the chain has turned back over itself!
Thus, when folding a DS chain : (p,2shs) , continue next chain with RODS
Conversely, when folding a RODS chain : (p,2fhs) , continue with DS

8. I love the way tattingweed has sketched & notated over the scanned doily with little red arrows showing the direction of tatting – very clear. While tatting, though, I did miss the numbering on rings. Hence, halfway through the 3rd sector, I took another printout & inked the ring sequence. It really helped ! I also added the stitch count for the mirrored Sector 2. in the first printout.

9. There are some rings that need picots, while other elements join there. Due to changes in direction, it was sometimes difficult to tell which ring came first and had the picot. I made a black line on that ring, in the printout. But with the rings numbered in 2nd printout, it was easy.

10. Using Reverse Stitch for chains is another way to keep track of the pattern. RS helps us tat from the front, reducing RW to a minimum. This makes it easier to read the printed sketch. However, if a segment has many ‘thrown’ rings, then RS is not such a convenient option (unless one uses Reverse Rings or Rings in RS!)
As it turned out, I didn’t use the RS much for various reasons. It did come to the rescue in the very last segment, when joining back to the first sector. Here, one has to work inwards, and it became too confusing. When I switched to RS, I could accomplish the tatting and joining all from the front.


Spot treatment

There were a few mistakes where I had to retro-tat the element. But one mistake was discovered very late and a lot of tatting would have to be cut – I had joined a ring to the wrong picot! This called for some minimally invasive localized surgery.
Here’s what I did :
Cleared some space in the ring by moving the stitches and snipped the stitch thread - Not the core thread ; Not the entire ring.
Logic : It would give me plenty of thread at either end when the ring was unraveled.  Luckily it was a large ring and I had more than enough length to sew in the ends to adjoining elements.
Pull the core thread to unravel all the stitches.

Add new thread and tat the ring.
This was also completely knotless method of hiding ends – tatting over tails and sewing in opposite directions to adjoining elements
As I write this, I realize an easier way – I could’ve done a Mock Ring using the core of snipped ring! Waaaaah :-(  Or may be I had already closed the ring and it didn’t seem worth the trouble to unravel it. Memory evades; but nevertheless a solution to keep in mind for future.

As a reward to those who have diligently read through all this, I’ll keep my mouth shut for the most part of the grand reveal in next post, letting pics do the talking. Ummm, at least I’ll try my best ;-p

happy tatting till then :-)