Showing posts with label 52 Earring Project. Show all posts

Friday, 22 September 2017

so far

Pin It now!
How far can I go with designing my first ‘doily’, I’d asked last time?
Here's how far I've come, so far ...


a snowflake ….
The first 3 rounds with picots and only 6 rings in the central rosette could masquerade as a snowflake, right? But the rosette needs some decorative picots I think.
The 3rd round here completely flattens out even without any blocking ! The initial ruffling is a design characteristic - I won't call it a flaw.

a possible motif ….
These 3 round medallions can probably be joined as motifs for a larger fabric.

After tweaking, ruffling was tamed, and with light blocking it stays flat.
One of the tweaks was to add some bare thread space between central rings. Unfortunately the compactness and slimmer teardrop shape of rings (as in the bronze one) got lost. Should I give it another go ?

To maintain the radiating look I nixed any thought of inward facing rings in later rounds.

Also realised that for a larger project, it is not enough to design the immediate next round. One has to think ahead to the round after that as well, in order to determine the placement of joining picots in next round. Doesn't mean I can transfer the “think ahead” to real life ;-P

and 5 (4 tatted) rounds….
I used Sketcher Guru app on my tablet to draw rounds 4 & 5, and a rough 6.
Have I ever crossed 3 rounds/rows in any of my designs ? Doubt it.
So I’ve decided to christen this ‘Aspiration’. It kind of suits the ever-widening radiating look, too – like widening my horizons, moving beyond my comfort zone, yada yada yada …
My intention is for rounds 4 & 5 to reflect rounds2 & 3. Let’s see.

Does the design resemble any snowflake or doily? I haven't copied any pattern, but who knows what's stored in the recesses of my cluttered brain! It’s such a simple pattern after all.
I used to dissuade myself from creating a simple pattern especially for a larger piece. But baby steps are important. I’m really excited about this now that it is laying flat.


Almost forgot – the tiny little leaf is Simple Shamrock earrings pattern is by Stephanie Wilson from the 52 Earrings Project (does this count, Mel ;-D). I made it in size 40 'coz she loves tiny thread (hey, I’m Not going beyond 40, Steph !). We’ve decided to sit side by side and tat ‘n’ chat, pretending we’re at the Fringe Elements ;-P Vicki’s posted another charade with simple rules … Join us ? I didn’t get to see what others had made last time, but as long as one is tatting, game on J
And this is my answer to the question in the Shamrocks pattern.  
#fringetatdays  #Tatting 

here’s to another round, ahem, of tatting !å


Wednesday, 13 September 2017

cascading ideas

Pin It now!
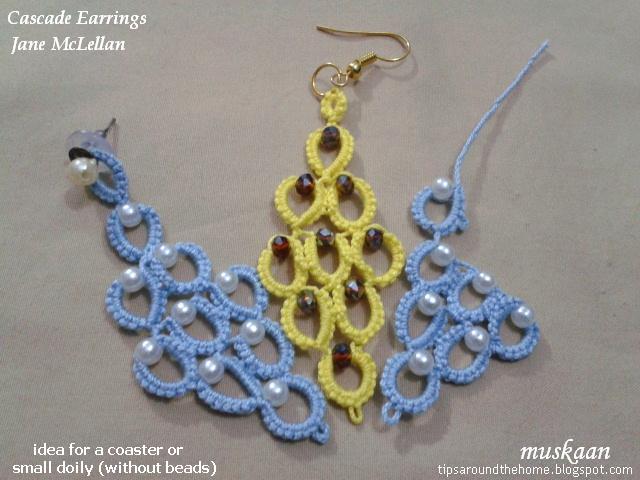
Cascade Earrings
Jane McLellan

If you remember my earlier post, I finally got around to tatting Jane’s Cascade earrings – long on my to-tat list. Pattern pdf is on the right panel of her blog here. This pattern was also shared with the Online Class as part of the 52 Earring Project in 2015.

Here’s what happened –
I started with the blue with pearl beads and loved it. Till I pulled away the 7th ring (see last pic) and while trying to unknot the ring, the space only worsened. Discarded.

That craft shop I’d been to didn’t have a good supply of beads. But they did have these beautiful sparkly crystal bead chains/necklaces which I bought in 5 or 6 different colours & was waiting to use them.
Started the next in yellow (Red Heart thread) with brown crystal beads. Meh ! Don't like the thread but needed to do justice to the pattern.
So back to blue with pearls – after all cascade conjures up an image of white froth and blue water! Happy.  Instead of earring hook this time, I used a post, gluing a larger pearl on it.

The pattern is presented with clear stepwise pics and explanation. Although not mentioned, I had to reverse work for a couple of rings. 


I love the clever use of SSSRs in this lovely pattern.
Got me wondering if we could make a small doily or coaster in one pass, without the beads of course. Requires some figuring out.

Floating Beads Substitution
Jane had wondered whether we could substitute the Floating Beads method for adding beads. 
I tried, and yes we can. 
However work starts from the top, going down rather than the original bottom-up sequence !!!


My 2 trials (in yellow) – both aborted for following reasons -
In 1st one, I used 2 shuttles & split rings and couldn’t figure out how to position 2 threads correctly...
In 2nd, I went back to single shuttle and SSSRs and this is as far as I reached before giving up. This can be done, but I discarded it only because I didn’t like the mundane shape of rings.

Part of the appeal of Jane’s pattern is the shape of the semi-closed rings – broad at one end & tapering at the other. This shape gets lost if I use FBs. So when 4th ring dangled away, I cut the trial.

Not a wasted effort at all. Discovered/Confirmed that the FB method works not merely in rings, chains, & thrown rings but also in SRs, SSSRs, and SCMRs. In fact I have a couple of ideas to try out before I post a few pics of each of these.

Oh, and also, I’m not done with the Cascade pattern – I have this idea of adapting it for a bracelet … watch this space - it may take a while coz I'm not tatting much these days :-)


Many many thanks, Jane for sharing your pattern and ideas J


Tatting with online friends and resources is like a never-ending 
Cascade of ideas, inspiration, and learning !

Monday, 19 October 2015

Tutorial : Findings Atop Diamond

Pin It now!

“Finding” The Tip !


The curled ring earrings (below) posed a dilemma when it came to adding a finding, the way I visualized it. How do I add the earring hook to the Tip of a diamond arrangement of beads on a Ring ? Now this may seem like a simple question, but my limitations with beads in tatting, and the limitations of bead/thread sizes, brought forth beads of perspiration ! Searching the net didn’t yield any results either :-(
At the time I went ahead by inserting the finding through the space between the 4 beads, as you can see in pic above. But the puzzle kept gnawing at me & I sought answers in the Online Tatting Class, etc. Everyone was very helpful, with lots of suggestions & tips. My sincerest thanks to the OTC team (Cyn, Mel, Barb, Tammie), to Georgia who sent me an email presumably after reading the conversation, & to Jane Eborall for her prompt replies to my emails. Your collective interest & promptness in trying to resolve the issue was very heartwarming & inspiring.

But the person who Finally “solved” this was our other Jane from exciting safari land,while multitasking ! I received a reply, with tatted sample pic, within a few hours !
Hence, the following pictorial is Jane McLellan’s Method of adding findings to the tip of a diamond arrangement of beads, on a ring.
If you enjoy puzzles & challenges, read no further. Why not give it a try before reading ahead ? :-D


But first a couple of pics to show how we normally make 
a diamond arrangement in beads :

Normally, when we want a diamond arrangement of beads on a ring, we hold 3 beads in the loop around hand, & slide 1 bead from the shuttle thread. 
Note : All 4 beads were pre-loaded on to the shuttle.
When the next double stitch is made & snugged, the beads position themselves in a diamond shape.


In order to add a finding in this arrangement, a jump ring or split ring will have to be inserted through the topmost bead. BUT : The bead hole has to be large enough for the wire to pass through easily, & without fraying the thread. Moreover, the jump ring will be held stiffly in place & may cause the hook (or earring) to curve unnaturally in another plane. 
This is where Jane's method comes in handy ....

How to Add Findings to the 
Tip of Diamond Arrangement of 
Beads On a Ring
Jane McLellan’s Method

1. Load only 2 beads around hand & bring forth 1 bead from shuttle thread. 
2. Load 4th bead on a hook & pull a loop of thread from BETWEEN the pair of beads. 
3. Pull this loop out further & pass the 4th bead on to it (like LBP of leave bead on long picot) 
4. Insert a jump ring or split ring through the ‘picot’ loop. 
One can insert an earring hook directly on to the loop, too. 
 5. The earring hook can be inserted into the jump ring now, or earlier.

 6. Snug the beads & loop into position by pulling on the core thread. 
Then make a double stitch & continue with pattern.
 7. Complete the ring & close.


Variations to this are possible. For instance,

  • With proper tools, the earring hook or any other finding can be added directly to the loop.
  • Add more than one bead to the tip, if one wants longer dangles.
  • Leave the thread loop long, like Jane has done here & here

My Heartiest Thanks to Jane for helping me out :-D


This tutorial was pending for such a long time ! Tonight, though, Georgia will be teaching the earring pattern in the OTC, & hence the impetus to post this post-haste ! 


Motif #5/III for 25 Motif Challenge


Related Posts : Jewelry Medallion Pattern

Friday, 22 May 2015

Curled Ring final options and a free pattern

Pin It now!
Jewelry Medallion (free pattern)

Curled Rings Options (Final)
 
As promised, this is the last post on the subject. Thank you, dear readers, for your immense patience & support. There are many more ways these rings can be used to great effect. It is up to you to discover them now ;-P

I. Large Ring    
A simple coaxing will make the large ring turn into figure ‘8’.
When curled up (picot folded from front to lie over the base of ring)
Curling behind gives a better shape 

II. Large Ring with offset picot   
‘Normal’ curl leads to an asymmetrical cup with great potential for 3D applications. 
Think of a bead within ! Or if picots are added, then these can be joined later to other elements.
Or coax the ring into an '8' & curl. Interesting effects ! 

Both the large rings (I & II) were used in the pendant I shared here


III. Bead at Base of a Curled Ring (outside) :


This is how I added a bead at the base of rings in the Curly Cross Pendant :(all beads shown with an asterisk in the notated pic in post).  The Curl & Bead are made at the same time, with a single join.
Please note : There may most certainly be better methods suited for this. I hope to improve as I learn more. This method is something I figured was working fine (I had the bead exactly in the spot I wanted) without causing me to loose focus hunting around.


IV. Bead inside a Curled Ring

Just as one would for a normal ring, the bead is held at back of thread around the hand 
& brought into position when the ring is closed. Curling is done, as usual, later.


V. Curled Ring around a Split Ring

Ninetta has used these in her bookmark tail, here. 
She recommends leaving a length of thread space to continue between the SR & CR.


VI. A Curled Single Shuttle Split Ring (SSSR)
Since the bracelet was already made, I used some auxiliary thread to add an SSSR & curl it, 
in order to get a toggle here. 


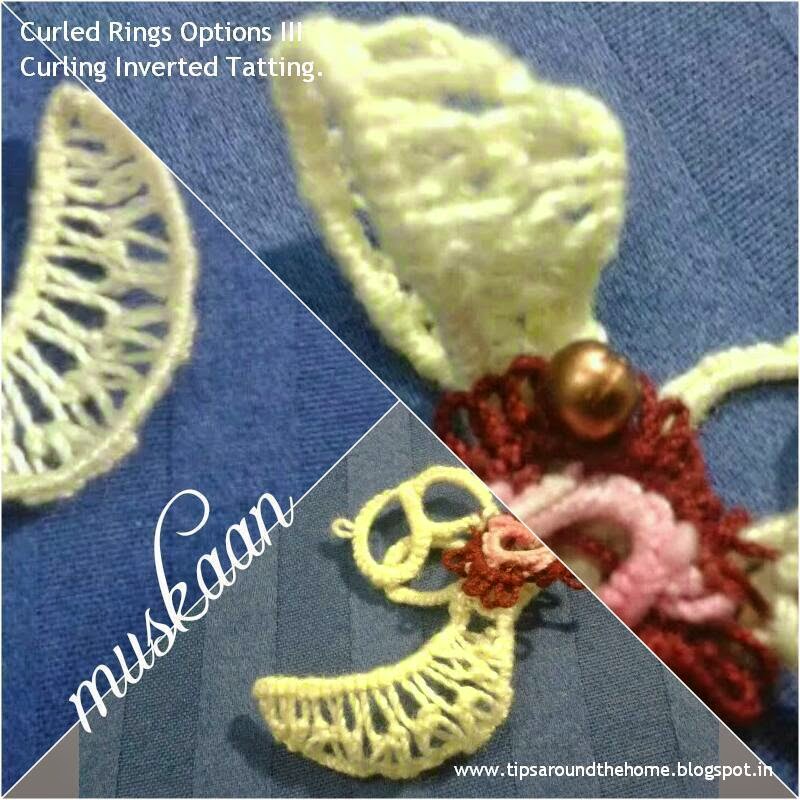
VII  Inverted Tatting Curled !!!
Simply experimenting with the curled look. Makes for a gossamer petal ! 
Definitely going to use this in future 3D projects

ooooooooooooo

My final thoughts / observations

As with so many techniques, some factors are universal, to bring out their real effect & aesthetics .. .

Thread Colour :  Lighter shades if using a single colour . Variegated ?
Thread Size : Finer threads – upto size 20.
Joins : Choice would depend on colour(s) used, how the rings are to be curled, etc.
Eg. Lock join is preferable for free-standing multiple curled rings, since it provides greater stability.
Adjacent CRs can be joined to each other like normal rings, as well as to other elements through the inclusion of picots . eg. the Jewelry Medallion, etc.
Picot Length : Small picot preferable. I experimented with longer picots, but it did not work out. However, I still believe, if done correctly, it should work. Experimentation for the future.
Rings : Split Rings,  Josephine Rings, small rings (less than about 20ds) will be difficult to curl, if at all.
Sides : There is a distinct front & back side in curling. For Curl Over rings, it does not matter much & convenience is paramount. However, in Curl Around , etc. care should be taken ; here, the curl should be from back to front, such that the picot is lying above the base. The difference is clearly visible in the mistake (shown within ring) I made in the golden Curly Cross Pendant .

Notation for Ninetta's Curled Rings :In response to a thread in Craftree, Judith Connors points out that these curled rings are “more of an effect than a technique”. Hence notation/direction can be added after the ring count, with an explanation for the type of curling used either there, or in the glossary.
eg. R : 12-12. Cl. CR  or    R : 6-6-6-6 . Cl. Curl Around chain.  [Cl – close ring ; CR Curl Ring]

For a great tutorial on how to make a Curled Ring from the master designer herself, check out the Curled Rings Pendant lissted in the Patterns page on Ninetta's blog.
ooooooooooo

Jewelry Medallion
a free pattern
A very simple, beginner's pattern. I am, myself, just starting out with beads & have probably used some very basic methods. Although yet to try any of her gorgeous patterns, I am certain this medallion (especially the placement of 4 silver beads) was inspired by some of Corina Meyfeldt's pieces.
Click to download pattern in pdf format :  Jewelry Medallion   
UPDATE : The pattern now has a diagram to go with it . You can download it here : Jewelry Medallion [Earrings]
In order to add findings to the tip of a diamond arrangement of beads on a ring, here is a pictorial 
Hope you enjoy the pattern & share or give feedback 


happy tatting :-)


Motif #20/II for 25 Motif Challenge

Related Posts : my 3D pendant