Showing posts with label stitchcraft. Show all posts

Sunday, 3 December 2017

lazy or smart?

Pin It now!
When was the last time I posted something unrelated to tatting? Hmmm, probably a year back for the Pinterest Challenge in December – that cute little bird. It still sits on my bedside cabinet with pins stuck in it!

This time I'm sharing a very quick mixed media project involving painting and embroidery, done sometime around mid-2000.
These pics were taken quite a while back, hence not as sharp, bright, rich and clear as I’d like them to be. Apologies for the poor quality.
The background is a light yellow but not as washed out as it looks here.

I’d wanted to embroider a bedsheet for ages, but was fearful of it becoming an UFO. Once during our summer vacation we forced our Mom to give us separate bedsheets to embroider and she succumbed despite her valid fears of us not completing them. The sheets did get finished but only after she sat alongside and embroidered the remaining motifs over the months following the vacation ;-P

Going by that experience, I decided to do something quick but covering a large area. After scouring through my pattern collection, I zeroed in on my favorite book – Creative Stitchcraft. It has a beautiful Bouquet of Roses Quilt – red stem-stitch embroidery on white background.

I went for colours, but a mere stem-stitch outline would look too barren. So after I had enlarged the template – drawing manually, since I was excited to start immediately – and transferred it to the cloth I looked in my fabric paints box – I use Fevicryl acrylics.
I had a few left over from painting a free-hand saree border for my MIL earlier.

Diluted them and did a quick wash. A thicker coat of paint could've caused some stiffening of the fabric making it difficult to embroider, and taken longer to dry obviously.
There’s a bit of yellow paint in the rose petals, too.

I deliberately didn’t ‘stay within the lines’, keeping it a bit random with some unwashed areas or some overlapping of colours, to give it a natural shading.

Then simple stem-stitch along all the outlines.
I kept the stitches very short, using 2 strands of Anchor embroidery threads throughout.
Manoeuvering becomes easier when stitches are short. Abrupt curves, sharp ends, pointed ends, etc. can b e neatly managed. 
Mary Corbet has some excellent tips & tutorials which I had already figured out on my own. 

There is also a lovely Morning Glory border in the original pattern which I did not use here. This seemed fine on its own. 
Yay, it was all over within a week – from enlarging to the very last knot! 
Is this multimedia project smart or sheer lazy? You decide :-D

Bouquet of Roses pattern from the book "Creative Stitchcraft". (Better Homes and Gardens) Murdoch Books. 1991.


Friday, 4 August 2017

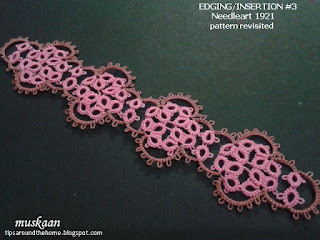
Needleart 1921 Edging 3

Pin It now!
free vintage to modern tatting pattern

Edging/Insertion #3 Bookmark
Needleart 1921 (vol 8 issue 3) 

This is a very simple insertion – rings and chains that can be worked with one shuttle and ball. Good practice in trefoils and chains for beginners. It is a slight variation of Edging #2 which I will share later, along with a bracelet variation.

The original bellaonline article has lots of tips including how to avoid gapsosis in trefoils, and the importance of picot lengths.
I tatted it in size 40. A ⅜ inch picot gauge held horizontally is used for the central picot to which 3 other trefoil rings will be attached.
Thought about using a Swirl Join instead of central picot. But impractical to leave all those rings dangling for entire length till they are joined on the way back (see also beaded version below).

4 repeats measure about 5 inches long and 1 inch wide.

The satin ribbon is ¼ inch wide. I double-backed the ribbon and tied a simple knot at the other end.

This time the pdf does not include any written pattern. It can be accessed directly from the article. Only keep in mind that all chains are 3ds separated by picots.

TIP : when trying to figure out the stitchcount from an image, be mindful of the type of tatting. In vintage patterns we usually have traditional tatting with no distinct front or back sides. While some elements will show complete stitches, others may show half stitches at either end. Picots, or more precisely the stitches adjacent to a picot, give away the secret :-)

Had an idea to tat a bracelet, adding beads. Hmmm, size mismatch. These seed beads were too large for size 40. Abandoned and haven’t yet been able to work it in 20. Hopefully in future.

I went for a bookmark. But I’m sure you can see the numerous applications for this pattern ? Bracelet, choker, belt, .... and much more !

'Silk Ribbon Embroidery' by Ann Cox is a lovely book full of floral techniques illustrated stepwise and scenic compositions. I really did intend to embroider a few, but couldn’t find silk ribbons. Then tatting came back into my life and everything else went out ;-P

keep tatting, happily, merrily  :-)

Sunday, 31 July 2016

merrily tripPINg n skipPINg

Pin It now!

Yay , I finally reached my study for the monthly pinterest challenge ! Er, not to dust the books & shelves, but within the pages of my books. And look, Suzanne, no tatting :-)))
I love to hand embroider, especially freehand styles – lines or fillings, choosing from the multitude of stitches, & embroidering with a single strand of thread.
Not possible now, so I fell back on counted cross stitch. I’ve done my share of cross stitch projects, though it is not my favorite style. This time it got so addictive that I merrily tripped along with 3 bookmarks & was going for more when a tatting question pulled me back into TatLand. There’s always another day for dancing & tripPINg …

All 3 bookmarks are from my Edgings & Laces 3 : Embroidery board.
And unlike tatting where it is required occasionally, I had to wear my magnifier throughout. 
Oops, I forgot to iron them after finishing off :-(


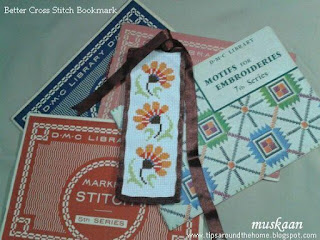
Better Cross Stitch Bookmark 1

Excellent free pattern pdf, with choices for black & white or colour printing. The symbols & grid size made reading the pattern very easy.
Changed the Anchor pale blue to a darker but brighter shade in silk thread .
I like to thread multiple needles, especially when few stitches are required - hate long threads spanning the fabric behind. Threading multiple needles ahead saves so much time & one can maintain one's momentum & rhythm.
While rummaging for a lining, I hit upon a fabric with a very similar pattern ‘embossed’ on it !! (pic towards end) 
Edged with brown satin ribbon.


Frieze Bindweed  
free pattern by Brigitte Dadaux
I had this long scrap strip of blue Aida left over from some old sewing (I had once sewn a seat cushion cover forthe swivel chaur in my study, using this blue Aida & corded piping in black). Plenty for a bookmark ! 
I deliberately chose a single colour. Would've preferred a silhouette, but the elegant curves in this pattern called out to me. 
I shifted the borders from the side (in original pattern) & moved them to the top & bottom. minor tweaks were made in order to maintain symmetry.
All I had to do was fold the strip back on itself & sew – no separate lining required. (This is the true shade of fabric when seen for real).

Fruity Delight
There isn’t a name, so I’m calling it my Fruity Delight !!! As I embroidered, fruits leaped to mind – strawberries, mangoes & purple raspberries !
 
I decided to not embroider the border (as in original pattern) - this looked soooo good & I feared a border would detract from the main body.
One would've thought that I'd be bothered by the frequent changes of needles/colours/threads, but for me there's always a magical enigma in embroidery... to see a pattern on paper coming to life on fabric, is always so fascinating & I usually find it difficult to drag myself away.
And counted cross stitch does have that element of a jigsaw puzzle - each cross is a tile or piece that needs to fit in precisely !

Finishing Off
I like to try different things. Each of the 3 bookmarks has a different finish. Hand-sewed the first 2, & basted a satin ribbon edging for the first. Third was cut with a zig-zag scissors. 
The first bookmark has a printed fabric, chosen because of it's resemblance to the cross stitch pattern. Machine-sewed the ribbon.
The blue one is simply folded back on itself & hand-sewn. I should've top-stitched the edge.. next time I sit at the machine...
For the middle bookmark, I fabric-glued some scrap fabric. After it was dry, cut the edges with the serrated edge scissors. Even caught the ring finger skin between the handles (that scissor is pretty tough to handle!) & bled for a while. So, if you look closely, you will see the top right corner is not in line (seen in pic below).


The Boring Stuff
To make it a wee bit interesting, I’m interspersing the boring details with pics from my collection of books that have cross stitch patterns .
I have this dream that when I finally give away my books, there will be a handmade bookmark, made in different media,  in each book.

Better Cross Stitch Bookmark 1
Aida 15 count. White
Anchor Embroidery Cotton Art 4625 – 3 strands. Shades : 0314, 0333, 0359, 0250
Besto Silk thread – 3 strands. Shade : 49
Stitches: 22 x 110
Embroidered Size: 1¾” x 5½” 

Finished size : ~3½” x 7¾” 
All 4 books were handed over to me by my dear MIL.
I have embroidered a wall hanging from the Motifs and Embroideries book. The other 3 booklets have some good border & filled-in designs, but too geometrical for my taste. 

Frieze Bindweed Bookmark
Aida 21 count. Blue
Anchor Embroidery Cotton Art 4625 – 3 strands. Shades : black
Stitches : 26 x 66 (main body) ; 28 x 9 (each border)
Embroidered Size: 1½” x 4½” (main body)
Finished size : 1¾” x 6½”
These are notepads with grids. The left one has patterns collected from various sources & colour-coded. The right one is my working pad. When a pattern needs to be enlarged, as from the above books, I do it here, using colours &/or symbols. Makes it easy to keep track of the stitches & pattern. Bought a new one because this dance ain't ending here !

Fruity Delight Bookmark
Aida 15 count. White.
Anchor Embroidery Cotton Art 4625 – 3 strands. Shades (from dark to light): black; ‘strawberry’ - 069, 027, 024 ; ‘mango’ – 0326, 0314, 0291 ; ‘purple raspberry’ – 0127, 0102, 0108 ; greens – 0879, 0258
Stitches: 19 x 77
Embroidered Size: 1½” x 5” 

Finished size : 2½” x 7” 
I bought these after my marriage & have made several projects from Creative Stitchcraft, which has more than just cross stitch patterns). I bought the left one specifically for one centerfold pattern,  which, happily I did make.
Will hopefully find the time to share them all some time.


Let's dance over to see what my dear Pin Chicks are up to ...


Hope you enjoyed tripping along with me :-)