Showing posts with label newsletter. Show all posts

Sunday, 19 July 2026

flowers and fire

Pin It now!
a tatted piece by Donna McDade (2024) 
Temperature Tat-Along designed by Helga

I first came to know Donna McDade when she participated in the DAL Celtic Snowflake challenge in 2024, designing the 3rd round in Five versions! We've been communicating off and on since then. And last year she participated with 7+1 versions of the 2025 DAL! Her twin passions include quilting and tatting and a lot of her tatted pieces get appliqued to her quilts as you witnessed with motifs from both the design alongs.

Below is her 3D Ruched Flowers quilt top and ... 

"I received the first place award in the national American Heritage fiber contest. There were over 3,000 entries in all the categories. The award was for "3D Ruched Flowers" unquilted top."
She is actually a descendant of George Washington!

Below are some close-up pics of three blocks to show some ruching details ...
Basket 1 - Sunflowers

Basket 3

Basket 4 - Cactus
This was the Daughters of American Revolution (DAR) 2025 event and she also won the state level award for the same quilt top!
💦💦💦

This year again her quilt titled 'Words Catching Fire' placed first at the Daughters of American Revolution (DAR) at the National level! She had sent me the story as a PDF file several months back at a time when she was uncertain if her quilt would be accepted or not! However, time slipped by and I couldn't blog about it and now her article is published in the latest IOLI Bulletin! The symbolism and acute focus on the topic is worth reading about to fully appreciate the thought and work Donna put in. Here is the link to her original PDF - https://drive.google.com/file/d/1ABNIRSEKrfwj4lzuy-RgTBKDIZxFXX80/view  

As you can see in the images below, there is ample use of tatting, besides embroidery, applique, quilting, etc. and her choice of colours and shapes provides an additional layer to the entire story of the 250 year celebrations this year.

bird's eye view of the quilt 

embroidered crown of King George III

each piece here, each colour here, has a reason, a purpose.

words scattered around, but not randomly!

tatted words catching fire!

tatted impression of the Stars and Stripes 

This quilted montage is a passionate representation of the role of women in the revolution. I hope you read the detailed story in the link above to understand and appreciate why she won the top award... how could she not! 
💦💦💦

Yet another feather in this unstoppable and ever-young octogenarian is her newsletter! She started the  Queen City Lace Makers (Ohio) Newsletter (a chapter of IOLI) late last year and has sent me 5 out of the 7 published so far! Within the first couple of newsletters one could see how much she learned and improved the presentation, layout, and format! From absolute novice to professional in a matter of 7 newsletters!!! 
Her group works on several different types of crafts and laces such as bobbin lace, crochet, knitting, and tatting, too. There is always lots of practical and inspirational information in the newsletters and often a pattern as well. In the latest issue #7 (June 2026), she included a pic of my Buttercup Trellis bracelet that applies the split/SCMR technique.   
💦💦💦

Congratulations, Donna ... well-deserved!

Wednesday, 31 July 2024

sing little birdie

Pin It now!

 The Ring of Tatters (Spring 2024, #88) newsletter I received couple of months back (https://tipsaroundthehome.blogspot.com/2024/05/reading-is-cool.html) has such lovely patterns and I hope to tat them all. I started with a little bird motif in order to submit it for the PICOT Bingo, striking off the Tat Fauna box (https://www.patreon.com/posts/picot-bingo-95729145?).

Just like it's pattern, the motif has a simple name - Bird. Made only of scrolls - rings and chains, it takes on the shape of a bird and can be tatted with a ball and shuttle. It is designed by Hannah Crowle. Worked in Anchor pearl cotton size 8, it comes to almost the exact size as the printed model.

There was a time when I kind of looked down upon simple ring/chain designs. They felt too easy and I was striving to learn so much more! And yet, getting the motif to lay fat, yet be visually identifiable and elegant, is a huge achievement and I am still not at that stage. Which is why I truly appreciate all kinds of designs.

I haven't changed anything and it was a joy to tat! Although an bead eye would look good, right? I remembered too late that I had some nice soft variegated embroidery threads (skeins) which would've looked nice instead of this solid colour. All my other variegates in tatting threads just didn't seem to cut the mark. 

This bird can be suspended or be perched on a tree and thus be eligible for the Small Decorations game I am participating in, I have already started something else for that. Stay tuned .....

Many thanks to Hannah for her cute little birdie 

Sunday, 16 February 2020

impeccable timing

Pin It now!
We all know and admire Judith Connors’ impeccable tatting, but her timing is, too! Remember how her dictionary arrived on International Tatting Day?  

This time her newsletter, ‘Talking Tatting’, arrived on Valentine’s Day! And a complete surprise since I was expecting a digital copy some day, not a physical one.
She has made certain I remember exactly which days her gifts arrived ;-D

What is even more special is that my pattern is part of their 10th anniversary celebration. It is an honour in every which way, isn’t it?! Can't blame me for wanting to shout from the rooftops.

I enjoyed reading through the entire newsletter. Informative, interesting, inspiring.
I rummaged through my numerous containers/envelopes to locate all the clover wreath lace I had made and used them to cover up the text. A few words/sentences in both images are blanked out.

The printed medallion on the left is tatted by Judith, the mat on the right is an image of the actual ecru mat you see below. She drew a diagram along with the pattern (in her own words). 
Many thanks, Judith.

I had started a border/edging for the mat, but haven’t gotten very far. Only thing I am certain of is that I want the 6 ring florets to be complete around the border. For the rest, I’d like to keep it simple and a bit airy to counter the relatively dense look.

I’m eager to get started on this again and finish it off. I’ve shared the beaded poinsettia pattern, but not the actual medallion. Thought I’d do it along with the completed edging. But if anybody wants the medallion pattern, let me know and I’ll release it. I merely need to rearrange and format the diagrams, etc.

All Clover Wreath posts, pics, & notes 

Thursday, 24 August 2017

Vintage Edging 4

Pin It now!
Here’s a respite from all those pictorials – another vintage pattern made modern and 2 separate rows converted to continuous tatting.

Vintage Edging #4
Needleart 1921 (vol 8 issue 3)

3 colours? Yes I went crazy! Remember that visit to my old craft shop after 4 years? These are a few of those lovely pastels I bought and was dying to try out! Size 20 Anchor Mercer cottons.

The 2 rows in this sampler are tatted separately using ball and shuttle. However the schematics provided in pdf are for one-pass tatting – climbing out with 2 consecutive split rings. It is pretty easy to convert vintage patterns into continuous tatting.

Learned a lesson from the CnC edging fiasco earlier. The first row should face the direction we tat in. Once this base is established, it is easier to orient later rows. 

I tried something different with the 2-coloured onion rings this time. After tatting the blue chain around pink inner ring, I made an over-under or alligator join, thus getting a complete blue circle around! No colour blips and pretty neat result, right?

Sorry no in-process pics – I was happily engrossed in tatting with these new shades!

Long picots on the onion rings are made using a ⅜ inch picot gauge parallel to core thread. Thus final picot is half the size.

Instead of lock joining the Row2 chains to these long picots, I made an onion ring join to avoid colour blips (I would’ve got pink blips over the blue picots). Then continued with a 2nd half stitch, counted as 1ds. Since core thread remained continuous, care needs to be taken when tensioning the chains.
Lock joining the chain would give a more pronounced/distinct dip.

Future Idea : Tat Row 1 and return back, interweaving the long chains. Then start Row 2 all around this ‘Celtic’ center.


happy tatting :-)

Friday, 4 August 2017

Needleart 1921 Edging 3

Pin It now!
free vintage to modern tatting pattern

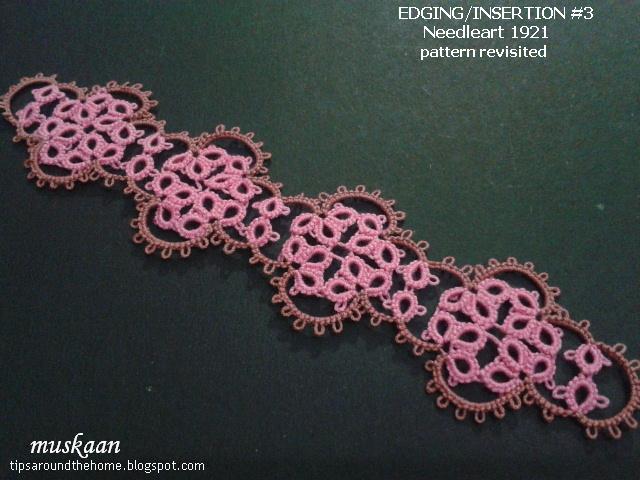
Edging/Insertion #3 Bookmark
Needleart 1921 (vol 8 issue 3) 

This is a very simple insertion – rings and chains that can be worked with one shuttle and ball. Good practice in trefoils and chains for beginners. It is a slight variation of Edging #2 which I will share later, along with a bracelet variation.

The original bellaonline article has lots of tips including how to avoid gapsosis in trefoils, and the importance of picot lengths.
I tatted it in size 40. A ⅜ inch picot gauge held horizontally is used for the central picot to which 3 other trefoil rings will be attached.
Thought about using a Swirl Join instead of central picot. But impractical to leave all those rings dangling for entire length till they are joined on the way back (see also beaded version below).

4 repeats measure about 5 inches long and 1 inch wide.

The satin ribbon is ¼ inch wide. I double-backed the ribbon and tied a simple knot at the other end.

This time the pdf does not include any written pattern. It can be accessed directly from the article. Only keep in mind that all chains are 3ds separated by picots.

TIP : when trying to figure out the stitchcount from an image, be mindful of the type of tatting. In vintage patterns we usually have traditional tatting with no distinct front or back sides. While some elements will show complete stitches, others may show half stitches at either end. Picots, or more precisely the stitches adjacent to a picot, give away the secret :-)

Had an idea to tat a bracelet, adding beads. Hmmm, size mismatch. These seed beads were too large for size 40. Abandoned and haven’t yet been able to work it in 20. Hopefully in future.

I went for a bookmark. But I’m sure you can see the numerous applications for this pattern ? Bracelet, choker, belt, .... and much more !

'Silk Ribbon Embroidery' by Ann Cox is a lovely book full of floral techniques illustrated stepwise and scenic compositions. I really did intend to embroider a few, but couldn’t find silk ribbons. Then tatting came back into my life and everything else went out ;-P

keep tatting, happily, merrily  :-)

Monday, 31 July 2017

Needleart 1921 Edging 7

Pin It now!
vintage edging revisited

My 'homework' while the Online class is on summer break was to send in tatted models and diagrams for 7 vintage edgings from Needleart 1921. All (old & new) are indexed in Bellaonline Tatting Newsletter July 14,2017. 
So while Georgia continues to enjoy her break (;-P) she has permitted me to share them here.
I won't be following the order but stay tuned ‘coz there are some interesting outcomes as each pattern caught my fancy differently !
Edging #7
Needleart 1921 (vol 8 issue 3) 


I like to study a pattern a bit (usually the image or diagram) before starting out. If that row/round has more chains &/or thrown rings, or large rings, then I prefer working it frontside.
The same principle was followed here. Started Row I with backside red rings and the blue chains along with the large thrown ring were done frontside. This also enabled me to work the rest of the rows all frontside, since they are only chains & thrown rings.

The original tatted model shows prominent picots, which is what I followed and it worked out well.
Unfortunately, that vintage pic was taken at a place which has a mistake! Took me a long time of peering closely and studying intently (going back and forth between image, diagram, and text) to figure out and dispel all confusion.

In my first sampler above I worked each row separately in an ombre arrangement. But the 3 separate rows can easily be worked continuously without cutting off thread. 
In order to work all 3 rows in one pass, the sequence of rows has to be changed from that of original. Other minor details and corrections have been included in the new standalone pdf, with corrected pattern and new models & diagram. I have tried to follow the style & format laid out in the article. 
In this second sampler,in Row I, I added 1ds to the chain on either side on the thrown ring to give it more curvature, as can be seen when the 2 samplers are compared.
Also, in order to the blue header, I used a Reverse Join between Rows II & III. However, the same can be effected by doing a lock join, then switching shuttles.


I hope to convert this edging into a necklace. Wish me luck and stress-free beadwork.

And there are lots more patterns to be shared - both vintage and the quatrefoil series :-)


happy tatting always :-)))

Friday, 1 April 2016

Look !

Pin It now!

Look what a lock join unlocked !!! Access to my very first MK pattern. My head was literally spinning with palpable excitement when this popped out of the Tatter Chatter newsletter last week (March)! Thanks to Bev, and her wonderful team at The Tatters’ Guild of Australia (NWS Branch). Their newsletter was the first to officially publish a post of mine - How to Unlock the Lock Join.

And just as I was finalizing this post, Another Huge gift arrived, just in time for ITD. Once again from Australia & probably partially connected to my Joins in Shuttle Tatting series. Judith Connors sent me a copy of her book ”An Illustrated Dictionary of Tatting” *! WooHoo – can you see me doing the happy dance ?!

In Hindu mythology, we consider Time as a wheel (‘samay / kaal ka chakra’) that keeps rolling … The Spinning Wheel glass mat symbolises how tatters across time, space & nations can come together through their continuing love for this beautiful art. We are truly joined, interlaced :-)

So what better way to celebrate International Tatting Day than dedicate it to Mary Konior, the queen of visual tatting.
I also want to dedicate this to the Wonderful online tatting community from where I have learned so much in such a short time & the community continues to inspire me in so many ways every single day, and in particular to Judith, my inspiration & guide.

Spinning Wheel Glass Mat
Mary Konior


The Spinning Wheel glass mat looks great irrespective of which colour(s)/colourway one chooses. But Diane's charcoal mat here threw up such interesting negative space designs tempting me to choose black.

In Anchor Mercer cotton size 40, black, it measures 4” in diameter.
Techniques I used :
2 shuttles CTM fully loaded bobbins .
Directional tatting
Switching Shuttles takes care of the change in chain directions (reverse chains).

It was interesting to note that directional tatting changed en bloc : while going up an arm, the rings were RODS, while returning back, chains were RODS.

If one stops at 6 arms or 7 arms, one gets a nice bowl shape – perfect for little truffles & treats to share on ITD :-)

There was a tip on Craftree to start the mat from an outer ring, so that it becomes easier to join back & tie off in the end. However, for my first mat, I decided to go as per directions.

I intend to tat another, with increased diameter like this, for my snood.  I've been collecting possible patterns but this one is exactly what I wanted !


Happy Tatting and nibbling on chocolates while you distribute tatted goodies :-)


I chose some symbolic tatting for the lead pic, alongside the Spinning Wheel glass mat –
Hold My Hand heart ( for the interlaced rings) ,
Anne Bruvold’s Hearts of Hope , and
Super 17 Butterflies to give away (one has already been given away on Sunday)

* This edition of the book is available at Lacis.com 

Related Posts : ITD 2014 - pattern