Showing posts with label curlicue. Show all posts

Thursday, 23 August 2018

spiraling into distraction

Pin It now!
Sometimes one just Has to! No excuses.


My first trials of Lenka’s Spiral Rings (her blog has some exquisite tatting and jewellery). Based on the tutorial by Ninetta. And also an attempt to try it on treble tatting as seen here.

For the braid, after first 2 rings, instead of a lock join I used the Ring on Picot method, without any join. It like it – subsequent rings remain flush, no gaps.
Notice that my failure to post the shuttle before closing the 3rd ring caused a twist.

TIP : I think the ring should be not be closed too tight as we often do in regular tatting. However, unlike my initial belief, leaving some bare thread (as in half-closed rings) is not necessary either. There is, however a design element there. If we do not close completely, we get a larger spiral compared to a completely closed ring.


Tried the counter-spiral as per instructions for the first one (3rd last from top). Works nicely, but since the ring is twisted or turned, the back comes to the front. I wanted the stitches frontside. 
There are 2 ways to do it –
  1. tat the ring backside (RODS), then pull into a spiral as instructed, or
  2. turn work, tat the ring backside (RODS), then turn back to the front and pull into a spiral. (2nd last ring from top).
I was running out the scrap thread, so managed only one spiral ring with treble tatting. It was enough to give me the confidence to proceed. I’ve been ogling at that gorgeous happy piece!

So, here is the medallion of off-side spiral rings using the treble stitch (tds). Peering into Ninetta’s model, I counted off 8tds and the exit was from the 3rd tds.
Work progresses in counterclockwise direction ie. each new ring is to the left of the previous one.
Now here again I used Patty’s ring on picot after the 1st ring. But see how close the 2 rings come? (the 2 dark pink spirals at the bottom). It looks like an overlapping spiral chain. A good design that can be used in future. But for the original effect, for the rings to curve gracefully and the spirals to show distinctly, a lock join is preferable.

No more dead end or single shuttle split chain (SSSCh) to create curlicues! These rings are so much easier!!!


So much for my distraction and fun in learning something new. Back to my other projects …. Although I haven’t cut off the thread – hoping to continue with another round(s).

Many many thanks to Lenka for this spectacular effect
and to Ninetta for sharing how to do it.

Thursday, 31 May 2018

I love floating

Pin It now!
The task was split chains and floating chains. I chose floating chains - 
also known as dead end chain, curlicue, or single shuttle split chain (SSSCh).

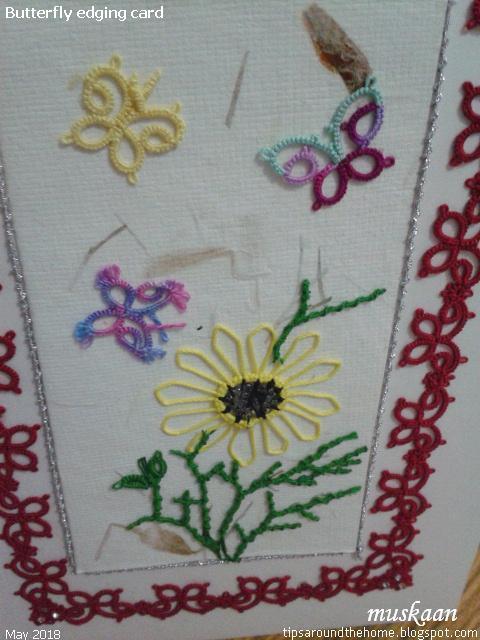
This black butterfly with curlicue antennae and the 3 with venetian picots (a variation of floating chains) was my earlier submission for the task. However I have a feeling that it was not appreciated by the ladies there. In any case I needed to complete the card topper.

I had gifted the earlier card to my SIL. MIL liked it very much, so this butterfly edging card is for her. For the card topper I used handmade paper with herbs embedded in it. I glued some folded paper underneath to raise the level slightly.

 
Rummaging through my many little scrap pieces, I tried to choose and arrange them into some collage (taking many pics to remember the arrangements) but finally settled on a fairly simple arrangement. I absolutely loved how Jane's Maltese Sunflower looked here, so that stayed obviously. And these were the only 3 butterflies that seemed proportionate.

Time to work on the foliage.... A helper thread worked wonders to wrap around the hand and hold the core thread taut while encapsulating. 
I mentioned this in my tutorial especially for fine thread, but didn't show it on the fingers.

All chains are spiral or Josephine chains. I like the texture and dimension they create without taking up too much space. In Anchor size 40, they are about 4cms tall maximum. 

While working on the foliage my Lizbeth specialty packs (size 20) arrived and I made one more butterfly using floating chain tipped with a Josephine ring for each antenna. 
Unfortunately it was too large for this scenery at 2-2/5×2 cms (2½cms high with antennae). 

 
The tatting SOUP has been arranged then glued! 
I deliberately followed the slant of the herbs in the handmade paper - it is what inspired this nature collage. But it still needs some balance and sparkle.

3 Swarovski crystals glued inside corner florets. 
Unfortunately, my stash was lacking in anything smaller for the rest of the florets. 

Added another little foliage on top of flower. 
And to echo the crystals, I tatted and glued a Josephine chain cord using metallic embroidery thread all around the topper. 
The core is size 40 crochet cotton for easier handling.

TIP: When making long JChs, I like to wind the chain thread on a shuttle too. 
It is convenient to dangle the shuttles and maintain the twist within both threads.


There seems to be something missing along the outermost edge or periphery - too plain. 
Any ideas to bring it all together? Another silver chain all around? 
Or 3 crystals in each corner? A mirror in each corner?

Check out what the others have made here.
With the exception of the sunflower, the entire card topper collage is worked with one shuttle and ball. A 2nd shuttle was used only in case of 2nd colour or for convenience. There is no dearth of techniques and effects that can be created with a shuttle - including the many variations of SSSCh or floating chain!

under appropriate headings. 

hope you have a great day with lots of creative tatting floating in ! 

Saturday, 19 May 2018

I love butterflies

Pin It now!

Garden soil had been split open to sow seeds and now those seeds have split into plants with lovely blooms, attracting butterflies to split open the pollen sacs and carry on the circle of life.
Hey, don’t split!!! Promise, I’ll behave … Just trying to clue you in :-D


You have already enjoyed & appreciated the lovelies made by friendly tatters. These are my versions of make me pretty butterfly fun. And the ‘split’ comes from this month’s I Love Tatting task set by Justyna – split chains, curlicues, etc. She has compiled an incredible list of tutorials and free patterns for inspiration!
I actually have something more in mind for the task, but till I find time to tat it, this will have to do. 

Tutorials for most of the prettifying techniques mentioned here are listed on these pages -

In chronological order … I have literally used scrap threads for most.
Venetian Picots for antennae, dot picots and graduated picots
Here, I made the same mistake Lavi made, but didn’t bother to rectify it. 
These were my very first venetian picots!!!
3¼ x 2½ cms in Anchor 20 cotton

Graduated picots and twisted picots (floating)
2 x 1½ cms in 2 strands of Anchor embroidery thread

Venetian picots for antennae & 4 picots
2 x 1½ cms in Anchor size 40 cotton
The Venetian picots worked out much better in this finer thread.

Right after posting the pattern, I tatted the above 3 versions. Some of the following versions were inspired by the butterflies flying in (Anita, Denise, Ninetta).

Twisted (floating) picots and seed beads
3 x 2 cms in 3 strands of Anchor embroidery thread.
This was inspired by Denise’s 3 beads in the lower half.

Dot picots and decorative picots
This is based on Anita’s stitchcount. I like the broader span of top wings.
2¼ x 1¾ cms in Lizbeth & Anchor size 40 cottons

Since this project was a spin-off from the Common Mormon caterpillar, there just Had to be a couple of butterflies in black and yellow ...
Beads and floating beads in different arrangements
I tried something different – beaded string wrapped around the lower rings. 
These are longer than I had visualized, but let them be.
The antennae uses floating beads (FB) or fringe on chain method.
2½ x 1¾ (or 2 with bead string) cms in Anchor size 40 cotton

The wooden black bead was too large and unseemly. So I decide to remove it. 
Wasn’t as easy as I’d thought. The FB method really does hold the beads in check ;-P
Then I remembered a tip on Jane McLellan’s blog about breaking unwanted beads. 
Yes, that worked! Once broken, I inserted a scrap thread for better grip, and knotted the tips.

Onion rings (Josephine rings inside the upper & graduated picot rings inside the lower halves), twisted (floating) picots, and Curlicues (dead end chains or SSSCh) for antennae.
3 x 2¼ cms in Anchor size 20 cotton
I started with a knot for each curlicue, serving to hold in pinch, 
and worked back with unflipped stitches.

Inward picots, decorative picots, long picots, a head ring, and Venetian picot for body. 
I followed Ninetta’s directions
2 x 2¾ cms in 3 strands of Anchor embroidery thread.
  
 
A couple of side views to show the 3D effect.
When making the Venetian picot, I left the scrap thread in it and 
this served well when joining the next ring to it.


I include the Venetian picot in this month’s kocham frywolitkę task because both the curlicue and this picot are standalone or floating chains. Although in the former the stitches are unflipped and wrapped manually, in the latter each half stitch is flipped but moved in place manually over the previous stitches.

I couldn’t resist a couple more pics.
 
The background is Monet’s White Clematis an oil he painted in 1887. 
The image is in this amazing book The Life and Works of Monet by Susie Hodge.

UPDATE : My latest butterfly with floating chains tipped with Josephine knots for antennae....


Do stop by to welcome this batch of butterflies :-)

UPDATE - New arrivals (2020) from talented tatters -
 https://tipsaroundthehome.blogspot.com/2020/07/welcome-intrusions.html

Wednesday, 18 March 2015

Dead end start to Split Chains

Pin It now!
All Coiled Up, Curled & Cozy !
No intention of boring my dear dear readers by revisiting same stuff …. 
Just thought it might still be helpful to anybody who is interested & wants to apply them to their tatting . 
And I Love curls, coils, curlicues – the shape is just so elegant and free flowing !

A brief background
It all started with this thread in Craftree and Lynn directing us to this video tutorial by Karen Cabrera, as a possible technique to apply. Well, it Was !!! And hugs & thanks to Lynn for opening up a wonderful world of Karen’s videos as well as the possibilities these curlicues have for free form/free style tatting.  

Dead end start to normal Chains
One can start a dead end chain by inserting a paper clip (Frivole) , a very small picot (Martha Ess), a lock stitch (Sue Hanson), or nothing at all (Frivole) like I did with this I Love Tatting Doodle (where no picot space was required). It is fairly easy to do it when working normal chains, where stitches are flipped, because one has the chain thread to grip, hold, & anchor. {Click on each of these for direct link to tutorials/tips. Also listed in the Resources Page.}

Neither of these techniques is, however, possible in case of a dead end start to Single Shuttle Split or Floating Chains

While browsing for more tutorials to add to the Resources page, 
here's a Gem I found ! 
Superb description & explanation by Elgiva Nicholls . 

WHY ? .... Because ....
  1. the stitches are not flipped. When all stitches are Unflipped, how does one make a Lock Stitch ?!
  2. there is no chain thread to grip & wrap around the fingers while tatting, to hold taut.
  3. there is no place (thread or element) to hold in a pinch while beginning the SSSCh. Nothing to anchor one’s tatting.
But what if one wants a “pure coil”; a simple curvilinear chain ?!

To overcome these problems, one needs , first, an anchor & grip of some sort.  Following are my solutions mainly in notated picture form with some general/overall tips summarized at the end of the post. 

Possible Dead End Starts to 
Single Shuttle Split Chains / Floating Chains
Please Note : For the main movements on how to work the chain, please refer to Karen’s video tutorial. 
I am only illustrating a few options to begin a dead end split chain , which have worked for me. 

Size 20 , 10 or thick threads ….
Clockwise Curlicue
For Size 20 or thicker thread , use a pin , a safety pin, paper clip, needle…..   
Measure the length of chain (curlicue) you desire, & make a very simple SLT-type Single knot on the pin at that point. (This kind of acts as a Lock Stitch later)
Note that since it is a SSSCh, we are working with a pulled-out length of Shuttle thread only !  


Counter-Clockwise Curlicue
These curlicues can be made in either direction ; clockwise as well as counterclockwise.
The above 2 chains were made starting from left to right, resulting in a clockwise coil.
The following chain will be made starting from right to left, resulting in a counterclockwise coil.
In both cases, Reverse Stitch is being used (also called 2nd half of Split ring method, lark’s head knot,  unflipped stitches/hitches, encapsulation, etc. )
In Jane’s pearl tatting, if one uses Sh2 movement in SSSCH, then one gets a clockwise curlicue ; if one adopts Sh1 movement, one gets an anticlockwise curlicue.
In my photo-tut, pics 3B to 3H illustrate the loop & shuttle movements in order to work the RS with caps facing on top of core thread.

One must remember, though, that in case of these counterclockwise floating curlicues, one is working from right to left. Order of hitches/unflipped stitches remains the same – 2nd half then 1st half, & repeat…

Theoretically, one could RW & tat the counterclockwise curlicue as the clockwise one. 
But I could not handle it - there are too many things going on : no place for a proper pinch ; 
short length of core thread ; And the tatted part comes in the way of shuttle movement, if Reversed ! 

For Finer threads : Size 40, 80, etc. or rayon, silk, …
A pin worked fine when working with size 20 thread. There is no space/gap at the beginning of the chain. However, this same pin proved too big when working with fine threads such as rayon & silk as I did in this Tatting for Holi composition.

My solution for fine threads – use a length of sewing thread in place of a pin ! For medium-sized threads, dental floss, fishing thread, etc. can be used. Rummage through your sewing kits for the right size of thread to start the curlicue !

Following images demonstrate some key steps in starting a dead-end Curlicue


Some Useful Tips :
·       When you pull tight, after removing the pin / auxiliary thread, a Lock Stitch effect takes place & the end ‘hitch’ gets locked in. You can push the hitches all you want, but they will stay as a curve ! No gap / space is seen at the start, once the pin/thread is pulled out & hitches snugged against the starting point.
·       For greater coiling effect, pull the hitches snug ; the tighter or closer they are, the greater the curve.
·        However, the hitches themselves should not be made too tight. Otherwise they will not move neatly, smoothly, easily over the core thread to form a coil.
·        I prefer using a pin/needle for counterclockwise SSSCh, because it can be pierced through fabric/mattress, thus keeping the work steady & anchored, & also keeps the core thread taut to make hitches.
·        Choice of pin, thread, yarn, wool, or floss would depend on the size of tatting thread one is working with. For 20 & above, pin is fine. For 30 & 40, floss would work. For 80 & less, any appropriate sewing thread can be used.


I  concede that reading or simply viewing the pics might be a bit confusing. 
But once the shuttles are picked up, it all "clicks" together.
happy tatting :-)

Related posts
https://tipsaroundthehome.blogspot.com/2018/05/i-love-butterflies.html 
https://tipsaroundthehome.blogspot.com/2018/05/i-love-floating.html