Showing posts with label Tatting joins. Show all posts

Tuesday, 29 May 2018

Mock Rings 1 U-O Join continued

Pin It now!
In my haste to upload, I missed adding some details to the pics in previous post. These have now been notated and updated.

Continuing from previous post ….


The following are again mock rings made using the Under and Over Join. But we now have a tiny picot at the start of the chain. When the chain is joined back to this picot, it creates a mock or false ring.


1C. Under and Over Join: With joining picot; Unattached rings

 
 Make a small picot at the base of the chain before tatting the ‘ring’ portion.
Since the mock ring is unattached, it is easy to place 
one thread above and other below the chain.

 
Pull up a loop of ball thread through the picot, pass shuttle, and snug. 
A simple picot join converts this chain into a mock ring. Continue tatting.
Note: Although we have made a picot join, this arrangement of joining an overlapping chain is included in under-over join. 

 
This time the shuttle thread is below and ball thread above.
Pull a loop of ball thread down through the picot, pass shuttle and tension the join.
Two unattached mock rings made with under-over join 

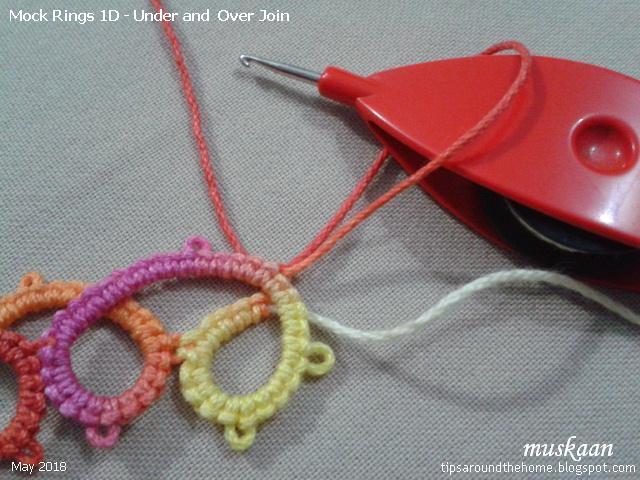
1D. Under and Over Join: With joining picot; Attached rings

 
Here the ‘ring’-chain is linked to previous ring and both threads are above the chain.
Pull ball loop down through picot, pass shuttle and make the join.
This is reminiscent of the down join.
 Continue tatting.

 
For mock ring #8 both threads are below the chain. 
Pull up a loop of ball thread through picot, pass shuttle and snug the join.
Notice the change in overlap between mr7 & mr8! Continue tatting.


as seen from the back.
This above sampler, with joining picots and overlapping chains that form loops is also known as the Running Scroll, for it’s flowing cursive style.


This join can also be used to create a line of back to back rings – called a Cord of Loops. We now prefer to work this as a split ring braid or mock rings with a flatter closure. The latter will be discussed in future posts.

Observations
  1. In all these mock ring instances, the core thread remains free to slide.
  2. They can all be worked with a ball and shuttle.
  3. All mock rings face the same side as the normal first and last rings when we reverse work after first ring.
  4. The under and over join creates a slight overlap/layer when crossing over, giving the mock ring a dimensional effect rather than lying absolutely flat.
  5. The overlap changes depending on which type of crossover we choose.

This completes the first category of mock/false rings using a join across a chain.
But there are so many more ways of joining or closing a chain to create a faux ring. While I work on that presentation, I invite you to sit back and recall all the different ways in which you may have made mock rings. It is quite an eye-opener. Please share your list in the comment box in case I have missed some.


Main references:
Tatting Technique & History – Elgiva Nicholls, 1962. (running scroll & cord of loops explanation  on p94, models on p96)
An Illustrated Dictionary of Tatting – Judith Connors, 2007.

…. to be continued 
See also -
https://tipsaroundthehome.blogspot.com/2018/05/mock-rings-1-under-and-over-join.html
https://tipsaroundthehome.blogspot.com/2018/06/mock-rings-2-lock-join.html
https://tipsaroundthehome.blogspot.com/2018/06/mock-rings-2-lj-mock-onion-rings.html

Monday, 28 May 2018

Mock Rings 1 Under and Over Join

Pin It now!
SCMR is a mock ring, but not every mock ring is a SCMR (self-closing mock ring).
While trying to explain this to someone who used SCMR as a default term, I started to remember so many different ways a mock ring can be shaped.

Mock Rings have been around for centuries. A mock ring is essentially a chain that is joined back on itself to create the impression of a ring. The difference lies only in the way the chain is closed.
In order to avoid overload I will break up the presentation into segments. This post covers mock rings made using the Under and Over Join.

Mock Rings 1: Under and Over Join


Once the tatted chain was invented, it was a simple step to convert it into a mock ring using an Under and Over Join - with or without a picot. Under and Over Join is a type of ‘across’ join, allowing us to move threads to the other side across an existing element.

A single shuttle filled with cream thread and a ball with variegated colour are used for clear distinction in this pictorial.
There are 5 stitches between every picot; each ring is 5-5-5-5 & chain 5-5.

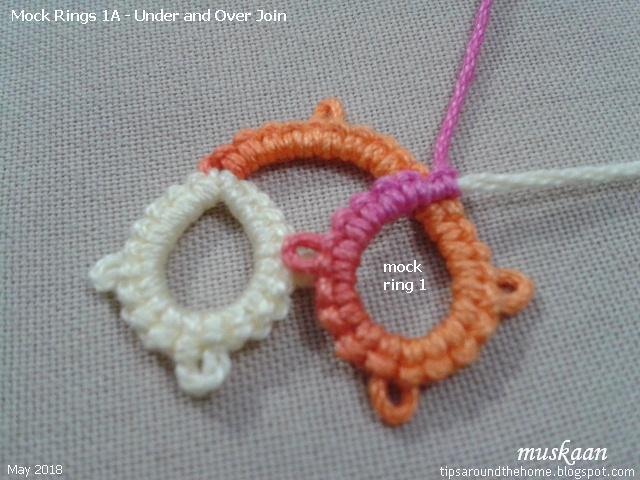
1-A. Under and Over Join: Without joining picot; Unattached rings

After a normal ring (cream), RW and 5-5 chain (above pic), we start working on a long chain (5-5-5-5) that will form the mock ring. 
 

Place shuttle thread above and ball thread under the chain. Continue tatting the chain normally, enduring that the first half stitch after the crossover is nicely snug.
A mock ring is made, with the chain (running scroll) moving across from above.

Note: Because of RW, the mock rings face the same side as the first normal ring.
We know this popularly as Alligator or Capture Join.


Let’s see what happens if we switch thread positions (ball above and shuttle under). 
It is difficult to control the shuttle enough to get a continuous chain above. 
But it can be useful in directional (fs/bs) tatting when working from the back side.

This method is useful when the elements (in this case mock rings) are free/unlinked and the threads can be positioned on either side.
But if the ring is attached to previous element, here’s how the join can be made.


1-B. Under and Over Join: Without joining picot; Attached rings

After linking the chain to previous ring, both threads are in front of/above the chain.
Pull a loop of ball thread down from under the chain, pass shuttle through loop, and snug tightly. Continue tatting chain.

In this case, after linking the chain, both threads are below/under the chain.
Pull a loop of ball thread up, pass shuttle through it, and snug tightly. Continue tatting chain.

This pulled loop is very handy when crossing over any previous element as in faux Celtic tatting. I used it in Teri Dusenbury’s Flurry snowflake. The pattern instructed slipping the long ball thread through the spaces and tatting the chain (as in #1A or alligator join). It was cumbersome and prone to tangling. Pulling a loop through the joining point is a quicker, more efficient method.
I made this in 2015, but am unhappy with my work.

This is a view from the back.

Without a joining picot at the start, there is greater flexibility in shaping the mock ring, but one also has to be extra careful to see that the ‘join’ is snug and secure. Adding a small picot at the start of the chain ensures accuracy and stability. I will show this in next post, along with some observations.


…. to be continued
Till then, enjoy tatting all over :-)))
See also -
https://tipsaroundthehome.blogspot.com/2018/05/mock-rings-1-u-o-join-continued.html
https://tipsaroundthehome.blogspot.com/2018/06/mock-rings-2-lock-join.html
https://tipsaroundthehome.blogspot.com/2018/06/mock-rings-2-lj-mock-onion-rings.html

Monday, 4 April 2016

Shuttle 2 to the Rescue !

Pin It now!
JOINS  IN  SHUTTLE  TATTING
IN SEARCH OF COMMON PRINCIPLES
PART – II

CATEGORY I. ABOVE  (contd.)

A Brief  Recap :
When a link needs to be made to a previous element Above the line of present working, the ball/SH2 thread is closer to the joining picot. Hence SH2 thread comes into play in the Picot joins (up, down, in a circle, swirl join)  the Lark’s Head Picot Join as discussed in Part I. The remaining joins in this same category are discussed below. 

Abbreviations used here :
SH – shuttle
SR – split ring
DS – double stitch
LHPJ – lark’s head picot join
RS – reverse stitch (unflipped stitches)
hs – half stitch
uSHS – unflipped 2nd half stitch
LJ – lock join

About Pics :
In the tatted samples worked in size 20 thread, yellow represents core/SH1 thread ; aqua blue represents ball/SH2/auxiliary thread ; black represents a previous tatted element with a picot to which current working needs to be linked.

A Note of Caution on Colour Blips/Spots:
I have used a 3rd colour (black) to represent a previous element. However, in actual tatting, when working with 2 colours, this previous element may be the colour of either SH1 or SH2 thread. When joining picot is the same colour as the stitch colour in present working, colour blips may not be visible.
For example, in LHPJ, if black, which has the joining picot, was substituted with aqua blue (SH2), no colour blip will show on back side. But if black is substituted with yellow (SH1), a colour blip will be visible on back side.

Rule : In two-colour tatting, if joining picot from previous element and current stitch are of same colour, colour blips/spots are usually not seen on the front side.

I.3 Joining the Second Half of a Split Ring  :
While linking the 2nd half of a split ring (SR), the picot may seem to be below the ring being made, but notice the caps on the two elements : they face each other. Hence it belongs to the ‘Above’ category of joins. 
Pic 6.  Explaining the visuals for Part II
A split ring has two halves : the first half (yellow in pics) is worked like a normal ring with flipped stitches or DS and any links on this side will include the Picot Joins and LHPJ (Refer I.1, I.2). The second half of a SR is made with reverse or unflipped stitches using SH2 and the SH1/core thread shuttle is not on hand. Thus the linkage calls for slight modification of movements, to ensure the core thread continues to slide freely after the join is made.
There are 3 main ways to accomplish this linkage :

I.3.a  Split Ring Join 
UPDATE: Reverse Stitch Join is a better, generic term since the same method/join is used in case of direct tatted chains, etc. The join is basically a feature of the reverse stitch, and not the element.
aka Transitional join10, Split Ring Core join11, Join to second side of SR12, Joining second half of SR13.
One comes across different names, as listed above, but the basic movement and formation remains the same. They have, therefore, been clubbed together under ‘Split Ring Join’ in order to distinguish this formation from 1.3.b & c.

  • A loop of SH1/core thread is pulled Up or Down through picot, and SH2 is passed through it. The core thread is then tensioned so that it ‘pops’ back from the picot with the SH2 thread wrapped around it.
  • It allows core thread to slide freely.
  • This join can be counted as a hs.
  • An up loop creates a colour blip on the front side; a down loop creates a colour blip on back side. Hence when working with 2 colours, use a Down loop to keep colour blips at back of work14.    
  • Any element (ring or chain) worked with RS can be linked with this join.
  • It follows the basic principle of a picot join.
Pic 7. Split Ring Join made with
Up & Down loops

(click on image to enlarge)

Rule : It is advisable to keep the loop that is pulled through joining picot untwisted while passing shuttle through loop for making any join.

I.3.b Lark’s Head Picot Join with Shuttle 2 (S2LHPJ) 15
This is a slightly elaborate multi-step procedure to wrap and flip a complete DS within the joining picot, thus creating an “invisible join”. While the 1st half of a SR can be joined using a LHPJ, the 2nd half needs to be wrapped a bit differently.   
  • 1uSHS is made outside the picot, before commencing the linkage formation within picot.
  • A loop from SH2 is pulled up through picot and SH2 passed through loop. Several ensuing movements enable the formation of a DS which is snugged into position. 
  • The join is counted as 1 complete stitch and lies within the picot.
  • Useful for smooth visual effect, with a continuous line of stitches.
  • A colour blip will be seen at the back only if joining picot is of different colour.
  • Any element (ring or chain) worked with RS can be linked with this join. 
Pic 8. Lark's Head Picot Join
made with Shuttle 2 (S2LHPJ)

I.3.c  Lock Join with Shuttle 2 thread
A third way to join SR is with a lock/shuttle join using SH2.
  • Pull a loop of SH2 through picot, pass SH2 through loop, adjust  tension carefully.
  • It locks the SH2 thread, while keeping SH1/core thread free.
  • This is a very easy and quick method. But care must be taken to position the thread carefully before final tensioning.
  • It does not create much of a colour blip.
  • It leaves a visible bump/bar along the line of stitches which may not be visually appealing.
[update] This join is also used in Inverted Tatting. Also called Ball Lock Join - http://www.georgiaseitz.com/2004/joins/mminvertedtat.jpg 
Pic 9. Lock Joins using Shuttle 2

The ball thread join 16
A decorative variation of LJ with SH2 which can be employed in all kinds of rings and chains.   
The movements of I.3.c are followed, but a space of thread is left on either side. (refer Pic 9)
The bare thread space of SH2 before and after the LJ imitate the picots in the element being worked. Thus the actual join is not placed in line with the previous stitches; it is placed at the tip of a mock picot. It enables the tatter to maintain, and continue with the decorative look of the element which is being linked.


This completes Category I. 
In Part III we will consider Category II where links are made Across elements.

Feedback, correction, or addition is welcome.
I will convert this entire series into a pdf file for easy reference, with requisite updates and modifications. 

Related Posts : Demystifying Joins  
_____________________________________________ 
Footnotes & Tutorials (Part II) :
14 Most tutorials show the Up loop being used to make the Split Ring join. Compare the up & down loop, as well as the SH2 movements in the collage picture.
15 Lily Morales 2003 
16 Martha Ess The instructions & pictures are shared in her Butterick Butterfly Bookmark pattern.


Friday, 4 March 2016

Demystifying Joins

Pin It now!

What started out as a simple project to understand the numerous joins we come across in tatting, has overwhelmed me. New as well as experienced tatters often ask “How do I make this join?”, “Do I know this join?”. Often, it is a join we know but is named differently. We think we’ve solved one question, learned a particular join, & another pops up! This has caused many bumps in my road of discovery, throwing me out of joint. After working on & off for the last several months, I have finally decided to post the work as a series. This will help me refocus my energies on smaller sections, and will keep the reader interested. It will also give me a chance to add or amend, based on feedback.


JOINS  IN  SHUTTLE  TATTING
IN SEARCH OF COMMON PRINCIPLES
PART – I

I would like to thank each person and resource named, including the many unnamed and unaccredited who have helped develop this beautiful craft/artform. 
A very special thanks to Judith Connors. 
Any error or oversight is solely mine .

Fundamental Principle : Nothing is sacrosanct. Choose what works best for you and the pattern. However, be open-minded. There is no harm in learning new options.

This is not to say that the evolution, history and development of tatting does not matter. It does, and we continue to learn from these, build on these, or create independently. They can, and do, cause duplication, multiplicity of terms, redundancy, overlap. However, nothing may be regarded as obsolete. The following is my attempt to make sense of it all: arrange all the joins in a conceptual framework, join the dots. 

Again, what I write here is not sacrosanct. It is simply my attempt, with the limited resources at my disposal, to clarify my own thoughts. It is not a tutorial, but a collation and annotation of various tutorials and terms (with links/references provided). An image/collage of each join is inserted as a quick visual reference only; for detailed tutorial of each join, refer to footnotes and links provided at the end of each Part. A tabulated chart for a bird’s eye view of the main/common joins is also part of this study. Considering the prolific creativity of our tatting community, I strongly sense that this will remain a work in progress. I invite you to contribute any information to make this more comprehensive & up-to-date.

Limitations :
  • This study is largely based on shared online resources & popular terminology. Of the large number of online tutorials, only a few are provided, due to obvious constraints. Any omission is unintentional and regretted.   
  • Some of the terms I have used for categorization and description may be arbitrary – best suited or limited to this discussion.
  • Some common “threads” have emerged from a study of the various joins. I have tried to encapsulate them into normative rules & general principles. There may be exceptions.
  • The study is limited by my own learning & understanding at this point in time.

Abbreviations & Explanations of Terms used :
DS – double stitch, double knot, double hitch, double, lark’s head
hs – half-stitch in a DS
fhs – 1st half-stitch
shs – 2nd half-stitch
cap – the horizontal bar over a DS
legs – the two vertical bars under the cap of a DS.
core thread – the thread on which DS are made & slide.
RODS – reverse order double stitch used in directional tatting.
FS/BS – frontside/backside tatting or directional tatting.
RS – reverse stitch, unflipped double stitch, lark’s head, 2nd half of split ring stitch
SH1 – shuttle 1 .
SH2 – shuttle 2.
SR – split ring
Joins (in alphabetical order) :
CWJ – Catherine Wheel join
LJ – lock join
JSS – Join to smooth side
OTT – over the top join
PJ – picot join
RJ – Reverse Join
S&RJ – slope & roll join

Notes :
  • The term ‘join(s)’ is used in the noun form throughout the text. To indicate action, ‘link/linking’ has been used, to distinguish it from the Join itself.
  • Almost all joins can be made without a 2nd shuttle (if working with 1 shuttle & ball) ; it is just that getting the ball to pass through a loop, as required in some joins, is not convenient !
  • Throughout the discussion, SH1 is considered to be the core thread over which DS are made. SH2 is the shuttle that forms the stitches in chains hence also called the chain, ball or auxiliary thread. Where the join can be made easily with a ball, it is mentioned. (refer to pic1 below)
  • While a join can be made directly between the legs of a DS (as in onion rings, coils and Catherine wheels), for the present purpose, all joins are made through a picot, unless otherwise stated. And this ‘joining picot’ is on a previously tatted ring or chain.
  • Unless otherwise indicated, all joins have been started by bringing the loop Up through the joining picot, as seen from the front. Make required adjustments in backside tatting.
  • For consistency, I have counted the join as fhs throughout, continuing with shs, wherever applicable.
  • Some alternate names that one may come across are added within brackets or at appropriate place.
About Pictures  :   
Pic 1. Explaining the visuals 
  • All tatting is accomplished with Anchor Mercer size 20 thread.
  • Black thread represents previously worked tatting which has a ‘joining picot’.
  • Yellow thread is the SH1 or core thread.
  • Aqua Blue thread is the SH2 thread which represents the stitches formed. 
  • 3 colours have been used only for visual differentiation & clarity.
********************************
WHAT  IS  A JOIN ?
It is a method to link, bring together or connect two or more elements/pieces and secure them in place. Over 160 years ago, tatting was done with a single shuttle. Motifs were worked individually and then joined together with tiny knots or with a needle and thread to create a fabric. Directions for joining at a picot (PJ) were published in 1851. This was a revolutionary step in the evolution of tatting as one could “integrate the tatting in progress with a piece of tatting previously accomplished” 1   

Basic Movement :
This requires three simple steps :
  1. Pull a loop through the picot or point where linking is required,
  2. Pass the shuttle through the loop.
  3. Tension and snug.
From this basic movement arise various modifications and adaptations. Hence the plethora of terms and techniques.

Variations in Step 1 :
1a. Pull loop up from back to front (Up join)
1b. Pull loop down from front to back (Down join)
1c. Loop pulled is from SH1 (eg. LJ, S&RJ, RJ)
1d. Loop pulled is from SH2 (eg. CWJ, JSS, LJ, S&RJ, RJ, ball thread joins)
1e. No loop, just threads across an element (eg. Over & Under, Wrap, Alligator, OTT joins)

Principle : Most joins can be made by pulling the loop either up or down. This provides the flexibility needed in directional and 2-colour tatting.
Rule : Thread/shuttle closest to the point of linking is used to make the join.

Variations in Step 2 :
2a. Pass SH1 through loop (eg. PJ, LJ, S&RJ)
2b. Pass SH2 through loop (eg. CWJ, S&RJ variation)
2c. Thread from Other shuttle is encapsulated within (eg. CWJ, RJ,)
2d. Thread from Other shuttle is not encapsulated within (eg. LJ)

Principle : Any, & I stress, entire project can be completed with just TWO joins – the picot join & the lock join, preferably working with two shuttles for a free-sliding core thread throughout. All other joins are a modification of these basic joins for the purpose of beauty and perfection; smoothly curved chains; even-looking and complete stitches; avoiding colour blips in 2-coloured tatting; ease of switching colours; etc.
Rule : Encapsulation of auxiliary thread eliminates the colour ‘blip’.

******************************** 

CATEGORIES
I have tried to divide joins into three categories for better understanding. However, there is still a lot of overlap and variation within a join. Think of it as a Venn Diagram or Olympic Rings where certain characteristics of individual joins can be common.

I.       Above : when the caps of both the joining elements face each other
II.     Across : when one element needs to cross to opposite side
III.  Below : when the caps of both joining elements face in same direction (parallel).

Each type of join discussed below is accompanied by one or more links in the form of original source, tutorial, or description arranged chronologically at the end, along with additional references. This is not an exhaustive list.

I. ABOVE - when the caps of both the joining elements face each other
All these joins are used when we need to link to an element that is above the line of working. In these cases, the chain/ball/auxiliary/SH2 thread is closer to the joining picot while the core thread (SH1) is further away.

I.1 Picot Join (PJ) aka traditional join, regular join, normal join, basic join, up join.
This is the basic of all tatted joins.
  • It allows the core thread to slide freely.
  • It can be done with single shuttle.
  • A bit of vertical thread/leg is visible within the joining picot, & may be counted as a hs.
  • It makes a colour blip at the back, when using 2 colours.
  • It applies to both rings and chains.
  • It is used in Folded Join, ANKARS tatting, Curled Rings.
  • It is the most commonly used join when adding beads to tatting.
  • When multiple rings/chains are joined to a single long picot, PJ is commonly used.
Rule : Some joins are considered in the stitch count (counted either as one half-stitch or as 1DS). There are tatters who choose not follow this practice.
Pic 2. Picot Join - Up & Down as seen from front & back
Variations
I.1.a  Down Join  aka  downward join
This is a PJ performed in the opposite direction, i.e. pulling the loop down, instead of up through the picot.
  • It allows the core thread to slide freely.
  • It can be done with single shuttle.
  • A barely visible horizontal bar is formed in front. In single colour tatting, this can be followed by shs to mimic a complete DS 2.
  • It places the colour blip at the back of work.
  • It is used in directional (FS/BS or RODS) tatting and, sometimes, 2nd half of split-ring joining in order to keep the colour ‘blips’ at the back of the work.
  • It can be used in the Folded Join.

I.1.b  Joining in a Circle aka joining last ring to first, joining first ring to last 
UPDATE May 23, 2017 :
This category can be termed Picot Join to the Right. See detailed explanation here  
Inward or outward facing rings can come together to form closed shapes or medallions where the last ring needs to be linked back to the first ring. At times, this can cause the joining picot to twist. Following are the ways to accomplish a twist-free join.
Also note that the same applies to a chain, when it has to be linked to the right.

Folded Join (FJ)  aka Twisted Picot Join
This is needed when linking the last ring to the first ring of a circle. It is simply a way of folding the tatting to get better access to the picot, and also prevent it from twisting when ring is closed.
  • Basically employs a PJ – either Up or Down join.
  • The joining picot is deliberately turned/twisted before pulling loop through it to compensate for the fold. The deliberate twist eases/untwists when the join is complete & ring is closed.
  • May take some practice to master it.
  • The linking may be made from the back side 3.
  • Most tutorials show outward facing rings, some show inward facing rings 4.
Avoiding the Folded Join 5
The last ring can be linked to the first ring easily without a FJ, in a PJ movement.
  • Basically employs a PJ – either Up or Down join.
  • It entails a simple reorientation of last ring in relation to first ring before linking.
  • Is applicable to both outward & inward facing rings.
UPDATE Sep 2018 : pictorials Part 1 ; Part 2 ; Part3
Pic 3. Avoiding a Folded Join
Riego Join
A slightly different way of achieving the same objective.
  • Before starting last ring, required length of thread is cut off & pulled through picots on both sides. Thus the core thread is linked before tatting the last ring. 6
  • Can be used to complete a circle of closely tatted rings.
  • Useful when tatting individual or separate motifs or if one is running out of shuttle thread.
  • The last ring is finger-tatted.
I.1.c  Swirl Join 7
The name refers to the visual effect created by joining multiple elements together.
  • It is a normal PJ
  • The join is made at the very end, while tatting the last element.
  • It is useful in linking more than 2 elements (usually rings) at a single point, in one motion.
  • A single loop in pulled through all the picots simultaneously & shuttle passed through.
  • It creates a swirling effect when the picots overlap in the centre. Hence length of picots is important.
    Pic 4. Nina Libin's Swirl Join & Wrap Join
I.2  Lark's Head Picot Join (LHPJ)
It is an “invisible join” since it forms a complete stitch within the joining picot. It can be applied to both rings and chains.
  • It creates a continuous/smooth/unbroken chain or ring by mimicking a DS.
  • The join is counted as 1DS and usually included in the stitch count of segment before the linking occurs.
  • It is an extension of the PJ
  • The formation can be done in one continuous motion by pulling a single loop through picot & arranging it like a lark’s head before passing SH1 through it. Thus the DS is ‘pre-shaped’ & snugged together in correct order. 8
  • Alternatively, the formation can be split into 2 motions : each hs is formed separately by pulling a loop through the picot once for fhs & again for shs. Each loop is twisted in a certain direction before passing SH1 through it. Each hs is snugged before starting the next. 9
  • Useful for smooth visual effect.
  • It creates a blipless join when working with 2 colours.
  • Can also be used in SR (to be discussed in Part II).  

Pic 5. Lark's Head Picot Join 


To be continued …
UPDATE : Part II - Shuttle 2 to the rescue 

********************************
Footnotes & Tutorials (Part I) :
2 A Study of Tatted Joins (2004) – up, down, shuttle.
The Basic Picot Join – Jennifer Williams (2011)
3 Folded Join by Lisa C Trumble (1992) 
Folded Join by Jennifer Williams (2010) 
Twisted Picot Join by Ann (2010).  
4 Finishing a motif with a folded join by Heather Tatter (2011) 
5Joining the last ring to the first. Method 2 - Jennifer Williams 2010 (outward facing rings)
Tatting Tip: Avoiding the Folded Join by Heather Tatter 2011 (inward facing rings)
Joining First Ring to Last Ring Jane Eborall 2012  (outward facing rings)
Outward facing rings join Jackie Reynolds
6 Lesson 113 video by Karen Cabrera  
The movement is similar to interlocked rings where instead of posting shuttle through previous ring, we are posting cut thread through joining picots.
7 Swirl Join by Nina Libin (2012)  
8 Lark’s Head Picot Join by Lily Morales (2003) 
9 LHPJ the Krystledawne way by Krystle Pyette (2012)


For a collection of great tutorials on a range of joins, please visit :
Additional reference : Elgiva Nicholl’s Tatting :Technique and History (Dover) 1962   


Motif #25 of III for 25 Motif Challenge