Showing posts with label designing. Show all posts

Sunday, 2 August 2026

time to play again

Pin It now!

I wasn't going to, honestly, I had no intention of doing a design-along challenge this year! But then I made this simple motif to show the common picot and it looks cute, quick, and easy enough to work as the starting motif for a DAL, right? 

Disclaimer - The design is so basic that I did a quick image search for a similar pattern done before, but couldn't find any. I used my own count without referring to any previous pattern. Yet, if you know of any, please do let me know.

So what is a DAL, you ask? 

  • Design-Along (DAL) is a little game I 'invented' where I give you a starting pattern. You tat the motif and then you have to continue by designing and tatting your own round or rounds to it. 
  • In this 2-round motif no special techniques, no special effects are used, hence it can be a good stepping stone for relative beginners to design another round.  
  • The motif can be tatted as separate rounds (like in my model) or you can climb out with a split ring.
  • Feel free to add more picots to these two rounds if you need your 3rd round to have more attachments.
  • You might even think of repeating this motif to create a larger piece, BUT you still have to design a round around them for it to be considered a DAL.
  • Send me a pic of your tatted-designed piece and as before, I will include it in a Google doc for everybody to see. You can upload to Facebook (tag me - MuskaanM), or in your own blog (leave a comment here to let me know), or send it to me privately through email.
  • Tatters are always looking for new patterns. Hence we would all appreciate if you shared your pattern as well in whatever way you can. All participants in my previous DALs have done so.

So here's the pattern. I hope you can find the time and enthusiasm to participate and display your budding or experienced talents! It is always such a huge inspiration to see the wonderful designs you come up with! In case of any doubts, feel free to ask.

Muskaan's DAL 2026 Motif pattern - 


Round 1 - (pink in diagram) Rosette, single shuttle. 
  NOTE: Common picot (△) - height is about 3 stitches across when folded.
  NOTE: For continuous tatting, use two shuttles and make the last ring a split ring followed by a mock picot, the same size as the common picots.
ringA: 2 - 7 △ 7 - 2. close ring, Do Not Reverse Work (DNRW).
ringB: 2 join to last picot of A, 7 △ 7 - 2. close ring, DNRW.
ringC: 2 join to last picot of B, 7 △ 7 - 2. close ring, DNRW.
ringD: 2 join to last picot of C, 7 △ 7 join to first picot of A), 2. close ring. Tie, cut, hide ends.  NOTE: This last join is a picot join to the right or a folded join.

Round 2 - (black in diagram) Scroll, ball and shuttle.
ringA: 6 join to any △, 6. close ring. Reverse Work (RW)
chainB: 6 - 6. RW
ringC: 6 join to same △, 6. close ring. RW,
chainD: 6 - 6. RW.
Repeat from A to D all around. Join back to base of A, Tie, cut, hide ends.

Round 3 - Your Design!!! You can design and add more rounds, too.

You can find links to tutorials here - http://tipsaroundthehome.blogspot.com/p/my-tut.html and here https://tipsaroundthehome.blogspot.com/p/tatting-resources.html

Feel free to scroll through my previous DAL challenges and see what emerged from the shuttles/needles of participants.
Past DALs - https://tipsaroundthehome.blogspot.com/search/label/DAL
DAL 2023 - https://docs.google.com/document/d/1pVqM6S5Ng49xk6erSsDyRm3y7SdV2tCIUOCgltze4lM/view
DAL 2025 - https://docs.google.com/document/d/1mQmdXWXQmcbXQ48nRz9FBeTJf_DoJqKz/view

Hope you join!

Sunday, 28 May 2023

my DAL tadaaaa

Pin It now!

 And the reveal!!!! My version of the 3rd Round design-along for the DAL Celtic Snowflake. This is where I first posted the game - https://tipsaroundthehome.blogspot.com/2023/05/lets-design-round-3.html. My next two posts showed my own dilemma, course correction and solution trial (thanks to Anna Bonelli!). 


Several techniques, effects, stitches, and their modification have been used to achieve this result. 

I am very happy with the end result. I challenged myself and am quite satisfied.

Tatted in Red Rose size 20 threads (equivalent to Lizbeth size 10), the final size is 14cms.
Motif 1 = 4cms ; Motif 2 = 7cms.

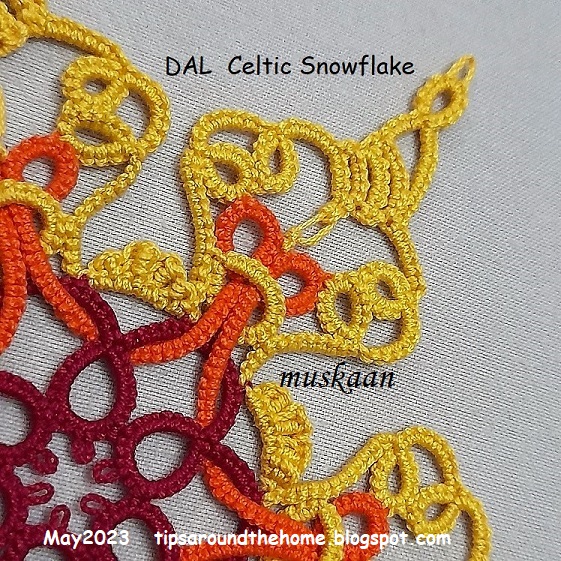
I did away with the Josephine rings. For the tip I used a decorative picot; for the treble arches I used graduated treble tat stitches.

This is how it looks in toto. I would've loved to try Sam's visualization of the flake in blues and greens. Hopefully I will do another one in finer threads using the water effect.

To anchor the are thread in the center, after doing a lock join, I made a tied stitch (as in encapsulation) at the very base and then again at the tip. The bare thread is deliberately left uneven to give an open, free-style look.

This is the same, but from the back. After all Celtic interlacing creates a different overlap on the two sides.

Again from the back.


We now have a total of, I think, 15 models submitted or WIP, with 6 patterns (I have to write out mine to make it 7) and 2 more patterns promised. I have started compiling them in a Google Doc but it takes time to get it all done properly since time needs to be squeezed in, LOL.

Please mention the name of the designer and the pattern whenever you post.

Tuesday, 23 May 2023

solution

Pin It now!

 Remember my problem and the mood to give up on my own 3rd round design? Well turns out there were two possible solutions! Anna Bonelli suggested something in Italian which, though lost (on me) in translation actually threw up the first solution to my mind! After making the join I could leave some bare core thread, work and interlace the large ring, then go back and cover the bare thread with 'tied' stitches using the 2nd shuttle!

Anna then tatted a sampler to show what she meant, and that is the solution I adopted. Notice the ring is now horizontal instead of vertical, and I made it smaller too.
Meanwhile I had this idea to use block tatting at the tip. It caught my imagination and between these two elements I allowed my shuttles to do the work, starting with treble tatting arches.
 
I like how the block appears like a flame. 
In several places I hadn't made any picots. Used a finer crochet hook to clear enough space for a join.
To offset any denseness, I did the bare thread thing in the center. I could use dot picot strings, but wouldn't it be overkill?
Just like the Josephine Ring at the tip of the 'flame' is an overkill, right? Although I cannot decide on the JR above the treble tatting arch.
I was going to include decorative picots, but I like the clean lines here.

So what is your verdict? 
I am open to suggestions since I haven't yet started tatting. Oh and this time I'll be using a muted shade of yellow.

So far the design-along has roped in 12 tatters: 1 diagram only; 5 models only (1 WIP); 5 models with patterns; and 1 late starter. I will collect them all in a Google Doc with shareable link so feel free to join the game whenever you can .... 
My journey so far -
Many many thanks to Anna Bonelli for her wonderful solution that got me going!

Sunday, 21 May 2023

problem

Pin It now!

My previous post 'promised' a 3rd round and also invited you to join in. Good news and bad - my round hasn't quite worked out as I had imagined but the great news is that tatters have already sent in their Gorgeous 3rd (and in some cases even 4th) round. Most have shared their pattern as well. But let the suspense linger till the next post.

I wanted to include another interlacing in this round, this time with a ring. First part is fine but then came the logistics problem! Notice the arrow? If I lock join the chain at this picot, how do I get the large yellow ring to interlace?! See, one should always 'think through' - yeah, I'm no good at that!

I tried a couple of options to no avail especially since this is a very large ring. While at this stage, I can insert the shuttle through the space, it will become harder once more arms are joined. There is one more option I can try - floating or bridging chain, joined back into a mock ring. But with this 40 stitch ring, it will be too much work. Oh, or I could shift to needle instead of shuttle!
Moreover, I am not at all happy with the overall look including the last-minute decision to use black. I was going to use 2 small ring between the arms but then I might get accused of copying another pattern. And seeing the lovelies that have come in, I feel totally inadequate at designing as good a round. So, I might shelve mine for the present till inspiration strikes.

Speaking of inspiration -
It turns out the first 2 rounds/motifs are very similar to Jon Yusoff's beautiful 'Quantiesque' Snowflake'. (free pattern here - https://tatsaway.blogspot.com/2008/12/snowflake.html). During my quick online search for Celtic models/patterns, this one did not show up. The most common were motifs by Rosemarie Peel and Sue Hanson, besides a few others. In the mood to try my own, I thought to improvise with twin rings in the 2nd motif (all models used only a single small ring at the end of the long arms). 

Now both motifs are very basic, beginner level. 
Motif 1 is probably something every antique tatting book begins with after the edgings. Ditto for Motif 2. Nothing proprietary after over a century and half.  
All we do is change the look slightly when we change the count or picot placement, or what we do with it/them subsequently.

Further there are only a very limited ways in which you can interlace, right? Again interlacing dates back to Mlle Riego  if my memory is reliable.Yet, the first impression is very similar to Jon's first 2 motifs [her 2nd motif has twin rings but with a short chain between them; the length of the long arm chain is also shorter than mine]. 

Jon explained all this rationally so much better in response to a self-aggrieved third party complaint.

Another similar start was brought to my notice yesterday. Renulek's 'Plait tatting' motif (free pattern here - https://renulek.blogspot.com/2010/09/frywolitka-pleciuga.html). Was Jon's snowflake the inspiration for Renulek's start? 

I know one thing. In my attempt to Not be influenced by the models that came up in my search, I ended up doing something similar to Jon and Renulek - both exceptional designers! I am nowhere in their league, LOL, as evident in my botched attempt above.

Be ready to be inspired and wowed by the models and patterns coming in .... stay tuned and my 'lazy' friends, keep your shuttles at hand!

Thursday, 18 May 2023

lets design round 3

Pin It now!

 Been quite a while since we played Design Along (DAL). I needed a model to show Celtic tatting with regular shuttles and after searching online I decided to create my own pattern. The first two rounds are tatted and I am trying out the 3rd round joining the 2 interlaced motifs. However, it will be fun to see what design you come up with for the 3rd round! You can design a 4th round, too, if you wish! Come join the fun.

DAL Celtic Snowflake -

Working with Red Rose size 20 threads (equivalent to Lizbeth size 10).

Pattern for Motifs 1 and 2 ---- [schematic of one repeat in the image itself.]

motif 1 pattern and notes - 

  • Ball and shuttle motif, start with ring. 
  • Each ring is joined to previous ring and the last ring is joined back to the first. 
  • All joining picots are very small.
  • Cut and tie and hide ends.
motif 2 pattern and notes - 
  • Ball and shuttle motif, start with left ring. 
  • All picots are very small.
  • This motif tends to twist because of the long chains. Hence, be very careful when you make the final tie to the base of the 1st ring. Make sure all chains are laid our correctly. 
  • Cut and tie and hide ends
  • Block the motif for ease of interlacing.
interlacing motifs 1 & 2 - 
  • Interlace motifs 1 and 2 as seen in the image.
  • Now go ahead and design a Round 3 (and 4?) to link both motifs.
  • TIP: It is a good idea to pin the flake on a polar grid to hold the motifs in place while you sketch out your idea. Or scan your tatted piece and use it as the base for future ideas.
  • Please leave a comment in this post or contact me through Facebook, Instagram, or email with your finished design and model! [all links in right panel top].
Let's have some quick fun!


Thursday, 13 February 2020

dress my heart

Pin It now!
design along (DAL)


What bug have I caught?! And why am I trying to spread it around? But then we are already 'suffering' from ATS - Addictive Tatting Syndrome, so what’s one more play-along?!

Recently I revisited this NeoVintage Heart. I gave the prototype pattern in 2015 – a 2-round continuous pattern. This time I ran out of thread after the 1st round and it struck me that there are So Many possible designs that can go around those chains! Since I cannot do them all, here’s a design-along (DAL) for you. You can choose to create your own outer round, although I have given my 2nd round pattern in the pdf

SCROLL DOWN FOR PDF LINK.

In Anchor Pearl cotton size 8,  it measures around 4cms×4 cms

I’d just like to state one rule : Keep Round 1 essentially the same (although you can add beads, etc.). Design Round 2 or more as you wish. It will be interesting to see the variations.
Kind of reminds me of this make me pretty please butterfly and the wonderful diversity that flew in!
Please do share your work either here (comment) or tag me on facebook , on Instagram, or email a pic that I will then upload here.

click to download the one-page pdf NeoVintage Heart DAL 2020

TIP : Dora Young Join (Knot) is exactly the same as what we now know as Catherine Wheel Join,  except that it is made with the same shuttle and no thread is encapsulated. .


And before I leave you to play, here is Elisabetta De Napoli’s beautiful version of Sway My Heart. All set to be a pendant on a necklace !!!


Sue (His Kid) also added a 2nd round using treble tatting – check it out!


Thursday, 7 February 2019

Buddy Hearts

Pin It now!
Sharing 5-in-1 Buddy Hearts patterns !!!

The pattern presentation would’ve been completed in November last year, if it weren’t for, well, life. Just so happy to be able to do it at least before Valentine’s Day!
the original notated pic Anita sent me!
There are 2 pdfs. 
The short version only has diagrams and is a single page printout.
The long version has diagrammed & written patterns, along with tips for impeccable tatting from Master Tatter Anita Barry. It also has a write-up about out design process and relevant details, which anyone can use to create their own heart patterns! Anita wrote her patterns while I wrote mine. So even if you decide to print only the diagram-version, I still urge you to at least read the long version for the insights. And, of course, for the tremendous time & effort we put in ;-P

Since I had already posted my thoughts here, I invited Anita to write about her journey. Which is when I realised our diametrically opposite approaches to designing our respective hearts – reminds me of centrifugal v/s centripetal forces!

See, where Anita goes from the out in, having drawn the heart first, I chose the decorative piece first and then drew an incomplete heart outline which was ‘completed’ with leftover motifs forming one side.
Further, her hearts can be worked continuously, whereas my hearts are a combo of separate pieces – the floral spray and the heart proper, and worked in 2 thread sizes for better effect.

Read about both approaches in the pdf. And oh, there is a bonus heart pattern in the bundle – 5 complete patterns for our tatting buddies, and one slight variation.

Click to download pdf :
And

Anita's models of Inside Your Heart & Cross My Heart
my Budding Heart - original & with variation
I used a CWJ in my Budding Heart models,
though not indicated in diagram. 
Blossoms Heart with & without butterfly
Anita's bonus pattern - Daisy Heart !
my rendering of Anita's Daisy Heart in
Anchor size 40 (maroon) & Lizbeth size 20.
♥♥♥♥♥♥♥
Enjoy J
And in Anita's words – “Think happy thoughts”. 
Connect with your buddy and spread new tatting hearts around !

♥♥♥♥♥♥♥

Update : Taught in Online Tatting Class on Feb 11, 2019

Friday, 30 June 2017

hacking out instant designs !

Pin It now!
This ‘hack’ hit me earlier in the month, while diagramming some vintage edgings. I was thrilled & eager to share, TILL I began writing this post & went over to Robin’s blog for her tutorial link. She’s already covered it meticulously in her last 2 tutorials – I’d totally forgotten (yeah yeah my encroaching greyness …quit teasing me already!)

But I’m still so excited about this shortcut because it led to instant designing – literally within minutes! Relatively simple and skeletal designs thus far, but such fun playing around ! Want to see how? Read on …


How can any of my Inkscape post Not have a reference to Robin?! She has shared free diagramming templates to get us started. Earlier, I would pick a specific ring or ring combo and arrange as required by flipping, rotating, resizing, etc. For clovers in a snowflake, I’d choose the 3 rings and adjust. This not only required additional steps, but some possible heartburn when they decided to change shape on rotation ;-/ 
(Of course, post-event I know that her Drawing ‘Automatic’ Pattern Repeats tuts eliminate all that heartburn & I’ll be internalizing it for future).


So, anyway, with just a few hotkeys and her Rosette template (6 outward facing rings), I created Instant Trefoil & Quatrefoil Patterns ! And went about tatting the latter, too.

This is just the tip of the creative berg - choose and move around templates & motifs !

click on images to enlarge
 
See how easy it is to ungroup and rearrange individual motifs. One does not need an advanced knowledge of diagramming or Inkscape here.
Although clicking on images will enlarge them, here it is in pdf for easy reading and reference.

 
The top left on p3 is a hexagon from trefoils. 
This skeleton is converted into a working tatting pattern diagram - a simple 2-round snowflake - with the inclusion of chains and picots. 
In the alternate method shown below with quatrefoils, more steps have been eliminated by working with a set of 3 motifs & flipping it!

I draw my own guide lines using the grid and a bezier. Actually this was to be the 2nd hack I intended to share, because many of us still find using the guide lines and snap commands confusing. But for those who can, use the actual guide lines.

Errr, tatting wasn’t as instant as designing – the first ‘hexagon’ turned into a square (the one with tails)! Just a slight stichcount tweak, and I got a square, pentagon And hexagon all from One skeleton diagram (on the left) !!! The picots & joins were shifted in the pentagon & hexagon on the right. It creates a visibly different look, but the hexagon refuses to lay flat.
Incidentally, all rings throughout have 24ds.
  
And there's another possible pattern on p4 with quatrefoils and thrown rings, but the quatrefoils are 'inverted' ! I think it can be accomplished in one pass using SCMR with thrown inner rings and split rings along the outer circle.


Now the Quatrefoil Square & Hexagon seem to be pretty basic, although my searches did not throw up such a medallion. And even the stitchcount – I came up by myself.
If you have come across an exact replica, please do tell.

I will share this pattern & it's myriad design possibilities next time. These different shapes seem to have a nice fit to create a larger fabric. Hmmm, a magic square, too, perhaps :-D No harm aspiring, is there - & I might just have got the sequence! 
But first I need to design a triangle to fit within. All help is welcome :-) 
In the meantime I'm halfway through a bookmark & next a coaster tatting it in one pass.


Related Posts

tatting or drawing – the name of the game is fun !
enjoy :-)


Saturday, 15 October 2016

A goodie bag of free patterns

Pin It now!
at least I hope you think they are goodies, and not ho-hums. 
and plenty more patterns to come, so keep your bag open in the coming weeks for snowflakes, squares, triangles, flowers, ....
There is also a notification at end of post ...

«»«»«»«»«»«»«»«»«»«»«»«»«»«»«»«»«»

I was thrilled when Georgia asked if I would share my Bonds of Love Rakhi/Bracelet pattern for this year’s Palmetto Tat Days goodie bag. Preferably with beads. Hmmm, working with beads – a challenge but also an opportunity.  

Staring at my plain rakhi, one thing was for sure – I wanted beads inside the 2 hearts, following the curve of the long chains and filling in the space. Ninetta uses beads so beautifully, and she sent me loads of Gorgeous beaded tatting – various ways in which beads could be incorporated – pics of her own works and other resource links. She was just as excited as me and test-tatted a sampler that very night while I slept! Thanks, cara amico :-)
In the end, though, I kept it as simple as possible, adapting the rakhi to a beaded bracelet. Jane’s earrings helped me solve the problem of the braid. 

Bonds of Love” Bracelet / Rakhi
Single page pdf  ;  Longer version pdf 

The bracelet is tatted in 3 segments, joining as you go : The central medallion, and 2 heart medallions with braids on either side.
Diagrams follow the stitch colour of the tatted model, and I hope that makes it even more easy to follow along.

This single page diagram-only version was for the Tat Days goodie bag where Georgia added some lovely beads, buttons, findings, etc. Colour-coded diagram follows the stitch colour of the tatted model. 

This longer 4-page version was meant for some book/booklet that they release (I have no idea what it is, or the title, etc) and has a step-wise pictorial besides a written & diagrammed pattern.
Diagrams follow the stitch colour of the tatted model


The Design Process

A peek into the design/conversion process …. My objective was to keep the lines clean and pattern simple. It was the idea more than the execution, where one can choose any small medallions or motifs and join them together to create a bracelet, bookmark, insertion, etc.

Tacking on the beads to the old bracelet, with simple sewing thread & needle, to get a feel of what, how, … tried these 3 placements. Bead in the small rings of center would only make the rings floppy ; the one in 3rd pic looked too crowded! Settled on the last pic.
The single ring connection between the medallions was also weak and floppy and needed to be strengthened. Perhaps 2 rings would work.
Test-tatting
The 2-ring attachment worked fine and was doable.

First Version … Okay, everything worked, except for the ring in the very center. It appeared too small. At this stage, I had to string a couple of beads on the shuttle. Could I do it without Any bead on shuttle ?
TIP : Keep the long beaded picots just a tad longer than required for joining purposes, in order to maintain curvature. The beads need room to create the curve; if tightly snugged, it will become a straight line.

Second Version …Used a large pearl for the centre. Yes, it lifted up the whole ensemble, acting as a good focal point. This time, the center medallion was tatted first, and the 2 heart-braids joined on the go.  Worked much better !

Update Oct 20 : While posting, I noticed that there wasn’t a single pic with close-up of braids. Finally took one showing the braids in all 3 bracelets....
TIP for Braid : Do not close the SCMR too tightly – it will create a curvature on the way back. Leave it ‘straight’, with plenty of room to join back.

Both these versions will require some stiffening, since size 20 thread was used.

Third Version/Working …. I didn’t have any polyester thread or metallic thread (hadn’t organized my stash then ! Only later did I discover my metallic threads in silver, gold, and copper !!!), except for this pre-twisted green with metallic silver. This one stays nice and stiff.

TIP (above pic) : One way to load beads was with paper clips holding them in place. But these get in the way. So, when making the first long picot, load the number of beads required and hold with clip. Make 1 stitch and remove the clip and the beads and continue tatting. When it comes to the joining point, load the beads with a crochet hook, join and continue.
This accomplishes 2 things – one can determine the picot length for beads used, and it makes tatting smoother with no beads and clips hampering work.

Now that I have plenty of stashed metallic threads, my jewelry tatting will have some shimmer :-)
I like the fact that not a single bead needs to be pre-strung! And depending on the size of bead, one can adapt the length of the picot.
I didn’t have any clasps or toggles, hence left it with metal split rings.

Download pattern pdf : Bonds of Love diagram-only pattern

Many many thanks to Georgia, for giving me this wonderful opportunity !!!

«»«»«»«»«»«»«»«»«»«»«»«»«»«»«»«»«»


I have already shared the diagrams in the TWoT Rings Only pdf.
Here, I have added written pattern alongside the diagrams. This will go to my pattern page in the tab above.
Not to bore you further, but for a new reader ...the bouquet comprises 3 simple, rings-only patterns. These can be considered beginner patterns, I think.  
As seen in collaged pic above, Wiggly Flowers, Butterfly Liberated, and Laurel Leaf. constitute the 3 patterns that can be tatted separately or combined into a collage sewn to a fabric, or glued to a card. These are all small enough to empty shuttles and use as charms, clip ornaments, etc. etc. Check out Eliz’s adaptations of the flowers and butterfly here

Download pattern pdf Ring In The Bouquet

«»«»«»«»«»«»«»«»«»«»«»«»«»«»«»«»«»

Please Note : 
Rachael’s Hen n Chick Square Motif link did not work in the Set I pdf. Click on name for updated link. Link to video - https://www.youtube.com/watch?v=4SoGklhCqL0 
And when I checked further, the entire pdf can only be viewed, but am unable to download or open it in Window. This is the file that I edited using DocHub. I can't correct the link, hence have created a new revised link. This Way or Tat? Set I - Rings Only updated Oct 16


happy tatting always :-)