Showing posts with label bead. Show all posts

Thursday, 12 December 2024

fulgent and folly

Pin It now!

This month Ninetta has hosted the Bead Me Endrucks game in the Endrucks 1920 Project FB group. Simple and single rule - to choose any pattern from the original or derivatives and bling it with beads. Here's my fulgent attempt...

I extracted a motif from Endrucks' pattern #10 and worked it into a complete circle. Since I haven't decided what to use it for - so many possibilities - it's a medallion for now.

I used Wally Sosa's version (page 4) in the reworked pattern presentation by Ninetta Caruso here - https://drive.google.com/file/d/1YFBYqbgssthqDKYi8YkTX-fvAPmIYbm-/view. After taking the length of bugle bead into account, I doubled the stitch count in the rings. Since the bugle bead covers the chain length, there are only 2ds on the ringside and 1ds, p, 1ds, bead, 1ds, p, 1ds on the inner side. See TIP below.

Materials - This is a pic after I gathered all the supplies needed. I chose to go with a ball and shuttle instead of 2 shuttles. Red Heart metallic thread size 40; yellow seed beads size 16/0; red beads size 5/0; twist bugle beads #4. And beading needles and crochet hook #11. I selected beads from my stash, though I do need to buy more in different sizes.

As per my visualisation, I pre-strung the bugles on ball thread and the red and yellow beads on the shuttle. However, the shuttle beads didn't work out the way I had hoped. Hence all the beads were removed and re-strung differently. One yellow bead between a pair of bugles on the ball thread and alternating 1 red and 2 yellow beads on the shuttle.

This is how I ended up doing the effect I had in mind. On the ring, a long picot holding 14 yellows...
I loaded the beads using sewing thread and size 28 tapestry needle as seen in the background. 

Followed by 1ds, red, 1ds, join to the beaded picot, continue. This centered all the beads beautifully.

Can't say how much of the brilliance and shine the camera caught, but in real it is quite the shining medallion!

Folly - not one but many! If you look closely, most are easy to spot.

  • I should've used pure metallic thread instead of this single metallic strand twisted around perle cotton, size 40. Tons of trouble with the metallic strand breaking while closing the large ring even after I started working the stitches loose. Had to start afresh many times! Took the shortcut but tying a slip knot and tatting over both tails. The number of rings you see in the final medallion are only half the rings I tatted, LOL. 
  • Once I forgot to work the twin ring and had to cut off two repeats. 
  • Not making a lock stitch at the end of the bugle bead to avoid the core thread from being pulled too tight. Did it for the last few beads. 
TIP: If the bugle bead is not on the core thread, it may be a good idea to add an unflipped stitch at the end before continuing, so as to lock in the core thread and bead.

  • Noticed the difference in bugle bead size in one arm only in the pics, LOL, though I kept wondering why it wouldn't stay even. And not to mention the space between two rings where the thread got pulled while closing the ring and I didn't notice in time. Dr Downplay at work here, though lessons learned for future.

It measures a wee bit over 7cms across. 

Mr Meticulous is not happy at all, but Dr Downplay rules the day. What's your verdict?

Many thanks to Ninetta and Wally for their work on the main pattern and thanks for organising the game, Nin!

Sunday, 18 February 2024

happy surprise

Pin It now!


I was tatting a sampler last night to show placement of beads. In my head was a possible zigzag effect but was so happily surprised to see this shape - such graceful arches! 

On pondering, it is 'elementary' - since the stitches all face the same direction, the broader waistband of the stitch creates an uneven arch -- the same reason why a normal tatted chain curves!

I haven't decided how to put this effect to use - possibly a necklace or even a bracelet? 

It would've been even better if the beads were all the same size. Overall the chain remains straight.

If anybody is interested, here's the 'pattern' for Beaded Scallops:

    One shuttle and ball, both pre-strung with seed beads.

    [ 1 bb 1 bb 1 bbbb 1 bb 1 bb 1 bbbb ] repeat for desired length.

The 'up' bead(s) are on the ball or picot thread ; the 'down' beads are on the shuttle or core thread. The red beads are on ball thread and the green on shuttle thread.

TIP: Be careful while snugging the cluster of 3 down beads and 1 up bead to avoid gapsosis. I left the shuttle thread a bit loose, made sure the up bead was positioned and snugged properly, then tugged on the core thread to snug the down beads. 

It might've been done before, obviously. However, this is my very own experiment and trial which threw up an unexpected effect. In fact I had first loaded all my beads on only one thread and it was only when I started tatting that I realized my mistake and went back to string beads on both threads ;-P

Happy happy dance!

Tuesday, 26 December 2023

lighting up

Pin It now!


The 2nd candle motif is complete, with pattern. As mentioned here (https://tipsaroundthehome.blogspot.com/2023/12/the-power-of-15.html) I used treble tatting stitch chains alternating with regular double stitch chains to block tat this textured candle. 

While I wasn't successful in obtaining the intended spiral effect, I have since found a solution and even tried out a very quick trial. I believe it should work. No pics yet.

E15 Candle Motif version 2 pattern pdf - https://drive.google.com/file/d/1r3SXvBp6bTwrHxU0Y6veyl2M5lnqA1uv/view

The flame is slightly different from version 1, both derived and adapted from a motif of pattern #15 from Endrucks' ‘Die Schiffchen-Spitzen’,1920.

The flame is tatted separately first. When we start the candle body, the first ring is joined to the final ring of the flame in onion ring style/join.

And the base or candle stand is also different. 

I'm not at all happy with my tatting, especially the stand. I need a change of glasses to see more clearly! And working under a magnifier limits the fun. Hmmm, come to think of it, I could easily have re-tatted the stand from scratch! Perhaps I will.

If you tat it, please do share your improved versions! May these candles brighten up the new year as well. Happy tatting! 

Sunday, 23 July 2023

wear me roundup 2

Pin It now!

 Continuing from the first batch of jewellery models that were made by our talented participants for the #WearMeEndrucks May2023 game in our FB group  (https://tipsaroundthehome.blogspot.com/2023/07/wearme-roundup-1.html), here are more models. Some are beautiful new adaptations, some are tatted from existing patterns, and some are newly derived patterns! It has become almost a given that every game throws up a few new variations and patterns to add to our directories. 

6. Lella Loops - a needle tatter par excellence!

E34 - Beaded Pendant derived from the center of the doily.

7. Lea Di Palma - another frequent E-tatter! This time she sent in this elegant version a few days back.
E12 - Bracelet with Coin Beads

8. Margaret Davies - loves to adapt and tweak patterns each time she participates and this time she converted her heart motifs into earrings.  https://margaretsdesignercards.blogspot.com/ 
E37 - Enlarged Heart earrings

9. Meenakshi (Muskaan) Jain - I extracted a small motif from doily #28 and tatted a prototype pendant (or earring) and then tweaked the count and included beads for the game.   
E28 - pendant prototype (new pattern)

E28 - Crown Jewels Pendant/earrings (new pattern)
The pendant/earring clearly showed a heart in its design and I merely needed to enhance the heart shape.

E1, E3, E28, E37 - bracelet, earrings, pendants.
Only one was tatted for the game, but I took a collective pic of some of the beaded jewellery I've tatted from Endrucks.

10. Nancy Moore - our new member had an interesting visualization ....  
E7 - Beaded Edging for Queen of Hearts costume
In her own words - 
"This is the pattern I will start with. I am making a Queen of Hearts costume this year and this will be perfect for the lace edging. Thank you for creating the English pattern and posting it.
This is the 2nd attempt. I want the finished lace to look like a row of queen’s heads. I like the gold thread but I think the seed beads at the top will be clear glass and I want to insert red glass faceted beads on the “crown” as well. They have been ordered and if they don’t fit, I will have to adjust the pattern. It is hard to find tiny faceted beads!"

We look forward to the completed edging and the costume!

E8 - Earrings "Trust You"

11. Ninetta Caruso - couldn't participate with a new model but her 3D earrings are timeless!  
E8 - Earrings "Trust You" (2020)

12. Sally Biggers - has been creating new derivatives or adaptations and sharing the patterns as well! This time is was a pendant but she noticed a couple of mistakes and tatted a second model. 
E10 - Beaded Pendant (new pattern)
This is what she says - 
"As my #wearmeEndrucks challenge for May, 2023, I have created a pendant using Lisbeth Metallic Thread #325 (Gem Stone), a single Precosia 3 x 4 mm faceted Crystal bead and 10 silver lined crystal beads (11/0) around the edge of the motif.
I modified Pattern #10 from Frau Endrucks' book"

E10 - Beaded Pendant (new pattern)
And here's a TIP from Sally - 
"Metallic thread was used in this pattern because I enjoy the bling it gives to earrings and pendants. Metallic threads are made from synthetic fibers so they don't absorb oils from the body, and don't tend to become discolored the way cotton and other threads will with wear."

So this is the second batch of models and experiences. Patterns can be found in the Jewellery Directory - https://docs.google.com/document/d/1ns-C3xQq4CA1tjZwGxFIyKWelLJbqwXJ/view  and in the main EP doc - https://docs.google.com/document/d/17LEVftXweztBIOWh4sL4BB7bX65ssoOsOn4oXIgCepY/view
A third and final batch will be posted soon.
...to be continued

Again, we can't thank our participants enough for all their enthusiasm and work!

Thursday, 31 March 2022

a happy day flower

Pin It now!
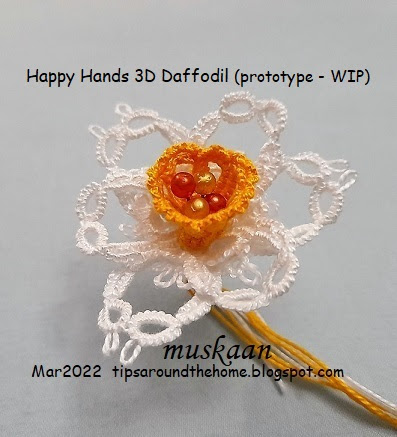
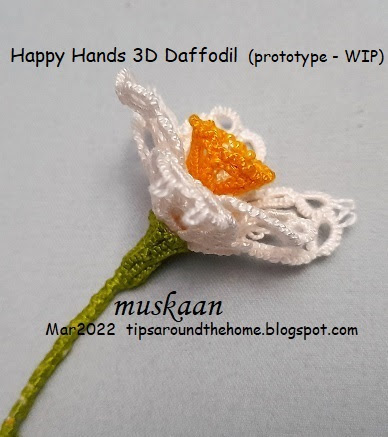
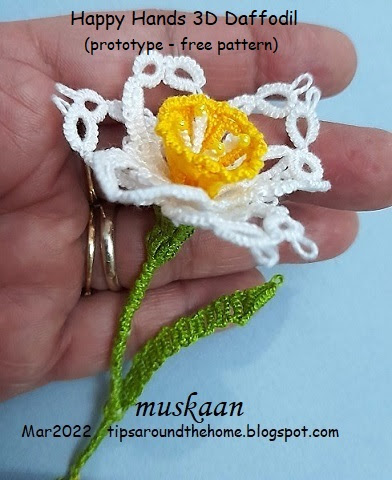
After the grumpiness last time, this flower seems to have settled down for now as a daffodil, which happens to be the flower of the month! She understands that there is a lot of improvement as well as diversity possible, but this is my little gift to all tatters on the eve of International Tat Day, 2022. 

Happy Hands 3D Daffodil  (prototype pattern continued)
adaptation of Endrucks' edging #1
The odd one out, but continuing the pattern for this prototype .....
After the first 3 petal fiasco, I chanced upon a superb daffodil pic posted by Coretta L where 3 petals were curved and the other 3 were pointed. This is the reason I chose to go with daffodil and after a bit of Googling, it turned out that it was the flower for March-born, besides having more meanings. Timely, huh!

Some abbreviations : ch = chain; LJ = lock join; fhs = 1st half-stitch; shs = 2nd half-stitch

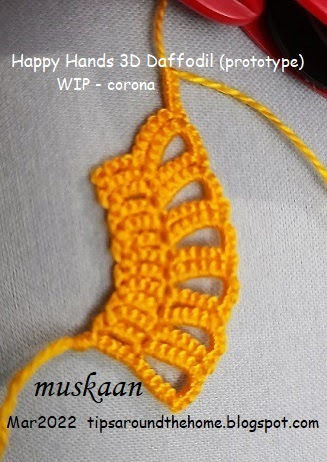
Corona : Use your preferred method of block tatting. I have followed Endrucks' style, using 2 shuttles, turn work (tw) and switch shuttle (SS). I simply knotted the threads, leaving the tails to add to the stalk.
ch-1: 1 - 4 - 6, tw SS
ch-2: - 4 - 6 LJ 4 LJ, tw SS 
ch-3: [ 1 - 4 LJ 6 LJ, tw SS
ch-4: 4 - 6 LJ 4 LJ, tw SS ]x6

Make one last chain and remember to join it to BOTH the 1st and previous chain at 2 points respectively. This creates a conical structure, with both threads emerging along the top edge. Continue ... 
Corona Frill : is made with a row of Node stitch or Victorian Set chains, lock joined to the picot below. You can choose a different colour. 
Victorian Set Chain: [ 3fhs 3shs 3fhs 3shs, LJ ]x7

This is how it looks after the corona and frill is finished. I simply put in a few pearl head pins in the center. All tails have been inserted through the center space of the petals, and before snipping off, join the base of corona to the base of petals. If desired, we can use one of the tails to sew and anchor it.

TIP: We can add a 2nd row for a wider and more pronounced frill. This could be with sets of 4 or 5 half stitches each.
Anthers : Each is made separately with a bead at the tip of a lock chain. Use leftover thread, short lengths are sufficient, and single shuttle. String bead and work the lock chain below it. You can decide the length of each stamen. I varied the lengths using between 6 to 9 lock stitches, for 4 stamens.

Again, insert the tails through the center space and cut off, leaving a few inches of tail. After inserting the last stamen, make an overhead knot at the base, encapsulating all the tails.

Calyx : Block tatting. Start with a paper clip to hold picot or a lock stitch (without paperclip, which is what I did here). 2 shuttles, ctm. 
TIP: You can make a join to the base of a petal midways through the calyx 
ch-1: - 6 - 4, tw SS
ch-2: - 2 - 4 LJ 6 LJ, tw SS
ch-3: 1 half-stitch - 6 LJ 4 LJ, tw SS
ch-4: 2 - 4 LJ 6 LJ, tw SS   
ch-5: 1 half-stitch - 6 LJ 4 LJ, tw SS 
ch-6: - 2 - 4 LJ, tw SS   
ch-7: 4 LJ, tw SS
These are the 7 chains seen in the image above.
Repeat chains 2 & 3 twice. Wrap the open calyx around all the tails at the base of the petals. Make one last chain joining to BOTH 1st and last chain at both joining points so that we have a cone.
I used a drop of fabric glue to keep the tails and the calyx in place since I had not anchored the calyx. At the base, I made 2 overhand ties, keeping all tails within the knot.
Do not cut threads. Continue for stalk and leaf.
Stalk : Here we are encapsulating all the tails while covering it with unflipped stitches. You can choose to do a Josephine chain or simple direct tatting. I used an odd method to make a Lock Chain for a straight stalk. 
Lock Chain encapsulation : Always keep the tail ends encapsulated while making each half-stitch. Make unflipped shs, slightly rotate the stalk towards you, make a manoeuvred fhs, rotate stalk back to original position, and repeat this process for the desired length.

TIP: We make a manoeuvred half-stitch in Twist Work, as follows : https://drive.google.com/file/d/1To6YwZSkh2ffQH3XBcKZ-Ed3l4myW34c/view 

Stalk worked to the point where I now want to start a leaf. Continue without cutting threads.
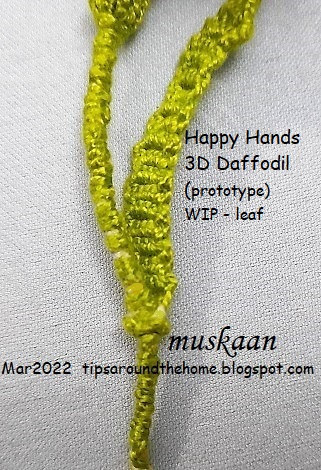
Leaf : is made with ring (forming a node), followed by a kind of phase-shift block tatting, ending in a folded ring.
ring: 4 - 6. Before closing, pull all tails through this ring and adjust the position.
ch-1: [ 1 - 3 LJ(to ring) 1, tw SS
ch-2: 1 - 4 LJ, tw SS ]x10-12
folded ring: 8 - 2fhs 8 2shs. 
You can either cut and hide ends, or whip stitch them back to the base of the leaf if you wish to continue with the stalk. I ran out of thread despite keeping the shorter length as core thread for the final chain, otherwise I would've liked the leaf to be a wee bit longer.
Having run out of thread, I joined new thread at the base of the leaf....... and continued the stalk for a short length. Then I tied and snipped off all tails and put a drop of glue to hold them together.
The stalk is semi-stiff and when held at the base of the leaf, it can hold the flower up. I have not done any kind of finishing here. This entire flower is as it is when it came off my shuttles.
I wanted more of a slant in the block chains for the leaf, but not quite successful. Will require more trials and testing.
A side view with displaced leaf. Yes, as I said in the beginning, this is a prototype and I have made several mistakes besides not being as neat as I would've liked. But hubby really likes it and I am happy for now. 
If there is sufficient interest, some day I will draw diagrams and create a pdf presentation.
Worked entirely with Anchor Pearl Cotton size 8. The flower spans 5cms, and the complete sprig is 8cms high; leaf is 4.5cms high.
Beware, some of the elements can be a bit fiddly, being small and 3D. Satisfying result, nevertheless.

Wishing you a very happy, chatty, chocolatey Tatting Day tomorrow. 
I have received such a wonderful gift and will share it as soon as I take pics!

All patterns from the Endrucks 1920 Project can be found here as pdfs - https://docs.google.com/document/d/17LEVftXweztBIOWh4sL4BB7bX65ssoOsOn4oXIgCepY/view