Showing posts with label beaded cord. Show all posts

Monday, 3 June 2024

beaded daisies and diamonds

Pin It now!

 I've been trying to work as many different techniques and effects as possible. In that quest, came these beads between split rings. Here are my trials and thoughts ....

Beaded Daisies are an arrangement of seed beads (from 6 to 10 or 12) around a center bead between consecutive split rings. There are two ways I've come across and I tried both.

BEADED  DAISIES between Split Rings by Sabina Carden-Madden (2007) :

What a disaster! And the reason was a shortcut. I found a single image saved in my Pinterest board and assumed that was it, since her Paradise Treasures site is down. However tensioning became a major issue. I tried a few tweaks in the 3rd and 4th trials and with my 'practice' on the first two, they came out a bit better, but not consistent. 
So, after a deeper search, I found her full tutorial and look at the three attempts above. I am very happy with how they turned out consistently. The trick was two joins to stabilise and center the arrangement. 
Follow the instructions and the work progresses smoothly.
[For those unfamiliar with the term Transitional Join - it is what we also know as the split ring join or what we use in direct tatting a chain with reverse stitches - https://tipsaroundthehome.blogspot.com/2016/04/shuttle-2-to-rescue.html]
NOTE : Both shuttles hold the same number of pre-strung seed beads and the center bead is free, loaded using a hook.
I had to use 8 seed beads around the larger center pearl bead. You need to gauge the number of beads according to your choice of beads.

TIP : The only hitch is finding sufficient space in the cap of the last stitch in the split ring, to make a join. Especially since I was tatting with perle cotton. This can be solved by making a teeny tiny picot before the final half-stitch of the first side of SR.


BEADED  DIAMONDS in a split ring cord :
This is a diamond-shaped arrangement of four seed beads between two split rings in a cord.
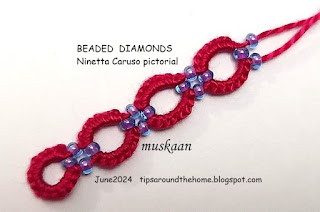
I don't know who first shared this effect or where it was seen first. Please share if you have any info. It's been quite the rage for bracelets and is very simple to tat with a vast range of colour effects. 
I followed Ninetta Caruso's tutorial - https://ninettacaruso.blogspot.com/2020/06/mama-non-mama-beaded-daisy-chain.html
Again, both shuttles are loaded with beads in 3:1 ratio. Two beads get trapped inside the split ring at the start and the base, while one bead on each side is moved after closing the ring.

[UPDATE 5th June 2024 - for a video, watch Imparae con Alicja - https://www.youtube.com/watch?v=TJJeUyw7cYw&list=PLQICwkA8T8e1dW0GvGiGzIjyj_5e6LK_W&index=13 ]

The reason I included this in the discussion is that Ninetta's beaded daisies is an extension of the beaded diamond.

BEADED  DAISIES variation by Ninetta Caruso (2020) :
A combination of the beaded diamond and Sabina's beaded daisies, but with a twist.
Notice how there are two beads trapped at the two ends of each split ring, just like in the diamond formation? In addition the beaded daisy has 3 beads on either side of a central pearl bead. Thus even though there are the same number of beads in all as the first version, their position is slightly different. 
This entails a different way of tatting the daisy. 
Follow Ninetta Caruso's tutorial here - https://ninettacaruso.blogspot.com/2020/06/mama-non-mama-beaded-daisy-chain.html 

Two attempts, and not bad, though they could've been better. I found this method more mindful and needed to follow the instructions carefully each time. However, it is one of those methods where once you get into a rhythm, the cord will flow along.

TIP : In Ninetta's beaded daisy pics numbered 3 and 4 - we need to load and transfer the central bead while the previous split ring is still open. This needs a bit of practice and it is simpler if you hold the section of thread between the previous SR and the 3 seed beads and pull this to close the SR. Once closed, the central bead can be adjusted into position.

NOTE : In this variation, shuttle 1 has to be loaded with more beads than shuttle 2. If one is using 8 seed beads, 5 beads go on Sh1 and 3 on Sh2. The central bead is a free bead, hooked through later. This is different from Sabina's method.

All together. You can see the four untidy daisies towards the top of the middle cord. This is a lesson in not relying on partial information. Always seek out the complete instructions for best results.
 
The two methods together - Sabina's and Ninetta's. My personal preference for tatting purposes is for the former - they come out consistently neat. But there is something to be said for the latter where there is less of a gap between the two sides of the daisy. 

Many many thanks to Sabina and Ninetta for sharing their talents !

Sunday, 18 February 2024

happy surprise

Pin It now!


I was tatting a sampler last night to show placement of beads. In my head was a possible zigzag effect but was so happily surprised to see this shape - such graceful arches! 

On pondering, it is 'elementary' - since the stitches all face the same direction, the broader waistband of the stitch creates an uneven arch -- the same reason why a normal tatted chain curves!

I haven't decided how to put this effect to use - possibly a necklace or even a bracelet? 

It would've been even better if the beads were all the same size. Overall the chain remains straight.

If anybody is interested, here's the 'pattern' for Beaded Scallops:

    One shuttle and ball, both pre-strung with seed beads.

    [ 1 bb 1 bb 1 bbbb 1 bb 1 bb 1 bbbb ] repeat for desired length.

The 'up' bead(s) are on the ball or picot thread ; the 'down' beads are on the shuttle or core thread. The red beads are on ball thread and the green on shuttle thread.

TIP: Be careful while snugging the cluster of 3 down beads and 1 up bead to avoid gapsosis. I left the shuttle thread a bit loose, made sure the up bead was positioned and snugged properly, then tugged on the core thread to snug the down beads. 

It might've been done before, obviously. However, this is my very own experiment and trial which threw up an unexpected effect. In fact I had first loaded all my beads on only one thread and it was only when I started tatting that I realized my mistake and went back to string beads on both threads ;-P

Happy happy dance!

Friday, 12 February 2021

beaded SR braid part 1

Pin It now! Before delving back into the Endrucks Project, I had this strong urge to learn a few techniques/effects that are floating around for pretty beaded split ring bracelets. Keep learning, keep trying. 
Turns out I got only one method done before succumbing to that heart motif idea I shared in previous post and other behind-the-scene commitments. 
No progress on the heart and none on this study, either. Turns out there are too many methods and no time to go into each nuance at present. But hopefully a step here, a step there ...
    
Disclaimer: This is not a serious study of origins, primacy, etc. of technique and effect. It is my whimsical & random exploration and experimentation. I will keep adding to this personal learning journey as and when I can. 

I try to avoid stringing beads whenever possible ;-D - a logistical problem with the smallish Pony shuttles. Now Jon had once incorporated a separate string of beads into her tatting. So many lovely applications, but not on a split ring braid (SR braid). Called for some adaptation.

Beaded SR Braids
In order to clearly differentiate what comes from where -
  1. shuttle 1 has pink thread strung with yellow seed beads;
  2. shuttle 2 has green thread with purple seed beads; and,
  3. where needed, a blue thread with pearl beads.
1. beads on third thread. 
Adaptation of Jon Yusoff's Beads on a String .
I thought this would be easy. Turns out the 3rd thread needs to be anchored before starting next SR! Here is what I tried -
1. Weaving: The beaded thread weaves up and down between alternate rings. 
Well, it leaves a colour blip when brought to the front, (notice the blue between SR1 & SR2) unless using fine, invisible, or same colour thread. Further, the string would be too loose.

2. Encapsulation : To avoid any colour blip I prefer the first of 2 ways to encapsulate the beaded string.
NOTE:  KEEP beaded string at back of work throughout. 

2A. Encapsulating Within SR (in last half-stitch): Make SR but do not close yet. Move bead to center, make final half stitch and pass beaded string through the open loop (parallel to core thread) of half-stitch before tensioning and closing ring. Thus string is held tight through the last hs and start next SR.
TIP: do it through the 2nd half-stitch, then move string to the back again. It does not leave any imprint!

2B. Encapsulating Outside SR (in unflipped half-stitch): Close SR, move bead to center, then make an unflipped or wrapped stitch with SH1 encapsulating both remaining threads, and start next SR. (I did this before the 4th and also the 5th SRs above). 
This will leave a tiny space between 2 SRs, but it can become a design element.

In both encapsulation methods, the beaded string is not locked and can be pulled to adjust. I went to town pulling away (see above), but the braid can be smoothed back into shape easily.

Despite being invisible from the front, encapsulation simply moves the blip to the back as seen in above pic. Obviously, we need to choose a string that will not be seen as pointed out earlier. I used 3 contrasting colours for purpose of learning. 

3. Knotting: In order to lock the beaded string in place, knotting is required. 
3A. Knotting with 2 threads: We can make an overhand tie or SLT between 2 threads, one of which is the beaded string. In above pic, after closing last SR with bead in center, choose any one shuttle thread and the beaded thread to make the knot, then continue with next SR.
3B. Knotting with 3 threads: Or we can make a knot using all 3 threads (as seen at end). This makes a larger, more visible knot and increases distance between SRs, but can act as a design element.

This is it so far - all my own 'ideas'. 
But before posting, I did a bit more research and found the following !!! 
However, none of these resources make any reference to anchoring the 3rd thread (I didn't check any class logs for possible discussion).  

....to be explored further

Saturday, 12 October 2019

tat a beaded rope

Pin It now!
I wasn't to be distracted - everybody knew. But with friends like this, who needs enemies ;-P
This evil genius sweetly invited a few of us on facebook to put Sue’s suggestion to thread. She’s evil for distracting me, but genius for doing me a favour … I Finally got around to trying my layered/stacked SR bracelet/Kadaa - a first trial I shared in 2015, and it's Christmas tree trunk pattern here.

It took me one entire day of fiddling around (and experimenting), trying to refresh my memory and convert the pattern into a beaded cord. Problem wasn’t in the pattern but the mismatch between beads, crochet hooks/threaders, beading needles, threads, etc. etc. I had started off with finer thread and smaller beads; finally only these larger bicone crystals worked with the size 20 crochet cotton, and a #12 crochet hook. Now it is going smoothly & I’ve found my rhythm. However, Ninetta will be testing it first.

UPDATE : Pattern is shared here. But look out for more on Ninetta's blog.

It did give me a whole new admiration for all the bead-heavy work crafters do. Reminded me of Jane McLellan's numerous crochet beaded ropes that she seems to belt out at such rapid pace.  

A few Experiments and NOTES - 
  • I tried putting beads on the core thread, but they face inside the hollow with thread showing on the outside.
  • I also tried pre-stringing beads. This worked if alternated with picots where rings needed to be attached.  If I had beads on a picot, it was difficult to join since the picot/thread ran horizontal through the bead hole - so a join would become skewed.
  • In the pictured version, I loaded 2 shuttles with only brown crystals (half on each shuttle); the rest were loaded over long picots at the time of joining. This is more practical – no pre-stringing loads of beads, no large shuttle required. However, working a SR can become a bit impractical till one gets a hang of it.

Last night I made a short video of the start.

I haven't tried Ninetta's single shuttle method yet, or the other numerous ways including chains. For another day. But following are a few of my thoughts ....
  
  • Single thread/shuttle versus 2 shuttles
  • Difficulty level - simple rings versus split rings.
  • Pre-stringing beads versus few pre-strung beads (most are loaded on long picot at time of joining).
  • For long project, large shuttle required versus regular shuttles.
  • The cord twists on itself, like a double helix versus beads spiralling around while cord remains ‘straight’.
  • The subsequent rings are ‘rotated’ slightly before being joined below versus emerging out of a split ring with a phase shift.
It will be interesting to try out other methods. In fact there is a lot of evolution these methods might incur. Time, experimenting, and testing will reveal ….