I've been trying to work as many different techniques and effects as possible. In that quest, came these beads between split rings. Here are my trials and thoughts ....

BEADED DAISIES between Split Rings by Sabina Carden-Madden (2007) :


You can download Sabina Madden's tutorial here - https://web.archive.org/web/20160401075244/http://paradisetreasures.com/pdf/beadeddaisiesbtwsr.pdf
Follow the instructions and the work progresses smoothly.
[For those unfamiliar with the term Transitional Join - it is what we also know as the split ring join or what we use in direct tatting a chain with reverse stitches - https://tipsaroundthehome.blogspot.com/2016/04/shuttle-2-to-rescue.html]
NOTE : Both shuttles hold the same number of pre-strung seed beads and the center bead is free, loaded using a hook.
I had to use 8 seed beads around the larger center pearl bead. You need to gauge the number of beads according to your choice of beads.
TIP : The only hitch is finding sufficient space in the cap of the last stitch in the split ring, to make a join. Especially since I was tatting with perle cotton. This can be solved by making a teeny tiny picot before the final half-stitch of the first side of SR.
BEADED DIAMONDS in a split ring cord :
This is a diamond-shaped arrangement of four seed beads between two split rings in a cord.
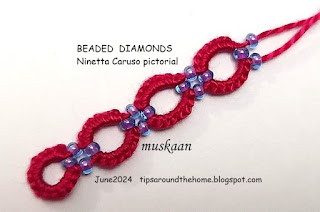 I don't know who first shared this effect or where it was seen first. Please share if you have any info. It's been quite the rage for bracelets and is very simple to tat with a vast range of colour effects.

I followed Ninetta Caruso's tutorial - https://ninettacaruso.blogspot.com/2020/06/mama-non-mama-beaded-daisy-chain.html
 Notice how there are two beads trapped at the two ends of each split ring, just like in the diamond formation? In addition the beaded daisy has 3 beads on either side of a central pearl bead. Thus even though there are the same number of beads in all as the first version, their position is slightly different.
Again, both shuttles are loaded with beads in 3:1 ratio. Two beads get trapped inside the split ring at the start and the base, while one bead on each side is moved after closing the ring.
[UPDATE 5th June 2024 - for a video, watch Imparae con Alicja - https://www.youtube.com/watch?v=TJJeUyw7cYw&list=PLQICwkA8T8e1dW0GvGiGzIjyj_5e6LK_W&index=13 ]
The reason I included this in the discussion is that Ninetta's beaded daisies is an extension of the beaded diamond.
BEADED DAISIES variation by Ninetta Caruso (2020) :
A combination of the beaded diamond and Sabina's beaded daisies, but with a twist.

This entails a different way of tatting the daisy.
Follow Ninetta Caruso's tutorial here - https://ninettacaruso.blogspot.com/2020/06/mama-non-mama-beaded-daisy-chain.html
 Two attempts, and not bad, though they could've been better. I found this method more mindful and needed to follow the instructions carefully each time. However, it is one of those methods where once you get into a rhythm, the cord will flow along.

TIP : In Ninetta's beaded daisy pics numbered 3 and 4 - we need to load and transfer the central bead while the previous split ring is still open. This needs a bit of practice and it is simpler if you hold the section of thread between the previous SR and the 3 seed beads and pull this to close the SR. Once closed, the central bead can be adjusted into position.
NOTE : In this variation, shuttle 1 has to be loaded with more beads than shuttle 2. If one is using 8 seed beads, 5 beads go on Sh1 and 3 on Sh2. The central bead is a free bead, hooked through later. This is different from Sabina's method.


For more beaded cord effects -
https://tipsaroundthehome.blogspot.com/2021/02/beaded-sr-braid-part-1.html
https://tipsaroundthehome.blogspot.com/2024/04/bracelet-query.html
Many many thanks to Sabina and Ninetta for sharing their talents !


