Showing posts with label tat a monument in pink. Show all posts

Thursday, 29 March 2018

tray cover wannabe

Pin It now!
Firstly before I forget, I have edited a few images showing the patterns from Vrinda’s squares. The notation was opposite to the working order. I’m aghast at my clumsiness; I guess the viral effect had not worn off :-( So please check out the revised directions when you plan on making them.

As I indicated in the previous post, I’ve started making these 3x3cms squares from the patterns sent in to Tat a Brussels’ Monument in Pink. It is my way of trying out all the lovely patterns and create a few more that I have sketched.

Worked in size 40, cream. So far, they are not all the same size and I may have to add an outer chain round to a few. I’ve made a couple more, but no pics yet.
I need to start joining the new squares to these as I go. But that will not give me enough leeway to play with arrangement. So perhaps I will hold off and make a thin insertion. Sound good?


Besides Vrinda’s squares (some are repeated), I now have Frivolé’s Reverse Quatrain ...

I started with an outer ring, throwing off the central ring with a mock picot between, and then continuing around. If we start the outer ring as a SCMR, then we can work the whole medallion with a ball and shuttle.
Frivolé also experimented without the central ring.

... and Henna J Hwang’s Fortuna Square (scroll through the album for this well-laid out pattern)

I tried one of the large rings as a mock ring but I liked the shape of the true ring better. Of course, the mock ring or chain option again allows us to work off a ball with single shuttle.


I enjoy working little patterns – quickly worked and can be used in numerous ways!
Since these pics were taken, I've worked a couple more from other patterns, but now I will share only when I have made substantial headway. I am using this project as a final hour for that end-of-a-busy day.

Tomorrow I have something exciting to show you .... so don't go far ;-P 

Wishing you happy hours of tatting always 
and 
many thanks to the designers for sharing their beautiful patterns :-)


Friday, 23 March 2018

squares from knotty creations

Pin It now!
updated post with revised images

As promised, here are 5 free patterns from Vrinda. She created 6 patterns one of  which was called Checkers. However, even though she came up with it independently, since it is a common split ring square, the pattern is not shared here.
All Vrinda’s patterns have also been uploaded to Cathy’s facebook page.

At the very beginning, Vrinda had graciously given me permission to share them on my blog. Unfortunately it has taken time. In deference to individual preferences, I have notated the pattern in photos alongside the written pattern.
 
Squares from Knotty Creations !
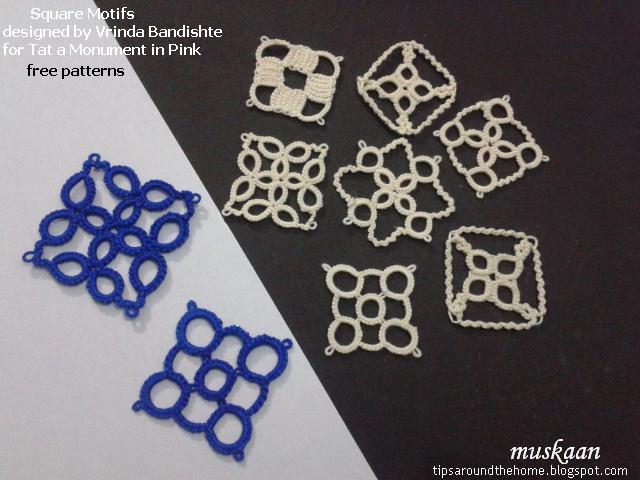
3cms square motifs designed by Vrinda Bandishte
for Tat a Brussels Monument in Pink

I started in size 20 blue then switched to size 40 cream. I will show you why in the next post.
I like the way different techniques have been used to create interesting squares.

NOTES:
A few general notes before I begin with the actual patterns.

  1. Vrinda’s pink squares, designed for Tat a Brussels’ Monument in Pink measure 3cmsx3cms when worked in Anchor size 20. As I’ve often pointed out, Anchor 20 is thicker than Lizbeth 20. Hence, stitches will need to tweaked depending on the brand you are using. 
  1. “slip ds” in her notation refers to reverse stitch (rs) or lark’s head knot or unflipped stitches as used in the 2nd side of a split ring or in encapsulation. 
  1. “Zigzag chain” here refers to Sabina Carden-Madden’s S-chain. It is made of alternating flipped and unflipped stitches. i.e., 1 double stitch and 1 reverse stitch. Vrinda counts each stitch separately, not as a pair. Thus chain of 5 means (1ds,1rs,1ds,1rs,1ds). And she always starts with a normal double stitch.
  1. Some medallions use a central picot in first ring, to which later rings are attached. Ensure that this central picot is long enough to hold additional rings. 
  1. In 2-shuttle tatting, when in doubt, use the shuttle that is closest in position to start the next element. 
  1. I have tried to make minimal changes to the written pattern, except for consistency or bringing it in line with common notations. Sequence and some details are notated on my tatted models. My models are worked in Anchor size 40 in cream. Vrinda’s original models are in pink. 
  1. Some of the squares need to be blocked. 
  1. Leigh Martin has prepared pdfs for these squares, along with her notes. These can be accessed from Craftree.  

Abbreviations :
CTM    continuous thread method.
ds       double stitch
rs       reverse stitch (unflipped stitch in reverse order as in a split ring)
– or p  picot
vsp     very small picot
R        ring
--       long picot
+        join
rw      reverse work
SR      split ring
sh       shuttle
SS      switch shuttle
FR      floating ring


1. URCHIN
The enclosed space in this medallion is formed by clusters of block tatting. 

Techniques used : 
block tatting , starting chain with a picot
Worked all from the front in clockwise direction.

Load the shuttle with the required thread. Keep the ball attached.
Insert a paperclip to hold picot before starting chain.

Start Block One with chain of 6ds, vsp, chain of 6rs. Join to the start of the previous chain.
Repeat twice to form a block of 6 chains, with a vsp at start of each chain.

** Chain of 6ds, p, 6ds. Pull snug.
Block Two : 
Chain of 6ds, join to base of last chain of previous block. Continue the chains to form block two. **
Repeat from ** to **, twice.
Chain of 6ds, p, 6ds.
Attach to the start of the first block.

Hide the ends and neaten.


2. WIGGLES
A zigzag chain outlines the square shape of this central picot medallion

Techniques used : 
central picot, zigzag or S-chain, picot join to the right (folded join)
Worked in counterclockwise direction.


see notes for zigzag chain
revised direction

One shuttle and ball of thread, CTM.

R1: 5 – 5 -– 5 – 5. rw
S-chain : 5 -- 15 -- 5 rw
**R2 : 5 + 5 + 5 – 5. rw
S-chain : 5 + (last p of previous chain) 15 -- 5 rw**
Repeat from ** to ** 2 more times, joining the last ring and last chain to the first ring and chain respectively.

Finish by tying the chain ends to the base of first R. Hide ends and trim excess thread ends.

TIP : Make the pioct on chains long to give a better finish and sharper corners (see the bottom right model in lead photo). 


3. BUBBLES
A central ring medallion worked in one pass from the front in counterclockwise direction

Techniques used : 
2-shuttles, mock picot, split ring

NOTE : This motif turned out smaller than 3cms. Hence I added 2 stitches in each segment of each element. Following is the altered stitch count.

Load two shuttles, CTM. Start with sh1
revised direction & stitchcount

Central R1 : 7 – 7 – 7 – 7. close. Leave mock picot space.
SR2 : 7 vsp 10 – 10 / 7.
**Chain (sh2): 7. SS
SR3 : 10 – 10 / 7 + 7. **
Repeat from ** to ** 3 times.
Chain (sh2): 7. Join to first picot of SR2.

Hide ends and neaten.

TIP : One can make the central ring and climb out with a mock picot and split ring; or one can throw the central ring off the first SR (from the 2nd side).

I think this motif would look lovely in 2 colours, especially when tessellated to create interesting patterns.


4. CLOVERS     
A central picot medallion made with inward facing clovers. 

Techniques used : 
2-shuttles, split ring, zigzag or S-chain
  
Load two shuttles, CTM. Start with shuttle 1.

R1 : 10 vsp 10.
R2 : 8 –- 8.
SR3: 10 / 10. rw
Zigzag chain : 1ds, 1rs, 1ds, picot, 1ds, 1rs, 1ds. rw.
**SR4: 10 / 10
R5 : 8 + 8.
SR6: 10 / 10. rw
Zigzag chain : 1ds, 1rs, 1ds, picot, 1ds, 1rs, 1ds. rw. **

Repeat from ** to ** 3 times. Join to the vsp of the first R. Hide ends and neaten.

TIP : I did rw (reverse work) before and after the zigzag chain so that the picot faces outwards easily and the shuttles also remain in the right position.


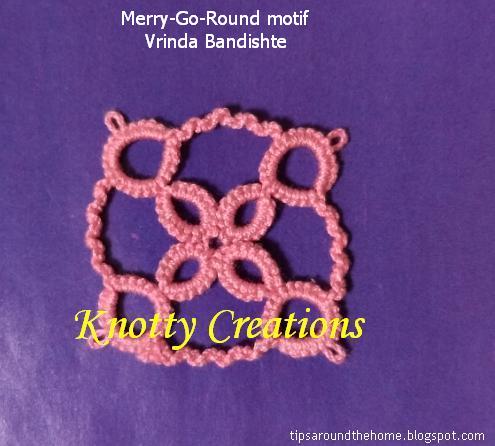
5. MERRY-GO-ROUND
A central picot medallion made with inward facing thrown rings.  
        
Techniques used : 
2-shuttles, split ring, thrown ring (from 2nd side of SR), zigzag or S-chain

UPDATE Mar 23 : revised direction
NOTE: There is a floating ring (FR) thrown off the 2nd side of each split ring. Start the split ring and when we come to that point, switch to shuttle2, make the ring, switch back to shuttle1 and continue to finish the original split ring.
The first floating ring also has a long central picot top which later FRs will be attached.

Load 2 shuttles, CTM. Start with shuttle1.

SR1 : 6 – 6 / 6 SS, FR: 8 –- 8, SS, 6. close.
**Zigzag chain: 9
SR2 : 6 – 6 / 6 SS, FR: 8 + 8, SS, 6. close **
Repeat from ** to ** 3 times,
Zigzag chain: 9
Join to the base of first R. 

Hide ends and neaten.


There was a mistake when I first tatted this motif. 
I made 15 stitch zigzag chains instead of 9 stitches. 
And the merry-go-round spun away !!!
If we add a picot in the center of each chain, we get another square motif !


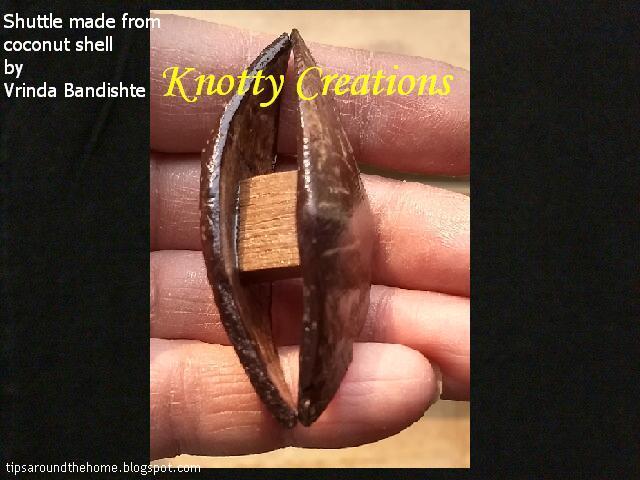
Before I leave, another glimpse of her multiple talents - a handmade and handcrafted shuttle. 
Can you guess the material?
Tatting Shuttle made from a Coconut shell !!!

Many many thanks to Vrinda for sharing her lovely patterns

hope you have tons of fun tatting up squares :-)


Tuesday, 20 March 2018

65 + 126 + 24 and one

Pin It now!
Sent and received !
Rather sent and received and sent and received and sent and received and sent and received...

When the hubster realised I was going to send 55 squares, he panicked and insisted I courier them. Cho chweet. 
In the end, though, I sent in 65 squares : 55 from Cathy’s original pattern and the rest from 3 of my patterns (Classic Square ; Heart Square ; & Quatrefoil Square in size 40). I tied them in batches of 5.

Since the rates were same for the first 500 gms, I asked Usha whether she would like me to include her group's work as well. She couriered me the package, & I received it along with a surprise  ....
A beautiful letter and her exquisite lanyards and oh so lovely beads !!! 
Yay. It came in handy almost immediately when my new glasses became a bit loose & I feared dropping them! Very light & beautifully worked - the sparkle of the crystals is not captured here. 

So the 1st sent was by Usha & her group; received by me.

The Happy Tatters group had collectively sent in 126 squares, some from own original designs. 
9 tatters with 126 squares and wishes (scroll down for screenshot).

Even with our collective tatting and stuff, the padded envelop barely weighed 200gms!

Thus 2nd sent was by me (through my BIL); received by Cathy a couple of days later.

Meanwhile I received another envelope from Vrinda, delayed by a day, with 24 more squares - 
4 each from 6 original patterns! Wow!
We decided to send this by ordinary mail, keeping our fingers crossed.

The 3rd sent was by Vrinda; received by me.
4th sent was by me in a new envelope; received by Cathy about 12-13 days later.

I am so very fortunate to have seen firsthand all the lovely tatting from the Happy Tatters group !!! You can see a lot of their work on Usha’s blog. Above is a screenshot from Cathy’s facebook listing
And Usha’s gift to me is priceless!
I can take credit for motivating Vrinda to share her square patterns ;-P She has used different techniques to create her squares, and given them adorable names, too. Cathy put each pattern up on facebook.

I also have Vrinda’s gracious permission to share them on my blog. So don’t go away – my next post will have her square patterns (in my notation). And also a listing of the various 3x3 cms squares that creative participants have shared (it’s good to have the links all in one place, right?).

The deadline for receiving squares has been extended to the end of this month 
and the tatted fabric will be displayed at Les Halles Saint Gery.

Many many thanks to Cathy for her graciousness and help throughout,
including sharing her personal address for the courier.


Oh, but before I leave there was another lovely sent & received a few weeks back (this has been a hugely delayed blog post due to health reasons). 
This is the latest and sadly last issue of Frivolté(k)ring. This time they included my Block Heart bracelet pattern. If you remember, last year I had the privilege of sharing my Curly Cross pendant pattern with them. Since it is their last, I asked for a physical copy instead of pdf. They graciously obliged.
A very special thanks to Mari-jan !


Between all this sending and receiving, I have made new friends and forged old ones !
That’s what this global initiative represents – a unity of purpose and meeting of minds.

Oops I forgot to thank the men in my family - hubby & his younger brother for their role in the Tat a Monument in Pink ;-P

Sunday, 11 February 2018

heart square pattern

Pin It now!
My 2nd square pattern is ready, phew. This time I did the presentations for both squares a bit differently. Each is single page, with no listing of techniques, and no real diagrams. I had begun diagramming for the Classic square, but it wasn’t coming together easily. Rather than waste time, I notated counts on the tatted models.
Your feedback will help further improvement.
In time for Valentine’s Day ….
(click to download pdf)

Another 3x3cms square for Tat a Brussels’ monument in pink. Clovers around a central heart. Can be done in single or 2 colours. I prefer the latter. I was quite fed up with pink, so a change of colours was called for!
Worked continuously. 
In CTM, it can be tatted all from the front in clockwise direction.

I deliberately chose a dimpled ring for heart, though my preference is for the folded style 
to be certain that the shape would hold well throughout.


The picot thread can be seen across where the dimple is made. 
If you don’t like it, a bead/pearl on the picot can hide it.
Heart can also be worked as a mock ring/SCMR.

In the right model, I brought the top chain closer to the dip. 
But I don't like the look. An oval/spndle around the heart looks better.

There are clovers around the heart bridged by chains that are linked to the heart below using a Catherine wheel join (cwj) to keep the curve smooth.
NOTE: When using cwj, the core thread in the chains remains free to slide from start to end. Hence take care while snugging stitches.

UPDATE (FEB 13) :  
PLEASE NOTE : the chain before Clover4 ends with a cwj. 
4 cwj 5 cwj (for Lizbeth),  
and
3 cwj 4 cwj (for Anchor).
The 4th clover is again made with 2nd shuttle.

Depending on one’s tatting tension, adjust stitch count such that the outer chain 
is flush but flat around the heart. I have a tight tatting tension.

The last clover is linked back to the first clover using a picot join to the right.
TIP: Before making the join, ensure that Both shuttles are on the same side – preferably to the front – because there is a short chain still to be worked at the end.

Since we needed a specific dimension, the pdf contains instructions for 
size 20 threads in Lizbeth & Anchor both.

YYYYYYY

A Valentine’s Variation of Classic Square :


As promised in last post, here’s what Anita did – ‘tis the season after all! Hearts instead of plain ol’ rings, and layered to boot! Rest of the square pattern remains same.

(heart variation) : Ring: 6 – 6, 4fhs – 4shs, 6 – 6

TIP: The picot between seta & setb “emphasizes the point of changing directions”.

Now how about interlocking the 4 hearts – I’ll have to needle-tat it some day!


happy tatting J

Saturday, 10 February 2018

classic square pattern

Pin It now!
Honestly, tatting takes much less time than writing and presenting a pattern !!! I’d venture that even designing and trials take less time!

I created 2 patterns for the Tat a Brussels’ monument in pink and was going to make a combined pdf and post. However, it is taking forever, and I realise how late I already am. So, here’s my first pattern for now and the other will follow shortly.

(click to download free pattern)

It is a 2-shuttle adaptation of my single shuttle Inchie-Two, and made slightly larger to comply with 3x3cm size and to have 4 free picots in the corner.

I was going to name it flower/floral square because there seems to be a rose blooming between 4 corner leaves. When I showed it to my friend she said it was a ‘classic square’ and explained it as follows:
I use “classic” as a term for tatting that appears to be a simple, pleasing rings & chains project. Not a brain-twister. Something that has a timeless appearance.
 – Anita Barry.

.
Truth be told, there is a bit of pitfall. When joining the 2nd inner ring to 1st, I kept linking to the wrong picot! We are so used to joining to a free picot, that my hands automatically did the same. However, the linkage is to the same picot where the previous chain is lock joined. Beware :-D

I worked it in Anchor size 20 as all the other squares. But most tatters don’t use this thread. So I pulled out my single size 20 Lizbeth and adjusted the stitchcount. Mostly adding 1ds to each segment. 
Hence the conversion is fairly easy. It worked in the 2nd square pattern as well. I am keeping this ball for future conversions - more work, but it will make the patterns more universal.


The pdf contains stitch count for both threads as well as for single and 2 colour versions.


Wanting a more flowery look, I increased the chains slightly. 
But it ruffles and needs blocking to flatten out. 

There are many alternate square patterns already shared on respective blogs and Craftree. I didn’t need to create more. It is merely a personal challenge – “Can I?”.
And since the logistics of mailing my original squares changed, I had time on hand. I will now be couriering them on the 19th.


Stay tuned for the next square pattern – in time for Valentine’s ! Along with Anita's variation of this square which she sent me last night (need to ask permission).
Meanwhile I hope you enjoy working this square and adapting it to your pleasure.

For more squares, scroll down to Motifs/Medallions here.