Showing posts with label healthy eating. Show all posts

Tuesday, 30 November 2021

peel the beet

Pin It now!

One of the staples in my fridge is raw beetroot pickle. Ages back my friend had shared this simple recipe but the tip on how to peel raw beetroot was my Mom's. Mom had such a curious nature and never stopped learning and experimenting.

Scrub and clean raw beetroots in water. Dunk them fully in clean water and refrigerate overnight. I often leave it for longer, depending on my mood or if I get busy. The thickness of skin might also affect the time, so try it out...
Notice that hardly any colour has seeped out.

Next day, cut off the tapering portion (not on the leaf side) and with a simple knife start peeling the skin back like a banana! No need for a peeler, etc. I actually enjoy it ;-D

Well the next step is grating the beet. Make a solution of cider vinegar, sugar (I use either brown sugar or boora), pinch of salt, pepper. Mix in the grated beet, put in an air-tight jar, and refrigerate. It can be eaten immediately, but certainly the next day onwards.

I hate cooked beet. So this recipe is something that appeals to me and is a quick replacement for a proper salad. A healthy side adding tangy sweetness. It goes well with so many cuisines!

How do you prepare and eat your beets?

Friday, 30 September 2016

from pin to pin

Pin It now!


Confession : This month I did not work on any project specifically for the pinterest challenge.

Yes, I did make a start with my personal challenge of 2D tatting design, but this post will not talk about that.

Instead, I will fall back upon a few things I have been doing ever since I saw them on pinterest. Please excuse the quality of pics – they were taken back in 2013 (when I was still new to photography) & I don’t even have the unmarked stock pics. I urge you to check out the original posts for the great pics and instructions. Mine don’t do any justice to them, although it has become part of my life.

Healthier Butter

It all started with Jillee’s post on how to make your own herb butter.
For daily application, herb butter wouldn’t be accepted in my home, so I skipped the herbs and mixed only butter and olive oil – almost equal amounts.
Mix normal Butter with desired amount of Olive Oil 
(I used approximately equal amounts - 50gm butter + ~50ml olive oil). 
Mix with fork if quantity is less, as in this case, or pulse in blender as Jillee did.  
Olive oil has blended with the butter. Refrigerate and use as normal

I use a stainless steel container with tight lid. This small container easily fits into the bread box sitting cozily beside the bread.
And due to the oil, the refrigerated butter quickly 'thaws' to room temperature when taken out & kept on the kitchen counter. No longer need to Remember to take the butter out earlier !

Besides toast and sandwiches, I sometimes use it for grilling, too – oil gives it the fat, and butter the colour.
Works great in baking too - I use this for cookies, muffins & cake....

Eggless Cake using healthier butter

This was my first attempt at baking an Eggless cake & it wasn't As spongy as my usual cakes (with eggs) although the taste was great. It had a slightly denser feel, which I remedied the next time. I used Sharmi's Chocolate chip cupcake recipe (sans the chocolate chips)  
This pic was taken a few days After the cake was baked – more than half had already been consumed and the remaining pieces relocated into a smaller container. When I remembered, I just took the container out of the fridge and immediately took a pic. Hence the dry, crumbly look.

I have since used the healthy butter in muffins and cupcakes as well. They all bake fine.

Tear Drop Eggless Shortbread Cookies
I chose a slightly healthier version
1. A mix of APF & whole wheat flour (3:1)
2. A mix of butter & olive oil (the healthy butter above)
3. Only about 75-80 g of the butter & oil mixture.
Frosting would've improved the look, but added calories, hence not applied ;-)

As the visual show, baking is not my forté . My cakes and muffins come out great in taste, but cookies & biscuits have a love-hate relationship with me.

That’s it for this month.
I did overcome a personal challenge by finally being comfortable with designing 2D tatting patterns. Simple and small for now, but I felt the barrier lift. This month will always remain very special to me – my shuttles are actively tatting up little medallions and motifs, yay!

To see some really special stuff, though, let’s all hop over to our talented group (you are welcome to join in any time; simply pick a monthly pin from pinterest !) :

happy pinning :-)

Sunday, 28 February 2016

Spicy Pin Chicks

Pin It now!

It’s that time of the month again – a little earlier than usual.
As declared in my previous posts, I want my choice to be practical around the house & justify my blog url since tatting has taken over the diversity I had set out with.
My project for the pinterest challenge is very simple, but thoroughly yummy, adding a sweet spiciness to my dishes ! And an apt coincidence – we are now 5 Pin Chicks & like the 5 Spice Girls, adding flavour to our blogging lives :-)

Pickled Vegetables

Jane McLellan first tried it late last year, leading me to the original recipe here by Recipe Girl
I have it pinned on my Recipes board here. The recipe was followed down to the letter – well almost....
Make it Your Own
I wanted shallots instead of onion pieces, but didn’t get a hold of them. I reduced the amount of sugar, salt & vinegar just a tad, since it was going to be kept in the fridge anyways. And I added more pieces of ginger than specified in the original – love the flavour & taste. That's the joy of cooking - customized to suit one's tastes.
A Multi-cuisine Accompaniment 
It is a great accompaniment to rice, breads, salads, etc. Not spicy-hot At All, as Indian pickles go. Loved the sweetness it imparted & the delicate crunch of the vegetables. Whether it was our staple north Indian meal of roti & rice, or Mughlai/Tandoori cuisine, or Continental - the pickle was a hit.
Like Karaoke ! 
Rustle up a simple instant salad by adding a few lettuce level & jalapeños !
I really like the Instantaneous vegetable mix for salad ; no washing, peeling, cutting, seasoning, …. simply scoop out of the jars! No wonder it got over so soon.
Encore !
With hardly any pickle pieces left, I added a fresh batch of veggies, including turnips & onions this time, to the pickle solution. This worked great, too !
And then a 3rd & a 4th batch were added as the earlier ones dwindled. I did increase some sugar & salt & vinegar after the 2nd batch. All ready for a 5th batch soon !

Song of Happiness
The pickle is just Meant for egg salad ! I pick out some red pepper, onion & carrot pieces, dice them finely & mix with diced boiled eggs along with jalapeno peppers & very little seasoning.
Perfect egg salad sandwich !!! Sorry no pics for this, because I usually make this for dinner & the night is not suitable for photographs. You’ll just have to take my word for it, or why not make a batch yourself ?!


For more creative surprises, please don’t forget to check out what these lovely Pin Chicks have been up to : (click on names to reach their blog) the leader chicks - Suzanne Margaret,  ; & we, the follower chicks - Carollyn & Alma (our newest chick has added a separate page dedicated to this challenge!).

Till next month, then, happy pinning :-) 
  

Pinterest Challenge 2016 #2


Tuesday, 31 December 2013

TWFM #6 : Secret Ingredient for Non-Bitter Methi/Fenugreek : CURD

Pin It now!

HOW  TO  REMOVE  BITTERNESS  OF  FENUGREEK (METHI) 

aka 

TRICK  KIDS  INTO  EATING  MORE  OF  THESE  GREENS !


Kids won't eat fenugreek?
Methi leaves are too bitter?
Looking for a tastier option?


As a child, we were forced to eat methi ki sabzi despite our pronounced dislike of the bitter taste, all in the name of "This is good for you"! *  This dislike carried on well into my adulthood. Well, not any longer ! I now look forward to winters, when I can buy & devour fresh fenugreek greens with relish.

For me, the easiest way to eat a dose of the good-for-you greens Daily, without tiring of it, is to knead it in dough & make chapatis, etc. And to get rid of the bitterness, my secret sure-shot ingredient is CURD ! 

Curd / Yogurt adds flavor, enhances nutrient value, And most importantly, masks the bitterness of methi / fenugreek.
Simply grind with curd & add to flour Or make it even tastier & more interesting by including a few spices, etc. a la Thepla, except with More greens than in the latter !

1. Bunch of Methi Leaves
2. Some Methi leaves de-stemmed,
washed & drained


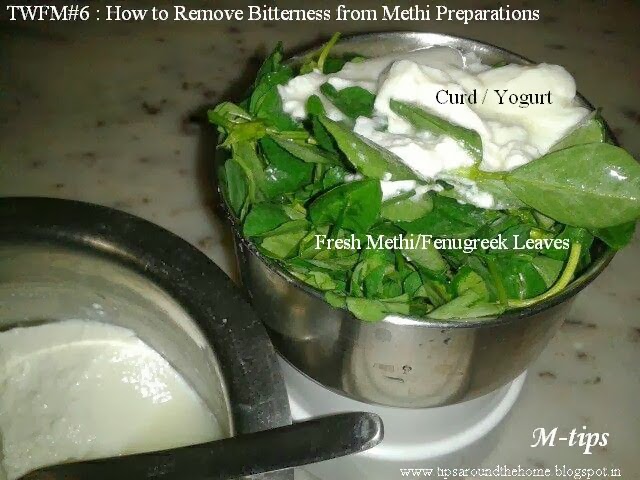
De-stem the leaves; wash, & drain excess water; put the leaves in a mixer-grinder jar or food processor Without Any Chopping ! Add some thick curd or unflavored yogurt and grind to fine paste. 
Usually, no extra water is required.

 3. Add Curd / Yogurt to Methi Leaves & grind.

TIP : If so desired, one can pulse & grind to a coarse mixture. A coarser mixture will have bits of leaves showing in the dough, which also looks & tastes good, adding a bit of texture & crunch.

This fenugreek-curd mixture is now ready to be added to flour & kneaded. 

Grinding to a paste/mixture & Then adding to flour, ensures that More Quantity of greens gets used than if we were to coarsely chop leaves & add to flour.

However, to make it tastier, more appealing & Versatile, I add some spices to create a Thepla  style dough but with much much larger quantity of greens !

4. Combine Ingredients & Knead

TIP : Besides spices, I often add some extras such as gram flour (besan), moong dal flour, soya flour, oatmeal, etc. to make a multi-flour mix & a complete Meal. 

5. Non-bitter Methi Dough is Ready !

   Once all the ingredients are collected together, combine & knead into dough of soft consistency. Add water Only if required. The dough is ready ! Let it rest for a while before rolling out into bread that remains soft & fluffy !


This dough can be used to make rotis & chapatis, paranthas, theplas, pooris (stiffer dough for pooris), etc. 
Serve with thick curd/yogurt, chutney, pickle, curry (especially potato-tomato curry), sweet pickle, papads, dals, etc.  Simply Substitute usual whole wheat rotis/breads with this Healthier version. Keep it versatile & interesting ;-)
These are yummy, when served hot, but remain soft even when served cold, due to addition of curd.
Serve for breakfast, as a normal bread substitute for main meals, or send it packing in a lunch-box!

Refrigerate the leftover dough for later. It keeps well for upto a week !
TIP : Add or brush with some oil, if required. I usually knead a larger quantity of flour & brush a tiny amount or olive oil over the remaining dough when refrigerating. This helps the dough to retain it green color for longer.    

Instant Methi Mix :

Since I had a huge bunch of methi, not all of it        
6. Freeze leftover methi-curd mixture for future use.

could be consumed in the near future. 
Hence, I processed some more of the leaves with curd, transferred the mixture into a stainless steel container with lid & pushed it into the freezer. Whoa! It stayed good for the next 3 weeks at least. And I got myself an instant mix to use as desired.

All I needed to do was take it out the freezer, let it thaw & use the desired amount. One can freeze in batches separately as well. Simply remove one batch, thaw & use. 
Saves the time & trouble of de-stemming, cleaning, processing, etc. every time.
Photo#6 shows the methi-curd mixture that I had frozen in a stainless steel container, partially thawed.

TIP : For quicker thawing, one can place the steel container in a bowl of warm water. One can use the microwave, but then wither transfer contents to a glass bowl or freeze in microwave-proof containers. [I  Never store & microwave in plastic containers].

Go Green !                                                                   

Methi Breads served with salad
All bitterness leaves the leaves when curd is added to dough !

And here's how it looks when rolled & cooked to make chapatis & paranthas. Since I had frozen the mixture without any spices, etc., this time I added a couple of Tablespoons of besan flour along with spices to the wheat flour. Chapatis came out 'Martian' green while the paranthas (stuffed with homemade paneer / cottage cheese ) looked a bit paler (due to the white stuffing inside) ! 


Here's to a warm green nutrient-filled, tasty snack / bread for kids & adults alike, 
to keep us healthy & bright in the cold winters :-)
  

 Nutritional Profile of Methi / Fenugreek Leaves