Pin It now!
HOW TO REMOVE BITTERNESS OF FENUGREEK (METHI)
aka
TRICK KIDS INTO EATING MORE OF THESE GREENS !
Kids won't eat fenugreek?
Methi leaves are too bitter?
Looking for a tastier option?
As a child, we were forced to eat methi ki sabzi despite our pronounced dislike of the bitter taste, all in the name of "This is good for you"! * . This dislike carried on well into my adulthood. Well, not any longer ! I now look forward to winters, when I can buy & devour fresh fenugreek greens with relish.
For me, the easiest way to eat a dose of the good-for-you greens Daily, without tiring of it, is to knead it in dough & make chapatis, etc. And to get rid of the bitterness, my secret sure-shot ingredient is CURD !
Curd / Yogurt adds flavor, enhances nutrient value, And most importantly, masks the bitterness of methi / fenugreek.
Simply grind with curd & add to flour Or make it even tastier & more interesting by including a few spices, etc. a la Thepla, except with More greens than in the latter !
 |
| 1. Bunch of Methi Leaves |
 |
2. Some Methi leaves de-stemmed,
washed & drained |
De-stem the leaves; wash, & drain excess water; put the leaves in a mixer-grinder jar or food processor Without Any Chopping ! Add some thick curd or unflavored yogurt and grind to fine paste.
Usually, no extra water is required.
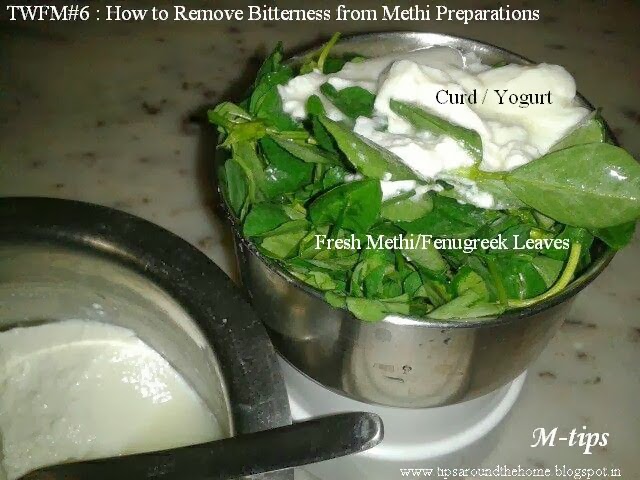 |
| 3. Add Curd / Yogurt to Methi Leaves & grind. |
TIP : If so desired, one can pulse & grind to a coarse mixture. A coarser mixture will have bits of leaves showing in the dough, which also looks & tastes good, adding a bit of texture & crunch.
This fenugreek-curd mixture is now ready to be added to flour & kneaded.
Grinding to a paste/mixture & Then adding to flour, ensures that More Quantity of greens gets used than if we were to coarsely chop leaves & add to flour.
However, to make it tastier, more appealing & Versatile, I add some spices to create a Thepla style dough but with much much larger quantity of greens !
 |
| 4. Combine Ingredients & Knead |
TIP : Besides spices, I often add some extras such as gram flour (besan), moong dal flour, soya flour, oatmeal, etc. to make a multi-flour mix & a complete Meal.
 |
| 5. Non-bitter Methi Dough is Ready ! |
Once all the ingredients are collected together, combine & knead into dough of soft consistency. Add water Only if required. The dough is ready ! Let it rest for a while before rolling out into bread that remains soft & fluffy !
This dough can be used to make rotis & chapatis, paranthas, theplas, pooris (stiffer dough for pooris), etc.
Serve with thick curd/yogurt, chutney, pickle, curry (especially potato-tomato curry), sweet pickle, papads, dals, etc. Simply Substitute usual whole wheat rotis/breads with this Healthier version. Keep it versatile & interesting ;-)
These are yummy, when served hot, but remain soft even when served cold, due to addition of curd.
Serve for breakfast, as a normal bread substitute for main meals, or send it packing in a lunch-box!
Refrigerate the leftover dough for later. It keeps well for upto a week !
TIP : Add or brush with some oil, if required. I usually knead a larger quantity of flour & brush a tiny amount or olive oil over the remaining dough when refrigerating. This helps the dough to retain it green color for longer. Instant Methi Mix :
Since I had a huge bunch of methi, not all of it
 |
| 6. Freeze leftover methi-curd mixture for future use. |
could be consumed in the near future.
Hence, I processed some more of the leaves with curd, transferred the mixture into a stainless steel container with lid & pushed it into the freezer. Whoa! It stayed good for the next 3 weeks at least. And I got myself an instant mix to use as desired.
All I needed to do was take it out the freezer, let it thaw & use the desired amount. One can freeze in batches separately as well. Simply remove one batch, thaw & use.
Saves the time & trouble of de-stemming, cleaning, processing, etc. every time.
Photo#6 shows the methi-curd mixture that I had frozen in a stainless steel container, partially thawed.
TIP : For quicker thawing, one can place the steel container in a bowl of warm water. One can use the microwave, but then wither transfer contents to a glass bowl or freeze in microwave-proof containers. [I Never store & microwave in plastic containers].Go Green !
 |
Methi Breads served with salad
All bitterness leaves the leaves when curd is added to dough ! |
And here's how it looks when rolled & cooked to make chapatis & paranthas. Since I had frozen the mixture without any spices, etc., this time I added a couple of Tablespoons of besan flour along with spices to the wheat flour. Chapatis came out 'Martian' green while the paranthas (stuffed with homemade paneer / cottage cheese ) looked a bit paler (due to the white stuffing inside) !
Here's to a warm green nutrient-filled, tasty snack / bread for kids & adults alike,
to keep us healthy & bright in the cold winters :-)
* Nutritional Profile of Methi / Fenugreek Leaves


