Showing posts with label pin chick. Show all posts

Saturday, 30 April 2016

pin pricks for this pin chick !

Pin It now!

A bit dramatic, but fairly true.
This month’s choice for our pinterest challenge was an idea I derived 5-6 years back & have shared it many times on Yahoo!Answers back in the day. It remained a want-to-make idea till this challenge challenged me to get on and make it ! I really want to thank the pin chicks for starting this challenge – so many of my old pins are now coming to life.

After the bedroom, kitchen, & bathroom, this time it’s the turn of the dining room! This pin has been a longtime resident at my DIY Crafts board.

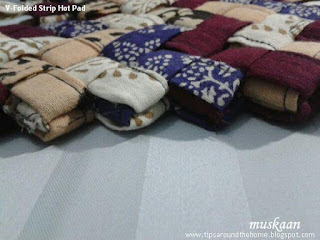
A V-FOLD STRIP HOT PAD
For the dining table

The intention had been to use up my plain rubia 2x2 cotton scraps, but those went into deep storage last year after a bout of rigorous housecleaning. Instead of pulling out the carton, I choose what scraps I had on hand. They are all cotton though of differing thickness & texture. I also got to use my new rotary cutter !
I first checked whether the dimensions in the video would work on cloth. Yes, they did! After sewing the folded strip lengthwise, 3 more folds are required. Paper holds it's folds, but had to use pins to keep the interlinked fabric pieces in place, resulting in a free-for-all pin prick contest !
Some modification & adaptation was called for….

Scraps were collected & cut & folded while machine-sewing the edge in long strings (too lazy to change threads, black/dark grey was used throughout). Forgot to take a pic of this stage.  This is fold #1 in above pic : the lengthwise fold is sewn down with machine. 

Keeping breadth same, I increased the length of each strip by ½cm, and machine-sewed the centre of the folded strip. Now all that was needed was to insert the folded strips to each other to create rows. And this time it worked splendidly; the pieces stayed in place and the short sewing line was not visible in the V-folds.
This is fold #4 in earlier pic, where the extra 1/2 cm is overlapped & sewn all through.

Strong blunt-edged Tweezers helped to pull the strips through the slots.

I chose to align the rows in a zig zag fashion rather than all rectangles facing same direction. 
Thus each alternate row faces opposite to the adjacent rows.

7 rows ; 15 strips for each row ; 105 strips in all.
2 strips create 1 slanting rectangle; the last rectangle is a single strip.
Final measurement of hot pad : approx 6” x 6½” x ¼” . Thickness depends on material used.

To Join The Rows, I chose to hand sew the thick mat. Here was another Major needle prick, with quite some bleeding. Decided to switch to the long sturdy sharp-pointed Sail needle, which worked great with due care. I’d had a vague idea of inserting wooden beads at the intersection points to both sew in the rows, as well as add interest. But it was a non-starter.
I used a combo of hem, whip, and running stitches, passing the needle through the middle folds/layers. 
After every 4-5 stitches, pull the thread (double thread used) taut to tension & hide the stitches; 
then make a kind of back stitch to secure them in place.
All this hand sewing was done from the back side.
I left the end strips to be sewn in last, since the single strips required sewing the flaps together too. For this, a normal needle was used (both needles shown in pic for comparison) and some sewing had to be done from front side as well.
My initial idea of basting a linen cloth base was not required. This pic is  the front view.
This mat is thick & sturdy enough and can be used from both sides. Above is the back view.
One corner of the single strip (top or bottom corner in above pic) can be left open to be 
used as a slot for hanging.
The pics are taken fresh off the needles, with no time to iron. 
However, it lays flat and compact.

This is a fun & playful stash-buster project (except for the hand-sewing)! Remember making these V fold garlands, buntings, bracelets at school ? Here’s another pictorial I found on how to make paper bracelets

There are many steps where I wanted to or could’ve made it prettier.
Eg. use matching thread for sewing (which meant straining my vision & time-guzzler) ;
hide the black sewing line (which meant trips to the ironing board) ;
make parallel sewing lines (meaning more work) ;
hiding the raw edges of the fold more neatly while sewing (too fidgety on the machine) ;

In the toss-up, practical reasoning won in this first attempt. It looks pretty enough & very functional in reality, & my DH liked it ! Each time he’d ask whether I was done sewing (the sewing room becomes a mess when I take up a sewing project & therefore try to combine multiple sewing projects adding to the mess) & what was I sewing … for all that 3rd degree, he could only extract an impish smile from me ;-D . I didn’t want him to prejudge (he is Not a labour-intensive person!). But the hot pad has been passed with flying colours – soon I will hunt out my old scrap stash & change all the store-bought hot pads - I want a woven one too ! 
Unless you insist on distracting me ;-P

Speaking of distractions, check out what the other talented pin chicks have hatched !!!
Margaret , Suzanne & Carollyn have already posted their challenges; Imoshen’s is an ongoing process this month, with 2 posts already uploaded. But I’m not telling – you’ll have to click on the respective names for an eye-candy tour :-)
I’m the last to post this month - you gals keep me on pins & needles ;-P


Happy pinning & join us anytime you wish
(all you need is to contact Suzanne)


Thursday, 31 March 2016

Keeping up

Pin It now!

Keeping up with upkeep , with so much tatting around ?! A Herculean task.
That is why the Pinterest Challenge is my ticket to keep at it, albeit at a monthly snail’s pace.


We bought this little wooden ‘antique-look’ chest about 8-10 years back. The brass overlay work was shining, the wood nicely polished . This is used to store hand towels in the bathroom. When an item is new, maintenance is so easy (and age was on my side)! Gradually, with time & eventual negligence, this is how the side facing the bathing area started to look ; the front is in no great shape either (leftmost in top pic). One can’t eliminate water splashes completely, despite the shower curtain ;-(


This pin has been on my DIY board for nearly 2 years now. It is among my most re-pinned images.
It was finally time to roll up my sleeves & get to work.
Materials : Oil, Vinegar, rag/towel
Quickly mixed up some vegetable (cooking) oil & vinegar (3:1), gave the jar a shake – it is an emulsion & sat down with a kitchen towel (the fiber roll type). That’s all one needs!
Applied the emulsion with the towel & left it in sunshine (for better absorption).
That’s it! Didn’t even rub it in.
Applying emulsion to left panel
Left panel after a few days
I’m sure if I do this regularly, it will get back all it’s original beauty. With a single application, there has been a marked change. With a few more applications spread over the next few months, the spots should disappear completely. 
TIP : I might even mix in some coffee powder to add colour! 
Top panel immediately after application of emulsion
This was my challenge completed. But the upkeep wasn’t over. The brass needs to be polished, too!


Easy Brass Polish

Simple tamarind paste as brass polish !
Materials : Tamarind Paste/pulp , toothbrush, rag, & water.

I had a few ideas in mind besides Brasso, which I do not like much (this branded brass polish does make the item shine but for a very short duration; and it is all chemical). For vases, etc. I use tamarind pulp. I tried store-bought salted tamarind paste (Dabur Homemade) . The paste worked quickly on the least affected brass parts. 

In the step 2 (top right) of process pic above, I have tried to show 3 areas within the same brass circle for comparison : (in counterclockwise direction) before any application of paste ; with tamarind paste ; paste applied & wiped off. 
More applications required for gunk build-up
The most difficult was the left side again. All that build-up took me many repeats before I realized that if a few drops of water are added after brushing, it wiped away the gunk easily. Repeat application, brushing, adding water, wiping for as many times as required. I think the before/after pics speak for themselves.

TIP : Lemon wedges & citric acid crystals (with a few drops of water) were the other two materials I tried this time. The results are inconclusive – they would work for regular cleaning & polishing, not for old & hard build-ups. I intend to scrub some areas regularly whenever I have a few leftover lemon slices.

With a bit more elbow grease & time, I could’ve done a better sparkling job. But my intention was to start with the upkeep & keep it up in future rather than tire myself out into distaste. I am very satisfied & motivated to regularly maintain the maintenance of this box !

So I’ve moved from the bedroom to the kitchen to now the bathroom. What next ?!

Before we answer that, don't forget to take a tour of what our other 
much more creative pin chicks are up to - 
Join us anytime you like - more chicks the merrier :-)


Sunday, 28 February 2016

Spicy Pin Chicks

Pin It now!

It’s that time of the month again – a little earlier than usual.
As declared in my previous posts, I want my choice to be practical around the house & justify my blog url since tatting has taken over the diversity I had set out with.
My project for the pinterest challenge is very simple, but thoroughly yummy, adding a sweet spiciness to my dishes ! And an apt coincidence – we are now 5 Pin Chicks & like the 5 Spice Girls, adding flavour to our blogging lives :-)

Pickled Vegetables

Jane McLellan first tried it late last year, leading me to the original recipe here by Recipe Girl
I have it pinned on my Recipes board here. The recipe was followed down to the letter – well almost....
Make it Your Own
I wanted shallots instead of onion pieces, but didn’t get a hold of them. I reduced the amount of sugar, salt & vinegar just a tad, since it was going to be kept in the fridge anyways. And I added more pieces of ginger than specified in the original – love the flavour & taste. That's the joy of cooking - customized to suit one's tastes.
A Multi-cuisine Accompaniment 
It is a great accompaniment to rice, breads, salads, etc. Not spicy-hot At All, as Indian pickles go. Loved the sweetness it imparted & the delicate crunch of the vegetables. Whether it was our staple north Indian meal of roti & rice, or Mughlai/Tandoori cuisine, or Continental - the pickle was a hit.
Like Karaoke ! 
Rustle up a simple instant salad by adding a few lettuce level & jalapeños !
I really like the Instantaneous vegetable mix for salad ; no washing, peeling, cutting, seasoning, …. simply scoop out of the jars! No wonder it got over so soon.
Encore !
With hardly any pickle pieces left, I added a fresh batch of veggies, including turnips & onions this time, to the pickle solution. This worked great, too !
And then a 3rd & a 4th batch were added as the earlier ones dwindled. I did increase some sugar & salt & vinegar after the 2nd batch. All ready for a 5th batch soon !

Song of Happiness
The pickle is just Meant for egg salad ! I pick out some red pepper, onion & carrot pieces, dice them finely & mix with diced boiled eggs along with jalapeno peppers & very little seasoning.
Perfect egg salad sandwich !!! Sorry no pics for this, because I usually make this for dinner & the night is not suitable for photographs. You’ll just have to take my word for it, or why not make a batch yourself ?!


For more creative surprises, please don’t forget to check out what these lovely Pin Chicks have been up to : (click on names to reach their blog) the leader chicks - Suzanne Margaret,  ; & we, the follower chicks - Carollyn & Alma (our newest chick has added a separate page dedicated to this challenge!).

Till next month, then, happy pinning :-) 
  

Pinterest Challenge 2016 #2


Sunday, 31 January 2016

coPINg with memories

Pin It now!


Jogging your memory on this Memory Afghan from the Floral Fiesta Afghan pattern by Maggie Weldon. I started it in Nov 2014 & completed on Jan 10th 2016 spanning two winters. 
I am entering this as my very first Pinterest Challenge. The challenge has entered its 2nd year and we are now the Pin Chicks !!! It is a novel idea started by 2 bloggers Suzanne & Margaret to choose one pin every month & do the project/task/activity. It can be Anything you wish, and everybody posts on the last day of the month. Adding to the fun & mystery, the project remains a complete secret till posted. 

So why am I picking this as my first Pin Chick project ? Because it all started two years back with this pin on pinterest ! The image immediately caught my fancy – such a beautiful pattern that would use up my yarn stash! A stash that had built up over the past 20 years from leftover yarn. Later, in my bid to work out a border/edging, I referred to several other pins.


I will let the pictures do most of the talking, even though the photographs have failed to replicate the cheerful brilliance & subtle shade differences of actual colours … And remember, there is more to come (read on)

Following the strong & almost unanimous preference here to use a lighter colour for border, I had lined the periphery with darker colours/shades. This would create more of a contrast with a lighter border.After joining 12 motifs, laid point-to-point, along the breadth & 18 along the length, I decided it was complete, and required only a border & edging. 

Maggie's pattern does not have any border/edging ; she weighs down the points with tassels. Tassels look very pretty but are not always practical. So I had to figure something out. I did so want to keep the ridges intact - no plain old rectangle ! 

Following is some of what I tried. This is inspired by another pin here, with image only & no pattern. I looked at many other pins on my Crochet Stitches & How-tos board for inspiration & pattern, but loved the slight overlapping effect created by the spike/dropped stitch.

  • Spike/Dropped stitch : Insert the crochet hook through the base of previous row & pull up a loop to crochet.
  • Picot : chain 3, slip stitch in 3rd chain from hook.
  • All stitches are worked in/through the back loop.
Trial 1 : 
1 in pic, in white :  Row 1 - slip stitch in back loop  
                           Row 2 - single crochet in back loop, & spike/dropped                                                stitch at the notches   
2 in pic, in yellow : Row 3 - sc in back loop, & spike stitch at notches
3 in pic, in black :   Row 4 - slip stitch in back loop, and spike stitch at                                                  notches.
 Trial 2 : The single yellow row got lost between the white & black. Hence I added one more yellow row, worked same as Row 3 above. Thus 2 white, then 2 yellow rows. The spike stitches are more clearly visible here, although the lack of contrast between white & yellow masks everything.
The last row in black, with slip stitch in back loop & the spike stitch at notches, adding a picot at the tip. 
I liked the well-defined arched look, & tried it around some more motifs for colour-play. After the final black row, the edging seemed to flatten out too, & I hoped that with usage, it will flatten out further. 
So, got right down to work around the entire afghan.
 Two rows of border completed, using off-white/cream wool.
Started the 3rd row, but the ruffling only increased ! I did not do the math properly & this cream yarn was thicker & looser than the baby wool in the trials :-(
Note to self : always do your homework first , use Same yarn for trials as for final version, & don't bite more than you can chew !
This is where I left off last season.
So what did I do next ? 
Continued / Corrected / Changed / Chucked ??? 
For the grand reveal to this great suspense, wait a while coz I still have to take photographs, teehee .

A couple more pics .... 
 from front, and
from the wrong/back side. Yes, lots of ends to hide ! 


But don't leave just yet. Please take a few minutes to 
check out the immense talent of these Pin Chicks 
(in alphabetical order ; click on name for respective blog)!
We will gather again on the last day of Feb. Hope you join us as 
a pin chick &/or reader :-)


Pinterest Challenge 2016 #1
Related Posts : Just Starting

Happy Crocheting & Pin Chicking  :-)))