A bit
dramatic, but fairly true.
This
month’s choice for our pinterest challenge was an idea I derived 5-6 years back & have shared it many
times on Yahoo!Answers back in the day. It remained a want-to-make idea till
this challenge challenged me to get on and make it ! I really want to thank the
pin chicks for starting this challenge – so many of my old pins are now coming
to life.
After the
bedroom, kitchen, & bathroom, this time it’s the turn of the dining room! This pin has been a longtime resident at
my DIY Crafts board.
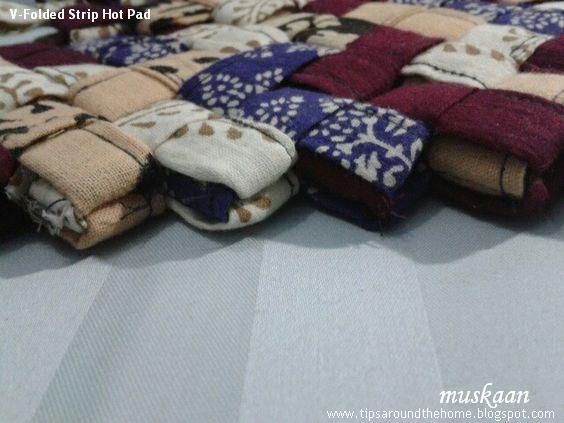
A V-FOLD STRIP HOT PAD
For the dining table
Derived from kativilaga’s Paper Panier

I first
checked whether the dimensions in the video would work on cloth. Yes, they did! After sewing the folded strip lengthwise, 3 more folds are required. Paper holds it's folds, but had to use pins to keep the interlinked fabric pieces in place, resulting in a
free-for-all pin prick contest !
Some
modification & adaptation was called for….
Scraps were
collected & cut & folded while machine-sewing the edge in long strings
(too lazy to change threads, black/dark grey was used throughout). Forgot to
take a pic of this stage. This is fold #1 in above pic : the lengthwise fold is sewn down with machine.

Keeping
breadth same, I increased the length of each strip by ½cm, and machine-sewed
the centre of the folded strip. Now all that was needed was to insert the
folded strips to each other to create rows. And this time it worked splendidly;
the pieces stayed in place and the short sewing line was not visible in the V-folds.
This is fold #4 in earlier pic, where the extra 1/2 cm is overlapped & sewn all through.
This is fold #4 in earlier pic, where the extra 1/2 cm is overlapped & sewn all through.

Strong blunt-edged Tweezers
helped to pull the strips through the slots.

I chose to
align the rows in a zig zag fashion rather than all rectangles facing same
direction.
Thus each alternate row faces opposite to the adjacent rows.
7 rows ; 15
strips for each row ; 105 strips in all.
2 strips
create 1 slanting rectangle; the last rectangle is a single strip.
Final
measurement of hot pad : approx 6” x 6½” x ¼” . Thickness depends on material
used.
To Join The Rows, I chose to hand sew the thick mat. Here was another Major needle prick,
with quite some bleeding. Decided to switch to the long sturdy sharp-pointed
Sail needle, which worked great with due care. I’d had a vague idea of
inserting wooden beads at the intersection points to both sew in the rows, as
well as add interest. But it was a non-starter.

I used a
combo of hem, whip, and running stitches, passing the needle through the middle
folds/layers.
After every 4-5 stitches, pull the thread (double thread used)
taut to tension & hide the stitches;
then make a kind of back stitch to secure them in
place.
All this hand sewing was done from the back side.
All this hand sewing was done from the back side.

I left the
end strips to be sewn in last, since the single strips required sewing the
flaps together too. For this, a normal needle was used (both needles shown in pic for comparison) and some sewing had to be done from front side as well.

My initial
idea of basting a linen cloth base was not required. This pic is the front view.

This mat is thick &
sturdy enough and can be used from both sides. Above is the back view.

One corner of the single strip (top or bottom corner in above pic) can be left open to be
used as a slot for hanging.

The pics are taken fresh off the needles, with no time to iron.
However, it lays flat and compact.
This is a
fun & playful stash-buster project (except for the hand-sewing)! Remember making
these V fold garlands, buntings, bracelets at school ? Here’s another pictorial
I found on how to make paper bracelets.
There are
many steps where I wanted to or could’ve made it prettier.
Eg. use
matching thread for sewing (which meant straining my vision & time-guzzler)
;
hide the
black sewing line (which meant trips to the ironing board) ;
make
parallel sewing lines (meaning more work) ;
hiding the
raw edges of the fold more neatly while sewing (too fidgety on the machine) ;
In the
toss-up, practical reasoning won in this first attempt. It looks pretty enough
& very functional in reality, & my DH liked it ! Each time he’d ask
whether I was done sewing (the sewing room becomes a mess when I take up a
sewing project & therefore try to combine multiple sewing projects adding to the mess) & what was I sewing … for all that 3rd degree,
he could only extract an impish smile from me ;-D . I didn’t want him to
prejudge (he is Not a labour-intensive person!). But the hot pad has been
passed with flying colours – soon I will hunt out my old scrap stash &
change all the store-bought hot pads - I want a woven one too !
Unless you insist on distracting me ;-P
Speaking of
distractions, check out what the other talented pin chicks have hatched !!!
Margaret , Suzanne & Carollyn have already posted their challenges; Imoshen’s is
an ongoing process this month, with 2 posts already uploaded. But I’m not
telling – you’ll have to click on the respective names for an eye-candy tour
:-)
I’m the
last to post this month - you gals keep me on pins & needles ;-P
Happy pinning &
join us anytime you wish
(all you need is to contact
Suzanne)
Related Posts : My Pinterest Challenge Projects
Gosh you must have been working on it all month, a lot of work went into the mat and very useful for the dinning room table when placing hot dishes. Lovely colours and a useful item
ReplyDeleteThank you for joining us with such a great item
Margaret
Actually only the hand-sewing took time & effort, Margaret, the rest was play while watching TV, etc. And yes it worked ! Used it last night YAY!
DeleteThis is so fun and interesting, as a child I grew up making the paper ones all the time, so I could do this with my eyes closed really (we use our gum wrappers) :) I never once thought about using fabric, at all, ever. This is such a great idea love it! You could even use one strip to frame a fabric project! I love this, PinChick!!!
ReplyDeleteWe used gum wrappers too, Carollyn !!! And those transparent wrappers made such beautiful buntings, etc.
DeleteGood idea about the frame :-)) This folding has a lot of potential.
Love this, a lot of work but the result is very nice and useful.
ReplyDeleteSome work, lots of fun, and functional - what more can I ask ?! hanks Ninetta :-)
DeleteWow muskaan, that looks very intriguing. I guess you could make the strips less folded for a thinner mat? Be easier to work with but perhaps not quite as useful.
ReplyDeleteYou are so right, Jane ! :-) If one worked with felt, it would be so much easier - no sewing & one could determine the layers/folds.
DeleteWow Muskaan you are so clever, this is amazing! I've seen this v fold style done with paper but never material. I really must try this myself!
ReplyDeleteYou are so kind, Suzanne ! Would love to see you give it a try :-)
DeleteVery nice design and a good use of your scraps.
ReplyDeleteThanks Bernice :-) Kind of like back to the past ;-)
DeleteThat is so neat! I remember making bracelets in a similar fashion. Making it out of fabric...wow, that's amazing!
ReplyDeleteThat looks so awesome!!!! :)
ReplyDeleteThanks Imoshen & Sue :-) It does take one back to school days & activities ;-)
ReplyDelete