Showing posts with label crochet afghan. Show all posts

Saturday, 2 February 2019

waffling

Pin It now!
‘waffling’ [North American]  : fail to make up one’s mind.
Apt! 
I first saw Diane’s admirable waffle stitch afghan(s) and immediately liked the texture! Several months later, Denise’s enthusiasm proved too contagious to resist. And the timing was right as I was convalescing in Dec.

 
After these learning trials, I set about crocheting a cushion cover for hubby’s chair. Which is why I started out with a 15” length. But started to get bored with the single colour (wish I'd factored in some white!) and tied off, changing my plan to an afghan. This first strip is worked along the length, but rest were worked up from the shorter side.

8 strips worked so far in 4 different colours. Each measures around 15”x3½” and weighs about 20gms. Jaypee knitting yarn/wool and 2.25mm/size13 hook.
Multiples of 3 and 2 extra chain stitches to start off, so that I get the same effect on either side.
I used only 2ch to turn.
Wanted to lay them flat before posting, but …

I need plenty more, but don’t know how to arrange them yet. Lots of arrangement ideas jotted in my grid pages, however my current waffling hampers progress!
Meanwhile I had other deadlines to meet, stuff to finish.

One thing is for certain; the entire afghan won't be waffle stitch. I intend to knit a few panels/blocks using different stitches – perhaps in batches of 8.

I kind of got into a rhythm with the stitch and it went fairly quickly; it consume a lot of yarn.


‘waffling’ [British] : speak or write at length in a vague or trivial manner.
Yelp! I’m leaving I’m leaving ;-P

Wednesday, 30 November 2016

whipPINg up …

Pin It now!
… a creamy frothy foamy edging around a surging sea of flowers & wooly memories !

Can’t believe it’s taken me this long to present my ta-dah post. Well, I can finally strike it off my list.  

Although completed much earlier, I am entering this as my pinterest challenge again because it took me many searches through pinterest, many cloudy moments, many trials & errors to finally settle on what was the best or closest fit for what I wanted. It is also the first time I have done something like this in crochet.
My goal : Keep it simple, but keep the focus on the elegant curves & diamond points of each motif around the edge.
When my earlier ideas didn’t quite work the way I would’ve liked them to, another option dawned on me. 
Let me walk you through the process & a few tips that work for me …

Border 1
I had some strong advice to go with lighter shades for the border. Always heed to experience & wise counsel. Decided to make the penultimate round all cream, with only a touch of colour. This made work so much easier ! I could crochet Round 1 all together; then choose the colours & crochet Round 2 ; then the cream for Round 3, attaching on the go.
This pic shows how much fun it was.
Sorry, no pics for the finished penultimate round. I was simply enjoying the rhythm and it was too cold to arrange & take pics. Also, I had begun working at a frenzied pace, coz I had to knit leg warmers before I could get back to tatting (major withdrawal symptoms ☺) Or maybe I just forgot!
Pics lower down give a fairly good idea of the penultimate round.

TIP 1 - how to remember colour choices
As I neared the last rounds of the project, colour choices & combos became more of an issue. Choosing colour combos for specific area took a lot of consideration. Then remembering those choices! I hit upon a simple way. 
After selecting, I crocheted the 1st round & loosely attached it to the adjacent motif where I wanted it. Thus I could cover larger areas quickly & fearlessly, spreading out the shades as much as possible.

Border 2
By now I knew what was required – a cream-only half motif to fill in the triangular space.
Never done it before, and didn’t want to have to cut after every single triangle. Solved it with a couple of trials. TIP : Always use the same yarn for final trial .
Made the 2 center rounds individually; keeping only half the pattern (in center of collage)
Then the last round was crocheted around, joining to the border, and continuing to the next triangle, all in one pass. After 220 motifs (not counting the triangles), each requiring tie & cuts & hides for each of the 3 rounds, this round was a breeze! I could finally crochet all the triangles in one pass !!!
I slip stitched around the corner motif, continuing with the next side till it was all done.

TIP 2 - how to store work safely
Large projects always require stops and starts over many days. Crochet stitches are very easy to unravel – one tug by a curious child or pet, and a whole day’s work may get lost! Here’s what I do to avoid any accidents.
Start to make a chain as usual but pull out a loop long enough to pass the entire yarn/thread ball through ; tension the loop just a bit so as to avoid snarls. That’s it. Even an accidental pull will only end up tightening the ‘noose’ into a stitch; it will never unravel the previous work.
When one is ready to pick up the project again, pass the ball backwards out of the loop & continue as per pattern.
I already delineated some of my tips on how to keep large projects clean when working over a length of time.

My Rainbow !
I’ve always admired Lucy’s cheerful colour palette & wished I had those many colours/shades. Well, guess what, I did !!!
This pic is only a slice – shades chosen from the already crocheted rounds. If I had the patience, the spectrum could’ve been much better. These motifs have the crochet hook inserted through their center.

Final Edging
I had bought this beautiful blue shade just a few weeks back, and it was perfect to rein in the creamy foam of the sea of flowers. 2 rounds of slip stitch (I think). 
All ends trimmed 
So that’s it. Ta-Dah ! Hoped to block the edge before taking pics, but didn’t get around to it. I can live with it, hopefully you can too ;-P
Pattern : Floral Fiesta Afghan by Maggie Weldon. My immense thanks to her for sharing this pattern ! I enjoyed every bit , including figuring out a personalised finish !
Total Motifs : 
Main body - coloured : 12x18 = 120+36=156
Border 1 - complete motifs : 13x2 +19x2 = 26+38 = 64
Border 2 - triangles : 18+18+12+12 = 60
Crochet hook # 9 (3.50 mm)  
Final dimensions : 44" x 64” ; 112cm x 162cm (approx)
Each motif : 2.5" x 2.5" (sides) or approx. 3.25" x 3.25" ( diagonals )
 It’s already in use and is adding such a fantastic splash of colour & cheer ! Although many colours appear same or similar n the pics, in reality, there are differences, and many more shades are visible than in the pic.
It does look like a textured sea of flowers when spread out ☺☺☺☺☺

Just one more pinterest challenge left for this year. 
Let’s see what the talented pin chicks have been up to this month ….

Related Posts :
Pinterest Challenge (click on the tag in right panel)


Sunday, 31 January 2016

coPINg with memories

Pin It now!


Jogging your memory on this Memory Afghan from the Floral Fiesta Afghan pattern by Maggie Weldon. I started it in Nov 2014 & completed on Jan 10th 2016 spanning two winters. 
I am entering this as my very first Pinterest Challenge. The challenge has entered its 2nd year and we are now the Pin Chicks !!! It is a novel idea started by 2 bloggers Suzanne & Margaret to choose one pin every month & do the project/task/activity. It can be Anything you wish, and everybody posts on the last day of the month. Adding to the fun & mystery, the project remains a complete secret till posted. 

So why am I picking this as my first Pin Chick project ? Because it all started two years back with this pin on pinterest ! The image immediately caught my fancy – such a beautiful pattern that would use up my yarn stash! A stash that had built up over the past 20 years from leftover yarn. Later, in my bid to work out a border/edging, I referred to several other pins.


I will let the pictures do most of the talking, even though the photographs have failed to replicate the cheerful brilliance & subtle shade differences of actual colours … And remember, there is more to come (read on)

Following the strong & almost unanimous preference here to use a lighter colour for border, I had lined the periphery with darker colours/shades. This would create more of a contrast with a lighter border.After joining 12 motifs, laid point-to-point, along the breadth & 18 along the length, I decided it was complete, and required only a border & edging. 

Maggie's pattern does not have any border/edging ; she weighs down the points with tassels. Tassels look very pretty but are not always practical. So I had to figure something out. I did so want to keep the ridges intact - no plain old rectangle ! 

Following is some of what I tried. This is inspired by another pin here, with image only & no pattern. I looked at many other pins on my Crochet Stitches & How-tos board for inspiration & pattern, but loved the slight overlapping effect created by the spike/dropped stitch.

  • Spike/Dropped stitch : Insert the crochet hook through the base of previous row & pull up a loop to crochet.
  • Picot : chain 3, slip stitch in 3rd chain from hook.
  • All stitches are worked in/through the back loop.
Trial 1 : 
1 in pic, in white :  Row 1 - slip stitch in back loop  
                           Row 2 - single crochet in back loop, & spike/dropped                                                stitch at the notches   
2 in pic, in yellow : Row 3 - sc in back loop, & spike stitch at notches
3 in pic, in black :   Row 4 - slip stitch in back loop, and spike stitch at                                                  notches.
 Trial 2 : The single yellow row got lost between the white & black. Hence I added one more yellow row, worked same as Row 3 above. Thus 2 white, then 2 yellow rows. The spike stitches are more clearly visible here, although the lack of contrast between white & yellow masks everything.
The last row in black, with slip stitch in back loop & the spike stitch at notches, adding a picot at the tip. 
I liked the well-defined arched look, & tried it around some more motifs for colour-play. After the final black row, the edging seemed to flatten out too, & I hoped that with usage, it will flatten out further. 
So, got right down to work around the entire afghan.
 Two rows of border completed, using off-white/cream wool.
Started the 3rd row, but the ruffling only increased ! I did not do the math properly & this cream yarn was thicker & looser than the baby wool in the trials :-(
Note to self : always do your homework first , use Same yarn for trials as for final version, & don't bite more than you can chew !
This is where I left off last season.
So what did I do next ? 
Continued / Corrected / Changed / Chucked ??? 
For the grand reveal to this great suspense, wait a while coz I still have to take photographs, teehee .

A couple more pics .... 
 from front, and
from the wrong/back side. Yes, lots of ends to hide ! 


But don't leave just yet. Please take a few minutes to 
check out the immense talent of these Pin Chicks 
(in alphabetical order ; click on name for respective blog)!
We will gather again on the last day of Feb. Hope you join us as 
a pin chick &/or reader :-)


Pinterest Challenge 2016 #1
Related Posts : Just Starting

Happy Crocheting & Pin Chicking  :-)))

Wednesday, 21 January 2015

WIPs

Pin It now!
I can safely call this post WIPs … Works in Progress, TIAS included !

New Learning, New Insights

This is my 2nd year of Jane's Tat It And See . I learned a lot in the 2014 series & shared my musings my learning in 2 posts (click on links for respective pages)
Besides the jump-start to learning modern or more advanced techniques in tatting, it was so much FUN that not joining again was Not an option !

I used Anchor Mercer Cotton size 20, Variegated Pink : 4054-1208 

The Firsts
Tatting with/on a button
Like beads, it was on my to-learn list, but as you know, it is always such a long list with shifting attention & priorities. So, this year's TIAS gave me the boost to cross at least one off my list.
Turned out to be pretty easy ! Why did I take so long ?!
I did snag my thread a bit the 1st time, trying to pull it up through the button hole with a fine crochet hook. Why ?!! I had a shuttle with a hook that could pass through that hole ... did I have a hole in my head ?!
Smooth sailing thereafter :-D
Now to tackle beads ..... like I said, the list never ends ;-P

Lock Chain
Seen so many wonderful bookmark tails & Jane's snowflakes, etc. using this technique. I knew how it was made, too. Never got around to actually doing it. So another first. Easy. Just required a little more focus to prevent premature locking down, & keep the chain neat.
TIP : I think the beauty of a lock chain is revealed more when there are contrasting colours in the shuttles.

My guess since Day 2 has remained Crocodile, although I can see where the other guesses are coming from, too. 
TIAS = SAIT !
Tat It And See

commanded Jane, so
Sat And I Tatted,
Saw As I Tatted,
it's a crocodile,  no ?!!


With my Day 6 installment, a few lines based on the main guesses/ categories …. Lots of guesses coming in, but each has some hitch or the other. I’ve tried to include these main guesses, along with their glitches in this verse (but some of them raced right out of my mind when I penned this : Starfish, Wheel, Windmill) :


Squids are slippery
Birds follow suit .
Dragonflies flutter away
Plants hafta take root !

Dolphins are playful
Bunnies are cute .
Crocodiles are toothy
Scissors' a brute !

But the Foxiest conjecture
A Cowboy without Boots !
Oh, Whatever we guess,
Jane cares not two hoots ;-(
                                                                                        muskaan, Jan 2015

And the fun continues !!! Do join in if you haven’t yet :-)


♪♫♪♫♪♫♪♫♪♫♪♫♪♫♪♫♪


Waves In the Sea
(On the Crochet Front)
A couple of pics showing the growing sea of flowers in the MemoryAfghan
Last 10 motifs left to crochet ! Didn’t get around to trying out the border/edging. Waiting to finish motifs & then focus on that.
 

The afghan looks much much better in reality than in the snaps, brightening up the room & livening up the cold wintry greys. DH loves this one the best so far ;-)

♪♫♪♫♪♫♪♫♪♫♪♫♪♫♪♫♪


Daisies in Winter
(Back to Tatting)
I took a day off from crocheting, to test tat Aislyn’s Bookmark, a pattern by Carrie Neahring
It is a fairly easy, beginner’s pattern. Will write about it soon.


♪♫♪♫♪♫♪♫♪♫♪♫♪♫♪♫♪


Related Posts : Learning is Fun with TIAS


Saturday, 10 January 2015

Crochet II

Pin It now!
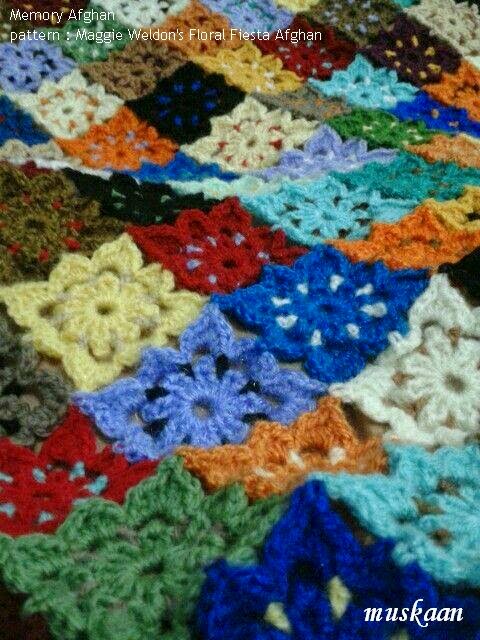
Memory Afghan (part 2)
Pattern : Floral Fiesta Afghan designed by Maggie Weldon (click on link for pattern)  

Thought it was time to update my Memory Afghan with a few pictures & musings. It is still in progress; about 60% complete when these pics were taken (now it is 75-80% done). Have visualized the border; still need to put it to hook to see if it will work. It can wait .....

Some Thoughts / Update :
Small motifs crocheted & joined in this pattern uses up even small scraps of wool.

As mentioned in my earlier post, I have used all kinds of yarn, of varied thickness.  While the size of each motif remains more or less the same, the density may vary, as well as the amount of yarn used. Thicker yarn is used up more & has a denser, fuller appearance.

Pony crochet hook #13 (2.25 mm) used for joining at corners ...


At 190 motifs, the afghan weighed 500 gms and was one diagonal short of the halfway mark. 250 motifs made so far. 12 motifs across (42') & 18 or 19 motifs long to get around 72'. The 35+ colours have kept me motivated, & I am still trying out new combinations.  (Since writing & photographing this, I am now less than 90 motifs short of completing the afghan! Then on to the border)

After the initial random joining of motifs, I systematized & settled to joining from left to right, diagonally, resulting in a growing triangle (till width of 12 motifs is complete). And these are some possible alternate uses of this pattern ….

Some Alternate Applications :

Triangular Wrap
If one works in a triangle, starting from one corner & joining diagonally as one goes, one can create a beautiful Wrap !!! In the pic, the ‘last’ row is still incomplete, but it gives an idea, doesn’t it ?!

Throw Cover or Handbag, with flap
This same triangle can be folded from the corners in the manner indicated by the arrows & numbers; sew on the bottom edge. Voila! We now have a square throw/cushion cover with a flap ! To make the flap stay in place, simply sew on a beautiful button & loop.
If you sew on some strings on either side, you have yourself a handbag or shoulder bag or a jhola bag!!!


 Incidental Advantages
Back to Future Memories :

Colour Palette
An incidental advantage of using so many colours : it acts like a colour palette !!! Trying out various combinations, some in 'unconventional' and unorthodox combos gives rise to some really unexpectedly lovely 'mergers'. Such a project can act as a guide to future colour selections and combinations !

Replacement
In this pattern, not only does one get to use up small scraps of wool, but Just in case some part gets frayed in the future, one can Easily Replace it with another motif !
And if one is using colours in no regular arrangement, then one can replace the motif with whatever colour & yarn is at hand !

Create Memories
One can Deliberately cut off a motif & substitute with scrap yarn from new projects !


Back to School Memories :
Another incidence of why this has turned out to be truly a Memory Afghan. 
It sent me back in time, to school lessons in Maths & Science !

Pythagoras theorem 
Size of each motif, as mentioned in the pattern : 2½” sides & 5¼” diagonal
I got the sides correct & carried on. Eventually when I measured the diagonal, it turned out to be only 3¼” !!!
How it That possible ?! If Both sides are equal, making it a Square, & I got the tension right, why was the diagonal not conforming ?
Pythagoras Theorem to the rescue. Applied it, and turned out the dimensions of my motif were right …. Phew !

Static electricity 
There are so many ends to cut in each motif. (I cut them as soon as one motif is complete). I keep collecting these yarn bits in a little glass jam jar (that has a lid), & throw them out when it fills up.
I also needed a needle frequently, to weave in the ends after each round. To keep the thread lengths short, I used the shortest needle I had. This needle fit in easily in the jar ; easy to pick & put back, whether there were yarn bits in the jar or not. Basically, the jar acted both as a temporary litter-container & a pin cushion ;-))
And look what happened : Static Electricity, resulting in magnetism !!!
Took me way back to my 5th or 6th grade ;-P


TIP : So, how about using yarn bits to stuff in a pin cushion ?! Yes, next time I make a pin cushion. Good recycling, too.


One minor drawback :
Cannot crochet on the go, especially if one is using many colours.
This can be minimized by –
* using very few colours,
* letting the thread ends of each round hang, and
* hiding all the thread ends together at a later stage.  (Not something I relish - too many loose dangling threads, plus such a chore to tackle it all together.)
 

Related Posts : Memory Afghan