Let's revolutionize tatting with beads :-D
 I just don’t know where this will stop ! I had a couple of
effects left to tat and photograph but they multiplied !!! As mentioned before,
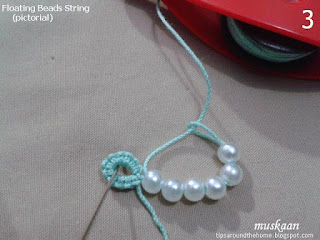
since the basic steps are still the same, the text is minimal. But first things first – the string of FBs .
I just don’t know where this will stop ! I had a couple of
effects left to tat and photograph but they multiplied !!! As mentioned before,
since the basic steps are still the same, the text is minimal. But first things first – the string of FBs .


To avoid going back and forth, here are the basic steps
and their variation in brief :
- Step1
- loop through bead(s) and fold back around the base. Tension.
- Step1
varA – pass shuttle through loop. Tension.
- Step1
varB – work After ring is closed.
- Step2
– overhand/half hitch knot around base of bead(s)
Floating
Beads String
In Ring -
This is a variant of Step 1 where shuttle is passed
through the loop that has been pulled through all the beads.
All the rest continues in same way, with a Step 2 overhand
knot, and a ring around the beaded string.
This same string of beads can be used as a central ring (as
in the earrings).
Only remember to leave some slack on the string to
accommodate the lock joins from next round.


On Chain -


 What if I want 2 beads STACKED one above other, as in this
teardrop and spacer set?
What if I want 2 beads STACKED one above other, as in this
teardrop and spacer set?

And why just 2 beads ? How about more, as in a FRINGE ? Obviously this will only work if the outer bead is larger
or can prevent the loop from unraveling.
Obviously this will only work if the outer bead is larger
or can prevent the loop from unraveling.
Floating Beads – Step 2 variation – differing lengths
 As I mentioned in one of the previous posts, if we leave
more space on the ‘shank’ before tensioning Step 1, we can repeat Step 2 multiple times till the shank is covered. Length of shank determines how far the bead will drop
lower and how many repeats are required.
As I mentioned in one of the previous posts, if we leave
more space on the ‘shank’ before tensioning Step 1, we can repeat Step 2 multiple times till the shank is covered. Length of shank determines how far the bead will drop
lower and how many repeats are required.
 It can be done both on chains and in rings.
 A combination of single FB and FB string
And below you see it on a chain. We require a 2nd
shuttle to make the beaded string on a chain.
Can you not just imagine all the possibilities &
applications ?!!! My head is afloat with ideas brimming to the surface ;-P

ÿÿÿ
Floating
Beads – outside & inside a Mock Ring / SCMR

Tried this idea. It works very well outside the mock ring,
using the other shuttle.
To get a FB on the inside, I completed the mock ring, closed
it. Then added the bead afterwards as in Variation B. But I’m not too
happy with this since this bead is not ‘anchored’ and has a tendency to ‘float’
in a different plane. But at least it is something that can be ironed out in future.
Another idea - SCMR with thrown ring and beads inside both or all rings. Is it doable ?
Another idea - SCMR with thrown ring and beads inside both or all rings. Is it doable ?
ÿÿÿ
Floating
Beads – Stacked , Fringe

I did this on a chain, using the other shuttle. (One can have it inside a ring by using variation B and working the FB After ring is closed).


1. Pull loop through both.

2. Then fold back the loop but
encapsulate ONLY the teardrop.

3. Bring the beads in position, and tension.

4. Step 2 around the base of spacer. Voilà !
No unwinding, no
long-winded procedures.
And why just 2 beads ? How about more, as in a FRINGE ?

Thus, in this application, the 2 steps are spaced out.
This is what I'd wanted to do with the Radiant Sun paperclip pattern , but at the time it did not work out. Time to revisit?
This is what I'd wanted to do with the Radiant Sun paperclip pattern , but at the time it did not work out. Time to revisit?
ÿÿÿ
Floating Beads – Step 2 variation – differing lengths


The overhand or half hitch repeats act like unflipped half
stitches creating a Josephine chain !
One can use complete reverse stitches as in a Floating Chain.
ÿÿÿ
And one last effect –
Floating
Beads – beads within beads

I was going to make a tatted ring/mock around these, but
it was late & I was getting scowls from DH ;-P
The immense possibilities this offers is up for grabs! I adore this effect!
 What else ?
Ah, yes the earring pattern and one last pictorial showing a can I call it more 'traditional' or conventional way of making a floating bead inside a thrown ring. In next post ...
The immense possibilities this offers is up for grabs! I adore this effect!

Ah, yes the earring pattern and one last pictorial showing a can I call it more 'traditional' or conventional way of making a floating bead inside a thrown ring. In next post ...
... to be continued
Related Posts
my neurons are shot,
elbow is stiff preparing this post and head seems to be floating around!
need to get a good
grip ... deeeeep sigh. Have fun with these effects while I take a few hours'
break.
Ready with your
shuttles and beads ?
happy tatting :-)
Very nicely done and very cute sampler this makes!
ReplyDeleteI am so tempted to play with beads, but there other things I must accomplish first. Luckily, I know where to find your blog! :-)
ReplyDeleteBeautiful effects!!! Tempted to bead tatting while I am actually going away from it with dot picots. Thanks for sharing technics Muskaan.
ReplyDeleteYou are so creative and ingenious!!! :)
ReplyDeleteThe sampler does look like a necklace, doesn't it, Carollyn !
ReplyDeleteAlways here, Diane :-)
Whenever you decide to return to beads, Usha :-)
(blushing) thanks, Sue ! I did get over my bead-inhibitions, though, and feel confident of being able to place beads anywhere I want now :-)
Beautiful, great results with your floating beads!
ReplyDeleteThanks, Ninetta :-)))) Now if you would use them in some of your exquisite tatting ;-D ???
DeleteAmazing effects! I will be try your ideas with FB :)
ReplyDeleteFantastic work, could be a great inspiration for many projects!
ReplyDeleteThank you for sharing these wonderful ideas :-)
Bring on the beads! I see a use for the pearl rice beads I have. Your idea is wonderful! And you explain it so clearly. I feel like we've just sat down with a cup of tea and explored tatting together.
ReplyDeleteWow! Makes my head spin! However do you do it?💕😂🦊
ReplyDeleteI hope to see your projects Anetta & Daniela :-) Thanks for your sweet comments.
ReplyDeleteMel, I'm here with my cuppa - where are you ;-P Wonder what you'll come up with ... rice pearls were quite the craze here some 30 years back.
Awww, Fox, I was aiming for floating, not spinning ;-P
Have a great weekend everybody !
This is great! Lots of possibilities for earrings here...
ReplyDeleteEnjoy, Grace :-) Eager to see your ideas ...
DeleteIt looks like you broke thru the glass ceiling for tatting with beads! You've shown more ways than I thought possible! Wow! Fun! (Where'd that bead roll....?)
ReplyDeleteThe best part, Anita? No stringing beads! But that does leave those beads to roll away, LOL ;-P
DeleteSmart idea!! Congratulations!!
ReplyDeleteThank you, Ana 💕 Glad you like it and hope you enjoy using it
Delete