I am so glad I didn’t convert the previous pictorial into
a pdf immediately. I am short on time, hence my posts contain a mix of
situations and elements as they evolved (and still is), with detailed steps.
And I’m not too happy with all the pics or my choice of beads, or whatever.
In essence, though, Floating Beads has 2 basic steps
which, with slight tweaks/variations, can be adapted to tackle a wide range of
elements and situations. eg. single bead – large or small ; multiple beads ;
inside a ring , thrown ring , mock ring ; outside or under a chain ; stacked
beads….
For the pdf, I will try to systematically organize
everything, accordingly take new pics for the important steps, remove
‘repetitions’ and immensely condense the presentation.
For now, I will share as is and hope you will bear
with me and also leave your suggestions for improvement … You can experiment and carry it forward :-)
Floating Beads –
how to pictorials
Part 2
muskaan © August 2017
Text is minimal, since most is already covered in previous
post. Here I will only highlight some aspects.
In case of single large bead …

Start Step 1
It helps to ‘stay’ the anchored part of loop close to bead
(with your thumb/finger) and gently but firmly tug on the shuttle thread. You
will notice how smoothly it slides.
Always a good idea to rotate or reposition the bead such
that the hole & thread within lie horizontally. It brings the looped-over
part on top of bead to the centre, thus ensuring that the loop will not unravel.
Start Step 2 ...
Encapsulating the bead
Tension. 1 large free floating bead
These are the same steps (as shown in pics 1-6) to be followed when adding a large bead such as a teardrop, to a chain.
Start ring.
Whether to keep the loop in front of bead or behind it is
a matter of personal choice.
1 large floating bead in ring – default method
Floating
Beads - In Ring . Variations
A] Variation
in Step 1
Instead
of folding the loop back around bead, pass shuttle through loop.
Position
and tension.
Follow the default method to complete.
This works well for small and large beads, as well as for a string
of beads (FB string as in an earlier post). Personally, I found it difficult to adjust position and tension using this method for this large faceted bead. I works better with the smaller pearl beads. I haven't experimented enough to confirm whether it is just the bead or something else.
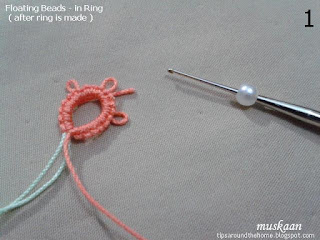
B] After ring is made
This came about accidentally ! I made the ring forgetting the
floating bead.
Question was - Would I have to unravel or start over or could I
dangle the bead Afterwards ?
Pull a loop through bead, and pass shuttle through loop.
Position and tension to complete Step 1.
Now make the half hitch/overhand knot for Step 2 ...
… and tension.
This same method can be used in Mock Rings. And also in Thrown Rings !
In the next pic, I started with the 2nd ring using default method.
Floating
Beads - Under a Chain
Since the bead is on the core thread and it will lock down
once the bead is added, make sure all stitches on the chain are properly
snugged before adding bead.
1. Pull core thread loop through bead
2. And pass shuttle through it
3. Position and tension. Step 1 complete.
4. Start Step 2
5. And tension
6. Continue chain.
Leave a bit of slack or space when completing Step 1 so
that bead has space to dangle And the chain arch won’t distort when completed.
Chain arch can remain continuous or dip down, depending on
the effect you desire.
These pictures, along with the FB in thrown ring pics from
previous post, will give you a good idea of the basics and how to play some
more with settings and effects. You really don't need me any more ;-D
But I ain't going easily ;-P In the next post I will share the string of beads inside
a ring and some more adaptations emerging from needs, along with the pattern for Diane's earrings.
to be continued ...
happy tatting always J


Fabulous technique!! :)
ReplyDeleteInteresting technique
ReplyDeleteVery interesting idea and tutorial:)
ReplyDeleteThe colored thread is helpful in the explanation. Love the puctures💮🌹💮
ReplyDeletePlenty of scope for experimentation!
ReplyDeleteInteresting technique !
ReplyDeleteThank you all so very much for rallying around :-)
ReplyDeleteI sure do hope there will be lots of experimentation & application, Jane :-)
wonderful project, I just wish my English is so weak
ReplyDeleteRenata, pick your shuttle and try to follow the pictures. PART 1 pictorial has more detailed steps - https://tipsaroundthehome.blogspot.in/2017/08/floating-beads-part-1.html
DeleteIf you have any difficulty, please don't hesitate to ask. I'll try to help.
Glad you liked the project :-)