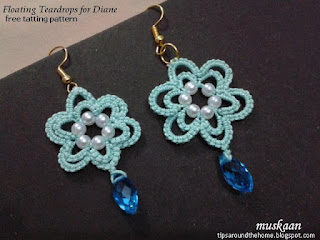
earring tatting pattern using Floating Beads methods
When I first posted a prototype, it turned out to be in
Diane’s favorite colour and birth gem! These earrings Had to be hers ! So while she was
away enjoying Tat Days, here’s her welcome back gift in the form of a mainly schematics
pattern along with a 2-colour version.
Since it is for our Ice Drop lady, there had to be a ‘drop’ in the name, right?! So here’s the pattern for ….
Floating Teardrops for Diane
This is a very basic and versatile pattern that can be
used as earrings, pendant, or brooch. Change the number or size of beads,
change the stitchcount of the 2 chain rounds, etc. to get a different look - dense, airy...as is visible in the 3 pieces photographed above.
Let your imagination & creativity soar while you enjoy tatting these up.
It is a single shuttle and ball pattern (CTM) with barely any thread on the shuttle and a Floating Beads String as center.
I have tried to diagram the 2 basic steps for FB string.
Hope it is clear. Otherwise the stepwise pictorials can be found here – Floating Beads String for the beaded center, and Floating Beads - on Chain (same as in ring) for the teardrop bead.
Only thing to keep in mind when tensioning the FB string is to leave some slack on the string. This space between beads is where the joins in next round will be made.
In above pic, left one is the original & in the right one I increased the stitches in outer chains, thus highlighting the concentric arcs.
I tried a 2-colour version using 2 shuttles.
To switch colours/shuttles for Round 2, either make a
Reverse Join or a Lock Join and SLT (shoe lace trick).
2-colour version can still be worked with single shuttle
if one uses Reverse Stitch chains (unflipped stitches as in split rings).
Worked in Anchor size 20 threads which probably equates to Lizbeth size 10.
Worked in Anchor size 20 threads which probably equates to Lizbeth size 10.
UPDATE: A beautiful needle-tatted version by Amarilys Cwb - https://tipsaroundthehome.blogspot.com/2021/11/fooled-by-tool.html
This is it for now. I hope you enjoy tatting these using
diverse colours, sizes and stitchcounts. Very quick to tat up too.
In case of any problems, please don’t hesitate to contact
me.
drops in any form – ice or water – are always
fun to tat J


Fabulous! I am very flattered, and I will be trying this soon!
ReplyDeleteOoh, beautiful! Can't wait to try them!
ReplyDeleteThank you for this pattern! The earrings are so pretty :)
ReplyDeleteHow lovely, so versatile and adaptable to any size bead and thread.
ReplyDeleteWelcome, dear tatters :-) Love to see the colours, etc. that you use.
ReplyDeleteA pair for each dress ?
Hugs
Awesome and beautiful earrings!!! :)
ReplyDeleteThank you for sharing the pattern!!! I don't wear earrings, but I will have to make these and see if someone I know likes them!! :)
I'm definitely going to give these a go!
ReplyDeleteLooking forward to your versions Sue & Jane :-)
ReplyDeleteSue you can avoid the earring hook and use it as a brooch or pendant ?
Beautiful earrings and colors:)
ReplyDeleteThank you for this really easy pattern. I tried to do something and earings are beautiful. This technic are super. I will prepare post on my blog and show my testing earrings.
ReplyDeleteHugs :-)
Thanks Anetta & Justyna ! I'm so glad you found the technique easy and helpful :-) Looking forward to your creations, Justyna.
ReplyDeleteHola. Todo es tan maravilloso que debo decir mil gracias.las imájenes de las técnicas y patrones.
ReplyDeleteEspero que disfrutes haciendo esto y aplicando la técnica y los efectos aún más. Gracias :-)
DeleteMerci beaucoup pour ce simple patron
ReplyDeleteWelcome to my blog, Nouran! Hope you enjoy tatting these earrings :-)
Delete