Showing posts with label bugle beads. Show all posts

Monday, 29 May 2017

rising a month late

Pin It now!
tatting on a paperclip - free pattern

Radiant Sun Paperclip
   
This little project was worked in 2 days flat – from ideation to execution to presentation – so that we could have a surprise paperclip pattern before end of April.

You know that I am not proficient with beads or their terminology, etc. So there were many senior moments here. Only later after pdf was made and sent (in record time for me! And this included a quick test tat and valuable feedback from Phyllis), I emailed Nina Libin for info and she graciously explained the correct terms along with links (which helped immensely during class). Georgia also shared links I didn’t know about, in class. I have used those terms & links in this post.

It all started when I saw a jewellery ad in the newspaper and wondered if I could get beads to stay positioned as free-floating rays using a shuttle.
I had an idea and quickly searched for similar projects & tutorials but as often happens, nothing came up close.
Pattern is a simple chain with beads radiating freely around .
To execute my idea I needed the end/stopper bead to be large.
Slip bugle bead and pearl bead on to a picot loop ;
Before tensioning the picot, loop it over the pearl snuggly like a noose (like we do for the SSSR or LTROR);
Pull back the extra length of loop, ensuring that the wrapped thread stays tightly noosed around the bead.
Continue with chain.
Pretty simple, easy, and no extra tools required.
Now to put it to the test, I started to tug at the pearls – 2 stayed in place, but one fell off.
One can use this method only if the piece is going to lie flat – glued or appliqued, and not worn/used.
Back to the drawing board. This time I used a beading needle to thread back through the bugle bead only. Of course it worked. But it has been around for ages – called the beaded fringe*


 pattern is so small, that it can quickly be finger-tatted . Or needle-tatted

A 'luggage tag loop' is used to start. It creates a complete double stitch. 
Care must be taken to keep the shuttle to the right.

I chose a blue clip for sky with the yellow sun emerging. 
For the right shade, I used 3 strands of Anchor embroidery thread.

If I leave tails on both ends, doesn’t it look like a headdress ?!

Many more ideas radiated from this, but the sun is setting for now :-)

* other terms : beaded stem (Corina Meyfeldt prestrings the beads and pulls into place when required) ; single file beaded picots (Nina Libin, Book #18)

this is not my first pattern with bugle beads on a paperclip - I made several trials of another pattern in February (remember, Ninetta? :-P), but have let the final tatting & presentation lapse. Should get back to it ....


Grateful thanks to Georgia, Nina, & Phyllis

hope you enjoy tatting this quick little pattern :-)


Thursday, 11 May 2017

the bugle calls again

Pin It now!
updated on May 13, 2017

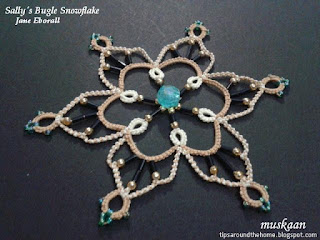
Sally’s Bugle Snowflake
Jane Eborall
Jane has been truly prolific with this lovely pattern, displaying such a range of colour combinations on her blog. When she uploaded the pattern, I had to give it a go.

The highlights of this pattern, to me, are the beads radiating in the centre and the lock chains forming a lovely petal shape. Jane’s tutorial on how to add beads that face outwards helped a great deal.

My Notes & thoughts

  • 12 seed beads (size 11) are needed for the long beaded picot (LBPbug) in center. Since my bugle beads are shorter (4mm instead of ¼ inch), I used size 8 or 9 beads in gold, thinking that these would make up for the length.
  • When loading LBPbug, make sure the loop for ring still slides.
  • Also, managing the 5 LBPbug with dangling paperclips can be a bit tough. I had to make certain each time before joining to them in next round, that they were in the correct sequence and not twisted around. I did use different colored clips for each, to keep track of sequence.
  • This technique for loading beads on a long central picot such that they radiate out, was first described by Frivole and also demonstrated here.
  • These kind of reminded me of LTRORs (loop tatted ring on rings)!
  • The central picot should’ve been more tightly snugged.
  • As in my previous forays, I again used picot gauges for the LBPbug on chains (as seen in pic above). 2 sizes were required for the beads I chose – ⅜ inch and ⅝ inch. And this time I used thread to load the beads later (one of the many ways of adding beads in Jane's tutorial).
How does one gauge the length of picot ?
Well, load beads as instructed and hold with paperclip. Tat the next couple of stitches. Then remove the clip and beads and measure. Voila . No hanging clips getting in the way and slowing one down. Once the length is known, use the gauge for future beaded picots, adding beads only at time of joining. 
And the added benefit is that one can usually use beads from one's stash rather than order new ones if the pattern calls for a size one may not have.


  • The lock chains could’ve been a tad longer for a more graceful curve as in Jane's snowflakes. One additional stitch would accomplish that for my tatting tension.
  • The split rings are another spot of genius ! They look like thrown rings, but being split rings, they become well-anchored with an ever so slight broad base.
In order to hide the space in center where some bare thread is visible, I placed a large crystal bead in center. Doesn’t it perk up the flake even more ?!

Measures 4” from tip to tip. Inner round is 2”.
Techniques used : 2 shuttles, lock chain, beads on central picot, lock join, picot gauge, beads on picots, split ring.


Many many thanks to Jane for all her lovely patterns and tutorials

happy tatting always J


Friday, 5 May 2017

thumb-nailed it !

Pin It now!
what you ask ?  the dot picot !!

It was my pleasure to test tat a couple more medallions with dot picots.
And I finally nailed it ;-P
Thumb nail – my key to a good dot picot .

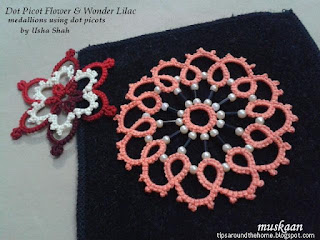
Dot Picot flower
Usha Shah 
 

It is always a good idea to study the sample or diagram. When I see chains with a lot of thrown rings, I prefer tatting these frontside. Hence the inner rings were worked backside. 
It is a 2-round medallion worked continuously. I climbed out with reverse join instead of SLT.

If you look closely, a couple of the dot picots have some thread showing – the ring did not close completely. I struggled a bit, just like I did before, with closing this tiny ring.

Till I stumbled on, for me, the perfect solution : Start closing the ring as you normally would. Towards the very last part, hold the stitch in the little crevice between the thumb nail and the flesh. Then pull the remaining thread taut and close ring fully. Worked every time as is evident in the much better tatted next medallion ….
Measures 2 inches in size 20 Anchor

Wonder Lilac
Usha Shah
This delightful medallion was a pleasure to tat (despite the beads, yes !), now that I had the dot picot under my thumb :-D
Instead of a regular ring, I started with a SCMR.
And instead of all those paperclips hanging from the long beaded picots (LBP), I measured the length required using a picot gauge. ½ inch was sufficient for these 3 beads. Continued tatting without beads to complete circle....
I left the first 3 LBPs with beads and paperclips for purpose of comparison.


The 2nd round was easy-going, loading beads with a crochet hook immediately before joining.
I believe thread also plays a role in the making. This medallion is worked in Red Heart size 20, which is a bit smoother and less tightly wound that Anchor crochet cotton in same size.

Take a pleasant walk through her creative journey dotted with picots here (pun intended)
UPDATE (May 7): pdf for both patterns now shared on OTC

Many many thanks to Usha for sharing her patterns :-)

and happy tatting always J

Monday, 30 January 2017

beady-eyed but dim

Pin It now!
playing with beads and lace
I’m getting better at stringing beads ! So playing is much more fun now. OTC homework for Jan 2017.
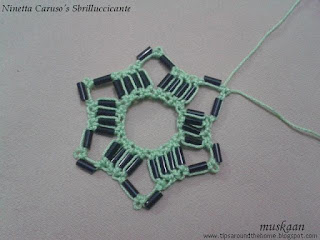
Sbrilluccicante
(or Bugle Bead Star)
Ninetta Caruso
Ninetta’s brilliance has always been apparent in her tatting, lacework, designing, and innovation ! Little surprise to see another winner from her.

Materials : 2 shuttles, size 20 Anchor 4054-0241 ; 72 glass bugle beads 5mm from Itsy-Bitsy
Techniques : working with beads, block tatting, reverse stitch (for block tatting and for split rings), split chain.
Dimensions : Rnd 1 – 1⅜” ; Rnd 2 – 2¼” ; Rnd 3 – 3½”  all tatted in one pass.

The video is excellent and really helps. The written pattern could’ve been better, though the images help.
Unfortunately, these are the only bugle beads I have on hand – not as shimmering, but good quality with hardly any jagged edged or broken ones.
TIP : My quick way of choosing similar sized beads – arrange along the edge of a flat-bottomed lid as seen in collage above!
After the first block, I followed my own way, using 2 same half stitches as a riser. The difference is noticeable (see below).

So you think the beads and thread are dull and dim? Wait till you see how dim I am ....
In this inverted V arrangement (Ù) of Round 1, notice how the thread goes under the bugle bead on the left and over the bead on the right arm ? I liked the shadowy effect and deliberately went with it, thinking I will do the same for the split rings in next round. BUT the thread Has to remain Above the bead for following reasons :
Ø      Bead count in shuttles goes awry
Ø      Joining to it in next round is slightly tricky because the picot can turn downwards.
Ø      More importantly, in split rings, the thread just bunches together when trying to close the ring !!!
I fell in love with the pattern at first glance and the tatting was equally fun !

{{{{{{{{{
3D Beaded Flower Earrings
Jane Eborall
Now this was undoubtedly an interesting piece when I saw it on Jane’s blog
But at the time I skirted around beads. With Georgia taking it up for the Online Tatting Class this week, I had a go at it. These are listed as Palmetto 3D Earrings here and are sewn up as a brooch here .
Pretty quick and easy. I loved the green calyx shape (sorry, no pic)! One can start the calyx as a mock ring with thrown center ring, too, but it is not required. I like it just as it is. 
I did not, however, add a bead between 2 petals, preferring to join to plain picot, and keeping the petals inside the hollow calyx. I like layered effect in tatting.

Materials : size 20 Anchor 4054-0241 green and 4054-020 maroon ;
Bead Craft emerald green seed beads – 5 ;
Bead Craft golden yellow seed beads – 36 ;
Gold beads size 9 – 5
Pearl bead cream size 3 (10mm) – 1 for inner center
Pearl bead size 6 – 1 for outside.

The finished flower measures just about ½” !
A clever design that makes the beads look like another round of petals, adding interest & texture ! Bead placement can be customized to create different looks. Hence beads in diagrams and tatted models may vary slightly.

This was a fun project and a good one to clear shuttles. I like the look of it as a little tree ornament.

{{{{{{{{{

{ Many thanks to Ninetta & Jane for sharing their brilliance with us  {

{{Happy tatting and come join us in The Online Tatting Class{{