Showing posts with label coffee-table books. Show all posts

Sunday, 21 June 2020

forever young

Pin It now!
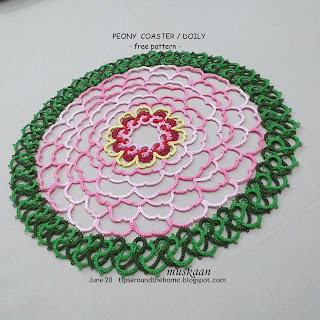
Flowers in nature, wilt; in thread, they stay a-bloom for generations! The tadaa moment for my Peony has arrived …..
I don’t remember ever seeing a peony flower in real life, but Goggle images came to my rescue at various stages, and structured my visualization. Eg. peony stock image and this

 
In the last post, the round wasn’t complete. Above pics show the completed Round 8.

Stephanie L (on fb) shared another 4-shuttle method of interlacing (or is it interlocking or simple overlapping or layering here?!) and I immediately decided that this would form my final round.

 
My first trial to confirm colour and count.... I thought the light shade hazed out the pink. Switched to a medium dark instead. 

With both shades on the darker side, the pink flower is better highlighted and nicely framed. 

PEONY pattern continued (final Round 9)
Pattern for rounds 1-8 and related Notes can be found in the following posts -

NOTE
  1. 2 shades/threads preferable for the overlapping to show up better.
  2. 4 shuttles (or 2 shuttles continuous with respective balls) in 2 pairs, ctm.
  3. Worked in Anchor size 20 ( Lizbeth 10).
  4. 10 mm Picot Gauge. The long picot is 8ds across, in case tatter wishes to use other thread size/brand (refer Section IV-B, page 5).
  5. Instead of reverse work (rw), switch shuttle and work direct chains (with reverse or unflipped stitches).
  6. Only the odd numbered rings (in this case, dark green) are joined to Round 8.
  7. Decide the manner of overlap and maintain it throughout the round. All odd rings join to each other and even rings to each other, through the long picot. 
  8. For an easier version of Round 9, skip the interlaced rings and work only the dark green part (simple rings and chains) using one shuttle and ball.

Starting Pair :
R1 : 6 --- 5 + 5 --- 6. rw
Ch1 : 9 - 9. rw
R2 : 6 --- 5 - 5 --- 6, rw
Ch2 : 9 - 9, rw
Overlapping Rings and Chains : 
In above model - The long picot of Ring1 is inserted from front to back (over-under) through Ring2 from  to be joined to Ring3. 
Chains also overlap front to back - Chain2 in front of Ring3; Chain3 in front of Ring4, and so on. 

Start next ring from behind previous ring as in model above -
R3 : 6 +(R1, after passing picot through R2) + 5 --- 6, rw
Ch3 : 9 - 9 , rw

R4 : 6 +(R2, after passing picot through R3) - 5 --- 6, rw
Ch4 : 9 - 9 , rw
Repeat from R3 onwards all around, remembering to overlap the rings and chains correctly.

Final Pair :
R79 : 6 +(R77, after passing picot through R78) + 5 +(R1) 6, rw
Ch79 : 9 - 9 , rw
R80 : 6 +(R78, after passing picot through R79) - 5 +(R2, after passing picot of R2 through R1) 6, rw
Ch80 : 9 - 9 , rw
TIP : It is easier to finger tat the very last ring (R80) after snipping off a sufficient length, or to work it as a self-closing mock ring (SCMR). It becomes easier to maneuver the overlap correctly before joining to respective picot. 

Measures 8" - kind of a mini doily?

Instead of 10mm, one can have 9mm picots. This will create a straight line of picots when joined, instead of this wavy interweaving. I deliberately chose 10mm to keep with the semi-structured, slightly natural and textured look of the doily.

Hubby was a bit hesitant during the early repeats of this round. But once close to the end, he was pleasantly surprised and actually felt the inner darker red shades and yellow could have been broader. I think a few more pink rounds wouldn't have been amiss either.

I have some design ideas to add more rounds, but that will be for a future day. I might even work out a beginner-level version.  

This one round took longer to tat than all the previous rounds together, and adds a lot of weight! But I am happy with the outcome. Of course, it can be changed to suit individual taste. And the best part – one can stop at Any round one wishes and call it done!!!

I wrote a teensy bit about this favourite and very handy book here.

This has been an unintentionally long digi-break, but I managed to get some tatting in. And now I am excited to show you what I believe is possibly a new picot technique – very easy, versatile, and functional. I'm calling it the Intruding Picot ;-P So stay tuned …. And happy tatting always :-)

Wednesday, 3 April 2019

my Italian connection

Pin It now!
Italian Connection bookmark    (a sneak peek)
You’ll soon see the reason for this name which led to the choice of books as well.

This motif is the First pattern designed by an Italian tatter, Patty Castagno and shared in the facebook group - Chiacchierino: Filo, Amore e Fantasia. It is a very creative and talented group but mostly in Italian. Which is why facebook's instant translation is a boon, though literal and sometimes confusing.

The promise of a square spiral attracted me immediately, but my first attempt (purple size 8 pearl) was surprisingly tough & confusing. 
Since I couldn’t understand why it was difficult, I had another go at it, this time in blue (size 20 Anchor). Worked up smooth as silk!!! Huh. Where was my head ???
Three’s Company! Hence a 3rd motif tatted in green (size 40 Anchor) for tapering bookmark.

There is a ¼” difference between each motif.

Now how should I connect these motifs – each a different size, with no peripheral picots? Here’s where more Italian connection came in. Ninetta’s curled rings!
These curled ring connectors are rings folded exactly in half and lock joined through the middle picot in each, encasing a motif (chain) within.
Even the tassel is encased within these connectors.

I’ve used curled rings for toggles, etc. but I think this Curled Ring Connector has great potential and use in jewellery or to link individual motifs of different shapes, sizes, and designs! They can also be used in place of adjustable toggles since whatever is within can slide. Or how about attaching motif to a bangle for sun/dream catchers?!

This post was intended for April 1st – ITD, which is why I included Teri Dusenbury’s dandelion chain link bookmark which I believe is a construction and engineering marvel in tatting. And among my most viewed projects.

Leonardo da Vinci: Artist, Thinker and Man of Science by Eugène Mũntz. A coffee table box set of 2 large hardcover volumes with lots of his diagrams, studies, ideas, sketches, etc. as well as finished works. Detailed, in-depth exploration. I have barely scratched the surface of these, but quite a treasure.


So would you like the pattern? I have Patty Castagno's gracious permission and here’s what she said (translated from Italian) when I sent her a close-up pic:  

Beautiful, beautiful, fabulous, you did an exceptional job, do whatever you want with my scheme, you made it a very good thank you
Now it is I who must ask you if I can take inspiration from your masterpiece

I need to ink the stitch count, and work on a presentation, but soon...

My previous Italian connection ...

Saturday, 30 March 2019

tape lace bookmark

Pin It now!
I went into a tizzy trying to find tatted bookmarks for 10 books in Hindi I was sending to my MIL for her friend. They were either brand new or almost so. In the very short time left after hunting down the books, I could only find 5 bookmarks, and no time to take pics either!!! Despite gifting or using bookmarks, I know there are more left. Time for some major reorganising, but before that some tatting ;-P

On cue, this video from Sushma’s Craft & Creations turned up. She regularly uploads videos on tatting, crochet, and embroidery, in Hindi. This is the first time I’ve tried her pattern. This is an insertion pattern she calls Tape Lace.
If planned ahead, I would’ve started with a ring at the tip – now the top looks ‘cut off’.
Also, the stark contrast in colours does not show the undulating effect clearly. 2 shades of the same colour would’ve worked better.

Decided to cut short my misadventure and end with a zigzag chain and tassel.
Using Red Rose pearl cotton (size 8), the body is 8 cms long and 2½ cms wide.
Techniques I used : 2 shuttles, directional (fs/bs) tatting, blipless join, SLT, zigzag chain, tassel.

If doing fs/bs tatting, all rings on one side are done frontside and on the other backside (reverse order double stitch or RODS). En bloc, as in the spinning wheel glass mat
SLT is used only once in each block
This is a comparative listing of Chains in Shuttle Tatting, along with tutorial links.
Don’t you like how even my tassel is this time? There’s a trick I’ll share soon.

The Book of the Vedas - Timeless Wisdom from Indian Traditions. By Virender Kumar Arya.
Since there is this ‘Hindi’ or Indian connection in this thread, I chose this book on Vedas. 
It is in English and offers a lucid 2-page summary of major religions, cultures, traditions, deities, beliefs, etc. A bird’s eye view of spiritualism with lots of images and charming layout. One can start and stop at any page! Hardbound with dust-cover.

I'm excited to show the other bookmark I've finished....


Tuesday, 30 January 2018

better than nothing?

Pin It now!
free bookmark pattern


I wanted to insert some bookmarks in a book to give away as a gift. Rummaged through my stash and chose a few. But an incomplete bookmark caught my eye. Remember I had promised a pattern back in 2014 at the end of the magic square deconstruction?

At the time all I did was the basic/central row derived from the magic square, 
but I couldn’t quite get the next row to work. 
You can see my woeful attempts along the left side before I had set it aside.

Slow forward to 2018 - This time when I laid it on paper, I could easily create a satisfactory design (sketched on the right side).

The recipient loves yellow. I Had to use it.
Combo of Lizbeth Falling Leaves & Anchor yellow both in size 40.
This combination looks even better in real.

The 2 rows were worked separately since I wasn’t sure what size ring was needed.
But if the same colour placement is followed, we can throw rings off row 1 chains using 2nd shuttle. Then the outer row will be mostly chains all around.
It can be worked continuously if we climb out with a split chain.

With requisite beads, it can make a lovely bracelet or choker or perhaps adorn a headband.

Struggled with naming it. Thought of ‘magic square bookmark’ to mark the end, & remind me, of that exercise years ago. But the overall design barely qualifies as a magic square, right?! And the outer row is nothing special either. So what better name than: “Better than nothing” from the heading above ;-P
The book is "Einstein. In his own words" by Anne Rooney. It is a fairly good collection of his thoughts and ideas on varied subjects, with some rare images thrown in. A hardbound copy, good print, and one can pick up reading & leave off anywhere.  


Better than Nothing bookmark pattern

stitchcount
ROW 1 : shuttle and ball
R1: 5 vsp 2 vsp 5. rw
Ch: 6 – 6 – 6. rw
R2: 5 + 2 vsp 5. rw
Ch: 5
This forms 1 motif. Repeat for length required.
To turn corner, omit the 5ds chain. Instead make chain: 6 – 6 – 6.
Then turn back, joining the rings as you go. First ring will be joined to R2, and next ring will be joined to both the previous ring and R1. 

sequence
ROW 2 : 2 shuttles
Attach threads to one of the side picots.
R: 8 + 8. rw
Ch: 10 lock join to same place as ring, 8 lj , rw.
Repeat till corner is reached. To turn corner :
Ch: 10 lj 8 rw
R: 6 + 6 rw Switch shuttle
R: 10 switch shuttle
Ch: 8 lj 10 lj 8 lj 
Continue with ring as before. 
Turn other corner in same manner.

Add decorative picots if desired. 


a question :
Do you think it should have a tail? If yes, any suggestions?


Enjoy  J 

Wednesday, 8 February 2017

TIAS-es

Pin It now!
2 TIASes and a book

Tat It And See 2016
Jane Eborall
I didn’t participate last year. But there's always so much to learn from Jane's ingenuity :-)  So I started both projects together, tatting and taking day-wise pics, but didn’t keep it up.
The carrot & greens are made with some leftover embroidery strands. For the greens , I used my spot adaptation of Corina’s fringe. Instead of the core thread, though, I joined them to the picot thread, while forming the picot, and snugged the picot tight. I found this quicker, easier, leaving no floppiness either.
This Brer Rabbit has found a juicy carrot and is excitedly calling out to his friend Herr Hare to share it together. Brer Rabbit is wily, though and might just give the greens to Herr Hare, keeping the carrot for himself ;-p 

 World of Wildlife
Anthony & Jacqueline Nayman
This is one of a set of 3 coffee table books including ‘The Oceans’ and ‘Space’ by Fergusson Publishing, Chicago.
At the start of each chapter, the wildlife of each region is depicted on the map graphically, giving a bird’s eye view of the range & distribution of fauna. And of course, there are lovely photographs and history. Have I read the entire book ? Ummm, no! But I like to flip pages and settle randomly on something.


Tat It And See 2017
Jane Eborall
The final came all you soon, but journey was joyful, with so much enthusiasm from all participants. 
She measures a petite 2½"× 2¼" in size 20 Lizbeth Vineyard Harvest.

This dame must enjoy her walk (it's almost sunset!), too, flaunting her beautifully designed gown from The House of Jane ! She's just as much a trooper as our Jane is ☺ 


happy tatting always J