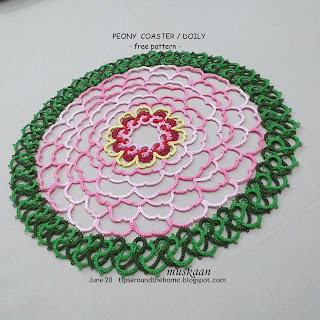
Flowers
in nature, wilt; in thread, they stay a-bloom for generations! The tadaa moment
for my Peony has arrived …..
I
don’t remember ever seeing a peony flower in real life, but Goggle images came
to my rescue at various stages, and structured my visualization. Eg. peony stock image and this
Stephanie
L (on fb) shared another 4-shuttle method of interlacing (or is it interlocking
or simple overlapping or layering here?!) and I immediately decided that this would form my final
round.
My
first trial to confirm colour and count.... I thought the light shade hazed out
the pink. Switched to a medium dark instead.
With both shades on the darker side, the pink flower is better highlighted and nicely framed.
PEONY pattern continued
(final Round 9)
Pattern for rounds 1-8
and related Notes can be found in the following posts -
NOTE
- 2 shades/threads preferable for the overlapping to show up better.
- 4 shuttles (or 2
shuttles continuous with respective balls) in 2 pairs, ctm.
- Worked in Anchor
size 20 (≡ Lizbeth 10).
- 10 mm Picot Gauge.
The long picot is 8ds across, in case tatter wishes to use other thread
size/brand (refer Section IV-B, page 5).
- Instead of reverse
work (rw), switch shuttle and work direct chains (with reverse or
unflipped stitches).
- Only the odd numbered rings (in this case, dark green) are joined to Round 8.
- Decide the manner of overlap and maintain it throughout the round. All odd rings join to each other and even rings to each other, through the long picot.
- For an easier version of Round 9, skip the interlaced rings and work only the dark green part (simple rings and chains) using one shuttle and ball.
Starting Pair :
R1
: 6 --- 5 + 5 --- 6. rw
Ch1
: 9 - 9. rw
R2
: 6 --- 5 - 5 --- 6, rw
Ch2
: 9 - 9, rw
Overlapping Rings and Chains :
In above model - The long picot of Ring1 is inserted from front to back (over-under) through Ring2 from to be joined to Ring3.
Start next ring from behind previous ring as in model above -
Overlapping Rings and Chains :
In above model - The long picot of Ring1 is inserted from front to back (over-under) through Ring2 from to be joined to Ring3.
Chains also overlap front to back - Chain2 in front of Ring3; Chain3 in front of Ring4, and so on.
R3
: 6 +(R1, after passing picot through R2) + 5 --- 6, rw
Ch3
: 9 - 9 , rw
R4
: 6 +(R2, after passing picot through R3) - 5 --- 6, rw
Ch4
: 9 - 9 , rw
Repeat
from R3 onwards all around, remembering to overlap the rings and chains
correctly.
Final Pair :
R79 : 6 +(R77, after passing picot through R78) + 5 +(R1) 6, rwCh79 : 9 - 9 , rw
R80 : 6 +(R78, after passing picot through R79) - 5 +(R2, after passing picot of R2 through R1) 6, rw
Ch80 : 9 - 9 , rw
TIP : It is easier to finger tat the very last ring (R80) after snipping off a sufficient length, or to work it as a self-closing mock ring (SCMR). It becomes easier to maneuver the overlap correctly before joining to respective picot.
Measures 8" - kind of a mini doily?
Instead
of 10mm, one can have 9mm picots. This will create a straight line of picots
when joined, instead of this wavy interweaving. I deliberately chose 10mm to keep with the semi-structured, slightly natural and textured look of the
doily.
Hubby
was a bit hesitant during the early repeats of this round. But once close to
the end, he was pleasantly surprised and actually felt the inner darker red shades and yellow could have
been broader. I think a few more pink rounds wouldn't have been amiss either.
I have some design ideas to add more rounds, but that will be for a future day. I might even work out a beginner-level version.
I have some design ideas to add more rounds, but that will be for a future day. I might even work out a beginner-level version.
This
one round took longer to tat than all the previous rounds together, and adds a lot of weight! But I am happy with the outcome. Of course, it can be changed to suit individual
taste. And the best part – one can stop at Any round one wishes and call it
done!!!
I wrote a teensy bit about this favourite and very handy book here.
This has been an unintentionally long digi-break, but I managed to get some tatting in. And now I am excited to show you what
I believe is possibly a new picot technique – very easy, versatile, and functional. I'm calling it the Intruding Picot ;-P So
stay tuned …. And happy tatting always :-)


Frames the peony beautifully. Work it in blues and the flower could be a waterlily perhaps.
ReplyDeleteThat's a splendid idea, Jane 💕🌹💕 Thanks 😍
DeleteIts beautiful💝💝💝thank you for sharing🎉🎉🎉
ReplyDeleteThrilled that you like it, Vicki :-))))
DeleteBeautiful!! :)
ReplyDeleteThanks, Sue :-)
DeleteUwielbiam piwonie! piękna!
ReplyDeleteMany thanks, Renata :-)
DeleteLovely tatting and amazing flower, my aunt used to have one in her garden, it looked nothing else than soil in the winter, but in the summer it was a little beautiful flowers' bush.
ReplyDeleteAha, so this doily bloomed at the right time ;-P Thanks, Nin :-)
DeletePretty, pretty flower! Love the intertwined edge! Very nice seeing your color trial for the outer greens.
ReplyDeleteThanks, anita :-)))
Delete