a free tatting pattern


 This row is tatted exactly as per pattern shared here, for
desired length.
This row is tatted exactly as per pattern shared here, for
desired length.
The first flower was mistakenly left unattached (see "Oops" below).


 The work grows from side to side as seen in the marked
sequence – this is only a guide.
The work grows from side to side as seen in the marked
sequence – this is only a guide.
There could've been a couple more flowers at the beginning (see "Oops" below)
 On one side, the flower is attached, using a normal picot join, to the row 1
marigolds before returning back to the other side. But leave some slack on the joining loop to resemble a picot, as described in pattern.
On one side, the flower is attached, using a normal picot join, to the row 1
marigolds before returning back to the other side. But leave some slack on the joining loop to resemble a picot, as described in pattern.
 To keep the 'open' edge relatively straight, I initially used
grid paper – place your work on the grid, and see that the work is aligned to
desired width.
To keep the 'open' edge relatively straight, I initially used
grid paper – place your work on the grid, and see that the work is aligned to
desired width.


 Attach threads to a marigold nearest to the edge of body. The first ring is joined to an adjacent picot after closing, to anchor the braid well.
Basic pattern, shared here, remains the same, except that the left column of flowers is attached to previous row of mustards as follows ...
SR (on left) : 8 + 2 p 6 vsp 2 / 2ushs p 1 p 1 .
SR (on right): 10 p 6 vsp 2 / 2ushs p 1 p 1.
 To
turn the corner : after tatting the right-side ring (numbered 1 in above pic), tat another ring without turning work. This ring 2 is joined to the vsp of ring 1. After closing, lock join to the vsp of previous left-side ring, and without turning work, tat ring 3.
To
turn the corner : after tatting the right-side ring (numbered 1 in above pic), tat another ring without turning work. This ring 2 is joined to the vsp of ring 1. After closing, lock join to the vsp of previous left-side ring, and without turning work, tat ring 3.
 Ring 3 is lock joined to the picot of previous left-side ring as shown by the + sign.
(see "Oops" below)
 Now turn work and tat a regular left-side ring, joining to previous row and continue to desired length.
 A gauge from the practice
piece : It was not always easy to gauge where to attach the
jasmine ring. A short practice piece of 5-8 flowers was very helpful in correct
attachment! When it came time to join, I placed the gauge over the braid,
matching the flowers, and knew which picot on row 2 would be needed.
A gauge from the practice
piece : It was not always easy to gauge where to attach the
jasmine ring. A short practice piece of 5-8 flowers was very helpful in correct
attachment! When it came time to join, I placed the gauge over the braid,
matching the flowers, and knew which picot on row 2 would be needed.
 When it was time to join, I placed the gauge over the braid,
matching the flowers, and knew which picot on row 2 would be needed (crochet hook used as an indicator here).
When it was time to join, I placed the gauge over the braid,
matching the flowers, and knew which picot on row 2 would be needed (crochet hook used as an indicator here).
 TIP : If one does not want a
straight-ish edging, join the jasmine at any stitch along the 10
stitches instead of after 8.
TIP : If one does not want a
straight-ish edging, join the jasmine at any stitch along the 10
stitches instead of after 8.

 Only 2 instead of 3 continuous jasmine rings would've sufficed to turn this corner. The first ring actually got hidden under the previous right-side ring ! But 3 rings would work for a full turn.
 The jasmine braid is continued unattached to form a tail or tie.
 I deliberately went with a different braid at each end in
order to showcase them separately and also to keep a bit of freestyling. Obviously, the tatter is at liberty to use any combination of braids, or repeats of the same braid, to create many variations !
I deliberately went with a different braid at each end in
order to showcase them separately and also to keep a bit of freestyling. Obviously, the tatter is at liberty to use any combination of braids, or repeats of the same braid, to create many variations !


I had just finished my Block Heart patterns in early Feb when Georgia threw me a hint about thinking ahead
towards spring, ITD, etc. (groan !!!)
Coincidentally, earlier that week
the advent of spring had been celebrated in India . Having already tatted an an
impressionistic collage for the end-of-spring celebrations called Holi, I looked up some details of the former.
The beginning of spring ‘basant’/‘vasant’ season is heralded by
a burst of flowers and celebrated in large parts of India as Vasant Panchmi, with
floral tributes, religious ceremonies, joyous singing, dancing, kite flying,…
You know how I love tatting
flowers – what better than a garland incorporating some of that joyous spirit in
an Indian leitmotif.
This pattern (and the mustard fields) is going to be shared with the Online Tatting Class on Monday, and length of post was unavoidable due to pics ...
Spring Garland
a tatted floral veni/jadai
UPDATE (Apr 21, 2017) : Spring Garland pattern is now in pdf here.

This is my attempt to capture a
few of the colours and spirit of this spring festival with attached symbolism –
auspiciousness of marigold flowers, the swaying yellow fields of mustard, and
the fragrant white jasmines – as a garland around neck or as a ‘veni’ worn by women in their
hair. (pronounced ‘waynee’. A broad
floral garland also called ‘jadai’ in
Southern India and worn by brides)
Before I dive into the pattern
details, I urge all tatters to please check out this video on flower veni making – the first few minutes will reveal something I'd never noticed before. I’ve seen many methods, but not this !

The scents !!!! Pure floral essence or attars and an exquisitely hand-carved sandalwood box.
I have already shared the 3
stand-alone patterns. Here, they are joined to create a broader garland.
Marigold braid acts as the foundation row ;
Mustard fields acts as a filler middle row ; and
Jasmine braid tops the ensemble.
Recommended thread size : between 30 to 50. The tatted
model is worked mostly in vintage 40 which is equivalent to size 50. The measurements work out to :
Marigolds : ½ inch wide; 3 flowers = 1 inch
Mustard : ¾ inch wide (~ 4½” long)
Jasmine : ½ inch wide; 8 buds = 1 inch
Row 1 : Marigold Garland

The first flower was mistakenly left unattached (see "Oops" below).

Part of this length is for the main body, the rest for a
tail or tie.
One fully loaded bobbin is sufficient for the 23 flowers in
size 50, and a bit less for the green.
Row 2 : Mustard Fields

Attach thread to any of the marigold flowers and work a
fabric of these single-shuttle picot flowers as per pattern & instructions here. This row is worked from right to left overall, but in a to an fro
fashion as seen in next pic ...

There could've been a couple more flowers at the beginning (see "Oops" below)


Continue for desired width and length.
One fully loaded shuttle (size 50 thread) sufficed for this 4½” long segment.

Since we are working with a single shuttle and flowers are
randomly arranged, some bare thread is required, old-style, to span the
distance between 2 flowers. This, however, stays hidden on the wrong side. (a wrongside view of garland is shared below).

For a dense effect, keep the flowers close, and bare
thread minimal. The texture & feel in fine thread is quite exquisite !
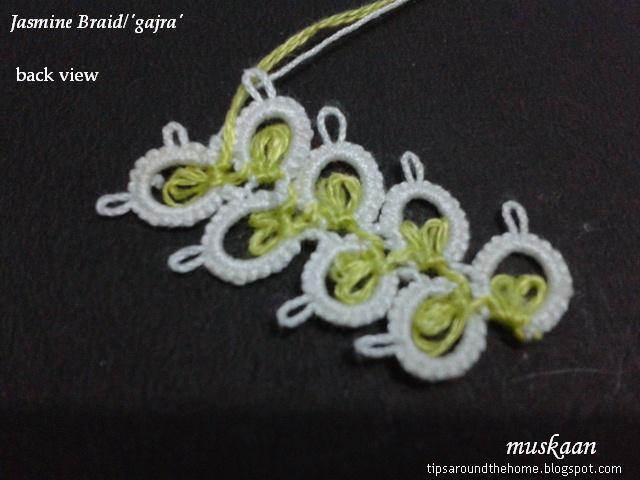
Row 3 : Jasmine Braid

Basic pattern, shared here, remains the same, except that the left column of flowers is attached to previous row of mustards as follows ...
SR (on left) : 8 + 2 p 6 vsp 2 / 2ushs p 1 p 1 .
SR (on right): 10 p 6 vsp 2 / 2ushs p 1 p 1.
In response to some confusion about direction of 3rd ring, I have drawn a diagram :


(see "Oops" below)


 |
| as seen from the wrong side. |

By
altering the row widths, and combination/placement/addition of beads, or changing the thread colours, the
pattern can become a necklace, a bracelet, anklet, belt, etc. or individual
flowers/groups can be used as appliqué, brooch, and so on. How about a floral henna for a bride's hand ?!
I am going to use it
as a bookmark, hence no beads.
Oops !
Parts of this garland were tatted on the go, and a few
mistakes crept in. Here is a listing to quell any confusion, hopefully :
1. Marigolds
– the first flower is not joined. It was a mistake which I incorporated as a
design modification in order to get the curve.
Since I did not know how long a tail was needed, the wip
pics show 2 threads of this row at right end where I left the shuttles ‘dangling’, and completely the unattached braid tail at the end.
2. Mustard
– the first few flowers are not as closely situated as the rest. I could’ve
added a few with scrap thread later, but have left it for now.
3. Jasmine
– the given pattern & diagrammed pdf starts with the first ring on the left, which is how I
started the row initially.


But it left an unseemly gap on the right side.
Hence, for this garland, the first ring is on the right, BUT it is tatted
backside just as in pattern.
Close-up pics in Jasmine braid show that I did not keep the green
thread at back of work while starting the next ring, thus the bare thread is
visible on top.
Corner : For an gentle angle, instead of
3 continuous rings, 2 would suffice. The first of these is now hidden behind a
previous ring on that side – one tatted & joined as usual, the next joined
to the long picot of right side flower, and then turn work and tat the right
side flower as usual.
Okay, I think I need a
break from all these long posts, as do you my dear readers :-)
Dear hubby
misses my company due to the long hours spent daily in front of this PC ;-P
Hope you are enjoying fair
weather and happily tatting away :-)
see you in class !