Showing posts with label onion ring pictorial. Show all posts

Monday, 21 August 2023

sneak peek variation

Pin It now!

 This is my submission for our #TALme2Endrucks Aug2023 game of the month. It is a variation on Ninetta Caruso's Garland pattern derived from Endrucks' pattern #20. The pattern was shared in 3 parts during the 3 weeks, and a 4th part on some surprise variations will be shared in a couple of days. Here's a peek into part of what might be expected, ;-D

Most participants have already finished and shared their beautiful versions. So sharing my variation will not cause any confusion now.

It was meant to have 8 repeats and 5 rounds. I have 7 repeats and a 6th round of rosette motifs.
 
This interesting pattern is worked from the outermost round. It has onion rings with thrown rings.
Onion Ring with Thrown Ring. A few members seemed to find it difficult to understand. Hence I quickly prepared this pictorial using 2 colours to show which shuttle was in action. It is the same process as for the Happy Hands patterns from #1 (https://tipsaroundthehome.blogspot.com/2021/03/balancing-act.html). But each tutorial I referred to, was missing in one feature or other that was need for this particular pattern. Hence it was simpler to follow the steps of this pattern without the need for detailed written explanation.  

The 2nd round is worked on the inner edge of the previous round, made of block tatting 'flowers'. In my first repeats I am sure there are mistakes in the block (the very first one was snipped) - it needed mindful tatting.
I may not have gotten the shape of the flowers very nice, but the construction is very clever, as is to be expected of Ninetta.

The inner space is filled by working 3 rounds, this time in the 'proper' order - ie., from the inside out ;-D
The center rosette is worked and cut off. The thread for Round 4 is attached and worked around. 
The left one has 8 repeats, as per the pattern. This time I had counted and followed correctly, LOL.

Round 5 continues from the previous one without cutting and it is the round that connects to the outer rounds. It was only at the 'final' join that I realized there had been a miscount!!! Nothing to it but to bring out the scissors and snip snip snip.

Tatted Rounds 3,4, and 5 again, this time with 7 repeats, and joined successfully. However I did not wish to change the count which is why you see the slight curve in the linking chains. However I kind of like the organic feel of this imperfection.

TIP: To get a neat point in parallel chains or with chains that turn back, as in the middle round, I always count the lock join as one half of the double stitch. It leaves a much smaller footprint.

I had the pleasure of test-tatting and proof-reading this clever pattern back in June. Well I messed up with the repeats, but it gave us a variation that lay flat. So not much was lost.

For some reason the tinted green felt too overbearing. Hence I wanted to tone it down a bit. So after a long tatting break, I picked my shuttles for 2 nights in August for some 'mindless' tatting .....

This is what I came up with - repeated the inner flower motif around the edge. I measured the distance between the rings and the picots on the chains. It was a good fit!
Design TIP: I had initially tatted a 6-ring rosette. Surprisingly it did not look nice! So the 2nd one was made with 7 rings and these reflected the pattern well. So the first one was snipped off. 
 
I intended to fill in the space between the motifs with purple and white flowers connected with a plain green trellis. However, my tatting buddy Anita Barry, completely forbade it! She called it finished at this stage. To assuage my designing curiosity I might still try out one repeat, but not in the near future since I'm back in the no-tatting zone.

The model is worked in Anchor Pearl Cotton size 8 [green 0128; purple 00087; yellow 00291; white; tinted purple 5393. It measures around 12.5cms without and about 16cms with motifs.

I had a great time tatting it and apologize for the inadvertent error in counting. Must go back to a Maths refresher class! However yet again a mistake led to a slight variation - I should call it 'Mistake Designing', LOL.

Many many thanks to Ninetta for her beautiful pattern and all the work that went into it and into organising the game. 

Friday, 8 May 2020

captured onion rings

Pin It now!
Ninetta has been posting a comprehensive study of Onion Rings – their construction and variations – along with pictorials and tutorial links. A must-read for anybody wishing to learn, explore, or improve. A sumptuous dish!
My guess is that Marilyn followed one of those links to my blog and left a comment for help with captured onion ring
Ever since I tried it here for the first time, I have been hooked to this method and have used it consistently with good effect. I think this is a good excuse, and opportunity, to present a stepwise tutorial.

Captured Onion Rings
Kathleen Minniti's method

BACKGROUND :
Captured Onion Rings are a pair of concentrically placed True rings. These true rings can be tatted with the same shuttle, or with different shuttles for a 2-colour version.

Aurora Lozada first shared her Perfect Onion Ring method (pdf) in 2014 with the Online Tatting Class. She captures the inner ring between the core and working thread After making 1ds. Thus the inner ring is captured Between adjacent stitches of the outer ring. After closing the outer ring, the emerging thread is offset by the 1st ds. 

Kathleen Minniti improvised Aurora’s method to capture the inner ring Within the 1st half-stitch of outer ring. After completing the outer ring, the thread emerges from the center.

I can now understand Aurora’s method, but am still unsuccessful at executing it! Kathleen’s method is like tatting over tails, substituting the inner ring for the tail. I can do that - and if I can, You certainly can!  

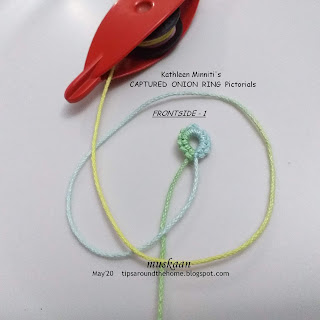
Captured Onion Ring Pictorial - FRONTSIDE

I have used a single shuttle for the pictorial. 
Inner ring : 6 – 6.
Outer ring : 10 + 10.
1. Tat inner ring. Close ring and loop the thread around to start outer ring.

2. Hold in pinch.

3. Start 1st half stitch – under ….

4. …..over

5. 1st half-stitch seen clearly after the flip, but do not snug.

6. Pass the inner ring through the open leg of this 1st half-stitch. Follow the core thread (just as in tatting over tail).

7. Bring the leg to the base of the inner ring by wiggling your left index finger, and

8. snug tight. Make sure the stitch is as close to the base as possible, and that the core thread slides freely.
9. Make the 2nd half-stitch (over-under) and

 10. snug normally. 1st ds complete.

11. Tat around the inner ring, joining to the picot. I used the ball thread or onion ring join

12. Close the outer ring normally. A pair of concentric or onion rings is ready.


In the above ConcentriCITY snowflake, there are 3 concentric rings where the outermost is a chain or mock ring. To bring the shuttles in position, the middle ring is worked backside. This is what Marilyn was referring to. Hence here are a few pics showing the backside working of the captured onion ring.

Note: In directional or frontside/backside tatting, the sequence of half-stitches in a ds is reversed (hence called RODS – reverse order of double stitch) working 2nd half before 1st half-stitch. 

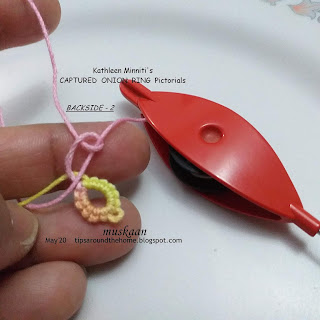
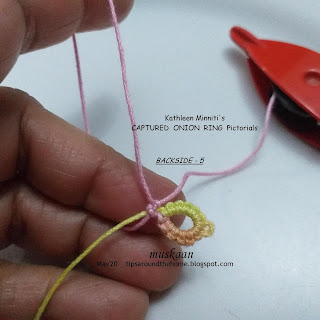
Captured Onion Ring Pictorial - Backside

In this pictorial, both rings are worked backside, but this is not compulsory.

1. Inner ring worked backside. Loop the thread around to start outer ring, and pass shuttle over-under to make the 2nd half-stitch.

2. 2nd half-stitch made, but do not snug.

3. pass the inner ring through the open leg of the half-stitch, following the core thread.

4. Snug the stitch as close to the base of inner ring as possible.

5. Make 1st half-stitch. 1RODS complete.

6. Continue around, joining to the picot, and close the outer ring normally.

7. This is how it looks from the front. (There is some inadvertent space left at the base - the ring should've been pulled close more tightly to avoid that pink line).

Note : This method is so basic that it can be used even for chains/ mock rings, etc. , either in onion rings or in other situations. 


Hope this answers your question, Marilyn?


Many many thanks to Aurora & Kathleen :-) 
My onion rings have certainly improved!  

UPDATE : Comparison of Captured Onion Rings - original and variations!

Wednesday, 1 July 2015

Robin's Frauberger Bookmark

Pin It now!

Frauberger Bookmark
Original (1919) : Tina Frauberger
Reworked (2015) : Robin Perfetti


I was determined Not to be tempted, distracted, Until I had completed Renulek’s Wiosna that’d been left at a crossroad ! Look, I even had all the materials for the next mini project all ready & lying in front of me, but I persevered with temptation staring so directly in my face ! One day, 2 days, …. 
Could I resist ?
Well, yes & no. 
I resisted this new project & persevered with the doily. 
I saw Robin’s beautiful rendition of the Frauberger edging here. Fine, something to do down the line. 
But then she shared her pattern notes here !

Down went the doily shuttles, up went the bookmark shuttles ! Actually, I already had one almost full shuttle from my Mystery Doily project . Back to size 40. Easy to succumb on both counts ;-P


Thread : Anchor Mercer Crochet Cotton . Size 40
Yellow : 0302
Measurement : 7”x 2” 

Techniques : 2-shuttle tatting throughout
For Main Body :
CTM (if using single colour)
Concentric Circle/Onion Rings
Floating/Thrown rings (rings on chain)
Catherine Wheel Join (CWJ)
Frontside/Backside tatting (optional)
For Tail (WIP) :
Split Rings
Cluny Tatting
For Charm (proposed) :
Concentric Circle/Onion ring
Floating Ring
CWJ

The original pattern was published in Schiffchenspitze (1919) & can be downloaded from Georgia Seitz's Archive of Tatting Books in the Public Domain, here.

Robin has reworked the original stitch count . It works beautifully, lays flat & is very elegant. Thanks for doing all the hard work for us, And sharing :-)

  • It is a 2-shuttle pattern where ALL rings are Floating/Thrown rings !!!
  • Her pattern diagram shows 2 colours coding one for each shuttle. The point to keep in mind is that the colours denote which thread will show up, Not the Core thread. (that created a bit of confusion as I was tatting, because I kept thinking it was the core thread. The pattern was working Great, but the shuttle sequence seemed odd to me. But that’s just me being me).

  • The use of CWJs is superb !

The only thing I did ‘different’ here, was to have 7ds+CWJ for the left half part of concentric chain, & CWJ+6ds for the right side.

TIP : The outer concentric rings respond strongly to one’s tatting tension & other factors. Hence it is a good idea to tweak the stitch count to suit one’s tatting.


  • For FS/BS tatting, the portions in red in Robin’s diagram need to be directional (RODS). All the rest are tatted from the front normally. Indicated by arrows in above image.
  • RW : Work is reversed Only once for each repeat : When going from the completed onion ring to connecting chain . Indicated by thick arrow in above image.
UPDATE (March 10, 2017) : click here for a stepwise pictorial applying this pathway to a similar situation/motif.

Oops ! One missing ring in the turning repeat !
Should I cut it all off ? Wait ... read on

  • On day 2, I missed one ring at the turn of pattern (top right in image above). Since it was nighttime, I thought I’d snip off the portion & tat it correctly the next day. Some wise person (must’ve been a tatter surely) has said that one should sleep over a problem. And hey presto ! Next morning, instead of snipping & tying & hiding all those ends, all I did was a SSSR (single shuttle split ring) by joining auxiliary thread close to the picot (this can be finger-tatted, but I had some remaining thread in another shuttle ...) !!! So happy with the simple solution ! (SSSR in progress in image below) 
Using auxiliary thread & SSSR to add missing ring !


The pattern, as worked out by Robin, using 2 shuttles & floating rings, but no SLTs, is the Same as what Iris Niebach did in the TIAS Doily. Except that in the doily, each shuttle held a different coloured thread & one had to RW & SS to get the right colour. In both patterns, the designer mentions the thread that will show, irrespective of the core thread. So, if one can work through this bookmark, they can very easily work through Iris’ pattern !

It’s odd that of all the lovely patterns Robin has shared, & I have downloaded/printed, the 2 patterns I did make so far have been from her pattern notes !!! The first one was her gorgeous Design Pattern Snowflake (which I tatted the very same night) & she gave a sneak peak of the pattern diagram here.  … Oh, and Both are in size 40 !!! What a coincidence :-)
This bookmark pattern will be uploaded by Robin shortly. 

Completed ! Can you spot the SSSR ?
I still need to make a tail & charm for this bookmark & have a pattern in mind. But it will take some time …. I intend to make a braid using Cluny tatting (Yay! I finally learned the basics last week) – giving me the much needed practice. For the charm, I intend to repeat the concentric/onion ring with trefoil.
I will post along with my thoughts/tips/tricks on Cluny Tatting . 

And in case you are curious .... yes, the Wiosna is finally over :-D


I seem to be on track on my 2015 resolutions for the most part ! Well, the Spring Doily will have to stay as it is - can't find the right colours to continue. And, instead of 2 snowflakes per month, I Have tatted quite a few earrings (single only), which will adorn the tree; after all, they're already hooked ;-P


happy tatting :-)
and thank you, Robin :-)