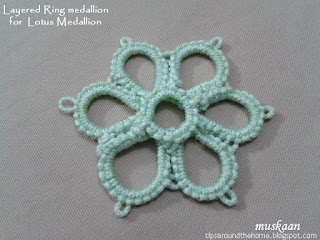
I’ve been revisiting a few techniques – both using layered
or stacked rings - to refresh my memory.
Ninetta’s modern adaptation using a floating layered ring
was my first stop. I converted it into a flower pattern. DH thought it looked
like a lotus! Lotus motif is a fairly common sight in temple architecture, decorative ceilings in buildings/rooms, Jaipur-style paintings, etc. That settled the name ....
Lotus
Medallion
(prototype)
In Anchor size 20, the finished flower measures 6cms
across.
The inner medallion uses the same stitchcount and process as Dillmont’s original motif. Except that I made 6 rings instead of 4 – which meant I had to add 2 more picots to the floating ring. All details here.
This is a modern variation of the rosette or enclosed space medallion.
I hadn’t planned anything specific. But this looked so
forlorn that I had to do something to cheer it up ;-P
I continued with the layering theme, this time with
chains. When did I last use 4 shuttles? Time to set them up :-D Tried out my idea with some scraps and ran out of the red at this stage.
Starting again, I used light and dark shades of the same colour - this contributes to the 3D effect.
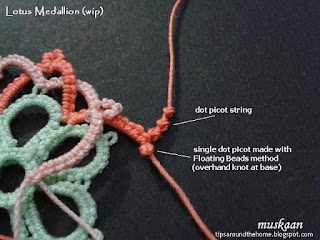
Yes, those are dot picots in a diamond arrangement! Can't stay away from experimenting ;-P Here's how I worked it ... Dot Picot tutorial links here
Work a string of 3 dot picots with shuttle 2, and 1 dot
picot with shuttle 1.
Note : When
making this dot picot with shuttle 1, leave a very tiny bit of thread on both
sides.
In order to make the make the single picot clearly
visible,
I used the Floating Beads with tatted rings method, tying an overhand knot around the
base of the dot picot.
The faux bead now rests at a slight distance from the
chain.
Now start the chain close to the faux beads.
When the
chain is tensioned, the 4 dot picots form a kind of diamond shape.
If one is using beads instead of dot picots, this round can be worked with 2 shuttles attached to respective balls. Pre-string 18 seed beads in each ball, and 6 seed beads in each shuttle.
Chains on either side of the faux beads have 10 stitches each. But this can be changed to suit one's taste.
Chains are lock joined to the picots on inner medallion.
But remember to overlap the new chain Before making a lock join with the previous
one. Also keep the overlap direction consistent throughout. An under/over
overlap as in the model helps when making the final chains and joins.
If using single colour throughout, one can climb out of the inner round with a split ring.
If using single colour throughout, one can climb out of the inner round with a split ring.
So what's your verdict ? And suggestions ? Colour choices?
Once I have your opinion I will work another model and present the final pattern.
happy tatting
always J


Oh, the Lotus Medallion really looks like fun. Still practicing the Interlocking split rings. I look forward to this challenge next. Thanks, Jean
ReplyDeleteLotus flower looks an interesting take on some new tatting methods combined with the old,
ReplyDeleteI like the pattern and can see more possiblires with it.
Piękny medalion !Pozdrawiam.
ReplyDeleteBeautiful! I've never been able to master floating layered rings so far, but this lovely motif certainly revives my wish to make some :) I like the soft colours best; purple is my favourite colour though... I think that what I prefer is the fact that, in your finished sample, there's less sharp contrast between the two colours of round 2. I love +++ the dot picots.
ReplyDeleteI'm so glad you liked this !
ReplyDeleteJean, you're doing an excellent job with the braid and I hope to see more of your projects in future :-)
So true, Margaret! This is going in the Medallion document to showcase the transition/combination of old & new.
Dzięki, Elzuki :-)
I used Ninetta's easier method here (the part 2 tutorial on my blog), Sylvie. I do like many of the techniques used here ;-P But I think the center should be a yellow.
That is beautiful! Also beautifully tatted! I'd try to add picots in the center floating ring, but it's already beautiful!
ReplyDeleteIt is beautiful. I tried the floating ring when Ninetta first introduced it, but that was a while ago. Good for you for re-introducing it.
ReplyDeleteThe motif really does look a lot like a lotus flower. I really like it. Maybe you could also try making the stamens, I think the floating twisted picots would do the trick. But that is just a suggestion.
ReplyDeleteI loved your idea of picots, Ninetta, but Lavi's is even more exciting !!! Or how about frayed picots?! The ideas never stop do they - more the merrier. But Santa needs a helper ;-P
ReplyDeleteJane, I love how you quickly try out every new technique :-)
I thought of adding another layer of overlapping chains but that might be an overkill.
Thanks ladies :-)))
Cudowny medalion!
ReplyDeleteFabulous motif!!! :)
ReplyDeleteThank you Madzia & Sue :-)
ReplyDelete