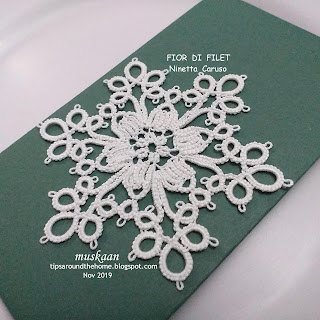
Obviously I was attracted to this snowflake – you know I have a weakness for flower
flakes, right! And I would've made it... eventually ;-P
When
Ninetta asked if I would test her diagram I jumped at the distraction. I didn’t realise what a This Way orTat (TWoT) lesson or reminder really it would turn into. There are truly
multiple ways to work this pattern, and oftentimes the tatter simply follows
her default method without even realising. For instance I came across a number
of Paisley snowflakes facing the other way, I'm sure unintentionally.
So
anyways, I have worked my model based off Ninetta’s original diagram (since revised and uploaded here), hence the
block stitches face the other right. Further, I did not reverse work after the
1st inner ring (which has a central picot) since I wanted to work
the block chains frontside.
If I were to make this again, I could start with a wrongside ring & RW for the sake of uniformity.
This is my default method for block tatting. I use 2fhs at the end of a normal
row and 2 unflipped shs at the end of direct tatting row, to turn. I find it
keeps the rows snug. However, it’s been a while & I could’ve used some
practice!
Due
to this turning method I did not need a paperclip to hold a picot. (I needed to refresh my memory, hence first block has a paperclip.)
UPDATE - I have also used a single half stitch for rising to the next row in block tatting and it looks much better. Will have to confirm which I use in future. Memory can be so fickle ;-(
UPDATE - I have also used a single half stitch for rising to the next row in block tatting and it looks much better. Will have to confirm which I use in future. Memory can be so fickle ;-(
Both
my rounds are worked in clockwise direction from the front.
TWoT Notes : Reverse work, how one starts the first row of a block, switching shuttles, etc. all can cause a change of direction to what the designer has presented. As long as one is aware, one can make informed choices.
TWoT Notes : Reverse work, how one starts the first row of a block, switching shuttles, etc. all can cause a change of direction to what the designer has presented. As long as one is aware, one can make informed choices.
Notice
how the 2nd round goes around the block with stitches facing the
same direction as the latter? Cleverly sneaky way of fooling us into thinking
it is a 6-row block!!!
Can you spot the difference between this latest chain-around-block repeat and the earlier ones? The chain here surrounds the block with All stitches facing outwards, creating a petal-like effect. Overall, though, I don’t think it really makes a difference which way the chains face, right? You can’t really tell – our brain ‘corrects’ any slight difference.
Be sure to leave some more space between the 2 blocks in round1. I had to pull them apart to allow round 2 elements to squeeze in (4 chains in the same space!). I could’ve done a much better job, but am still happy – it’s such a pleasing design! I think I’ll make another in size 40.
The printable pattern is uploaded here and the related post is here.
Worked
in Anchor size 20 (my shuttles had been preloaded for my 20th snowflake trial), the
flake measures 9½ cms tip-wise, and 4 cms as a hexagon side.
Thank
you, Ninetta, for the pattern as well as the chance to test tat :-)))


It’s a beautiful snowflake and right up your street.
ReplyDeleteWow, it’s stunning!
ReplyDeleteBeautiful snowflakes!
ReplyDeleteNagyon szép :-)
ReplyDeleteIt's outstanding!!! :)
ReplyDeleteThank you! 🥰🌹🌹🌹
ReplyDeleteLove your comments ! Michelle, Ninetta's designs have a tendency to evoke that reaction, don't they :-D
ReplyDeleteEnjoy a happy Thanksgiving weekend everybody :-))))
Love your snowflake! It's so lovely!!
ReplyDeleteHugs
All credit to the designer, casaERBA 😄😃 💕😍
Delete