Showing posts sorted by date for query false CTM. Sort by relevance Show all posts

Saturday, 9 May 2026

vintage false CTM

Pin It now!


There are so many methods and even more combinations to add new thread to a work in progress lace. We came across Eleonore Endrucks' advice to fix mistakes in her 1920 book, 'Die Schiffchen-Spitzen'. Here is the translation - 
We now call it False CTM (false continuous thread method) and I have shared several scenarios and applications over time. Here, we limit ourselves to Endrucks' method, a variation of the same, and a knotless method.
All this has been presented as pictorials in this PDF - 

False CTM - Endrucks' Advice & Pictorials -https://drive.google.com/file/d/1_Jm7puHcMemY3lhwP2cP8G3EmcgamlVj/view

Since everything is already presented in the PDF, I will be brief here, with only a few selected pics. Please click on the link above to download the document.

1. False CTM - Endrucks' Method

Notice 1. the old tails tied together and the new ones tied together ; 2. the knots are far apart, with the new knot wound on the ball or 2nd shuttle, far from the point of attachment to the work in progress.. The blue thread between these two points creates the false continuous thread.

However, since the two tails (in each pair) are tatted over in the same element, it creates bulk. This can be countered to some extent by tatting very tightly.

TIP: Use a slip knot to tie the new threads (blue) so that it can be opened and the knot repositioned as desired.

2. False CTM - Variation of Endrucks' Method
In order to avoid bulk, here the old shuttle tail is tied with new shuttle tail and old ball/2nd shuttle tail to the new ball/2nd shuttle end. Preferably, maintain a distance between the two knots so that we have a continuous thread space to work with.

Look closely, all four tails are hidden (tatting over tails) in four different elements. The extra ends are trimmed later.

3. False CTM - Knotless Variation of Endrucks' Method
Knotting the tails can be completely avoided. Above the new ball or 2nd shuttle thread is being folded around the old tail and will be tatted over in the chain element. 

Similarly, the core thread can be added and worked over.

The other tail in each case can be sewn/whip stitched later, or pulled through stitches using a magic loop, etc.

The choice of the three methods would depend on the specific situation - how long are the old tails, etc.  The above is merely a small glimpse of the numerous ways in which we can apply false ctm. Some related posts/pictorials/PDFs -
Starter Picot or Starting with a Chain (PDF) - https://drive.google.com/file/d/1vzSHMxas51Yn5iujdmror1obx27AuIhw/view
Hiding Ends and Adding Thread - vast compilation of options and tutorials - https://tipsaroundthehome.blogspot.com/2016/11/beginning-or-ending.html

Hope you find this helpful in some future situation. 

Tuesday, 14 October 2025

Starter Picot pictorials

Pin It now!

 Ninetta and I have been working on a resource page dedicated to the Endrucks 1920 Project. Over the years many tips and pictorials have been shared but they were scattered. In our attempt to finally gather and organise them, we discovered certain lacunae and decided to create pictorials and/or videos to address the issue. 

One such is the Starter Picot or Starting with a Chain. Elgiva Nicholls calls it the Link Loop or link loop picot. Several of Eleonore Endrucks' patterns in her 1920 book 'Die Schiffchen-Spitzen', start with a chain. She ties two threads together, and starts with a chain of 1ds, picot, and the rest of the chain. Of course most tatters now start directly with a picot and with continuous thread (CTM). Yet there are different approaches. Following are glimpses into the options detailed in the PDF which I won't repeat here....

Please note that this is a compilation sourced from various sites/blogs, some of which are no longer accessible. It is the reason Ninetta and I wanted a resource that did not have to rely on outside links, as far as feasible. The only outside link we included is for The Online Tatting Class, besides our own blogs. As it is my Tatting Resources page (tab above) lists tons of outside resources with credit. 

Starter Picot Options with Pictorials by Muskaan Oct2025 (starting with a chain) - https://drive.google.com/file/d/1vzSHMxas51Yn5iujdmror1obx27AuIhw/view

1. Starter Picot with paper clip, marker, or coilless pin.

Between the choice of spacers, I prefer the thread marker (or luggage tag loop) as you might remember from my past posts. I find it less interfering, and more importantly we can measure the picot to the exact size required - https://tipsaroundthehome.blogspot.com/2023/01/measured-picot-on-core-thread.html

2. Starter Picot with 1st half-stitch

or 2nd half-stitch
I left out this 2nd hs collage from the PDF since it is basically the same as the 1st hs pictorial.

3. Starter Picot with lock stitch


What happens when we want to work with two colours or we have leftover threads on our shuttles and wish to use them? Obviously CTM is not an option, but we do have False CTM. 

4. Starter Picot with false ctm in two-colour tatting

5. Starter Picot with false ctm in two-colour block tatting

The above collage was shared by Ninetta showing a two-coloured block in progress. And she starts the 1st chain with 1ds, picot like Endrucks. However, instead of tying the threads together, she uses the false CTM method.

For many more situations in which a False CTM comes in handy, click on the tag at the end of the post. I have two dedicated posts along with some specific projects where I used it. https://tipsaroundthehome.blogspot.com/search?q=false+CTM

Hope this is helpful in your future projects. 

Friday, 21 February 2025

overlapping interests

Pin It now!

Barbara Arango first caught my attention on FB several years back when she tried to recreate a design at the back of a hand mirror into a tatted motif! Since then she has successfully recreated more fabric prints into tatted lace. And in order to get the desired effect, she comes up with her own solutions. Some of these are clever adaptations or applications of existing techniques, though they evolve from her own trials and errors, the fruit of her own labours, without realising prior existence.

My recent post showing a tatted ring made with her overlapping split rings generated quite some interest and a couple of requests to show the steps. With Barbara's permission, I am sharing my pictorials along with pics of a few projects where she used them ... see for yourself how wonderfully they can be applied. Some quick practice patterns are also included but let your imagination take you places! All you need to know is how to tat split rings!!!

In the end, for immediate comparison, I have also included my own 2016 effect where I first coined the term. Links to a snowflake using the effect are also listed at the very end.

💦💦💦💦💦💦💦

Abbreviations used: Sh=shuttle in hand; CTM=continuous thread method; SR=split ring; vsp=very small picot; ds=double stitch; Ch=chain; - = picot; + = join to; LJ=lock join to.

There is no need to reverse work. The motifs are worked from the front continuously in clockwise direction or from left to right.

A]  Overlapping  Split  Ring  Braid, Barbara Arango style (2019)

2 shuttles (CTM if working in single colour). For pictorial I used two colours - Sh1: pink, Sh2:cream - Anchor knitting cotton size 10.
1. SR1: 8 vsp 5 vsp 8 / vsp 5.
NOTE: While the first ring can be worked as a normal ring, I prefer to start with a SR here so that the shape of all rings remains the same.  
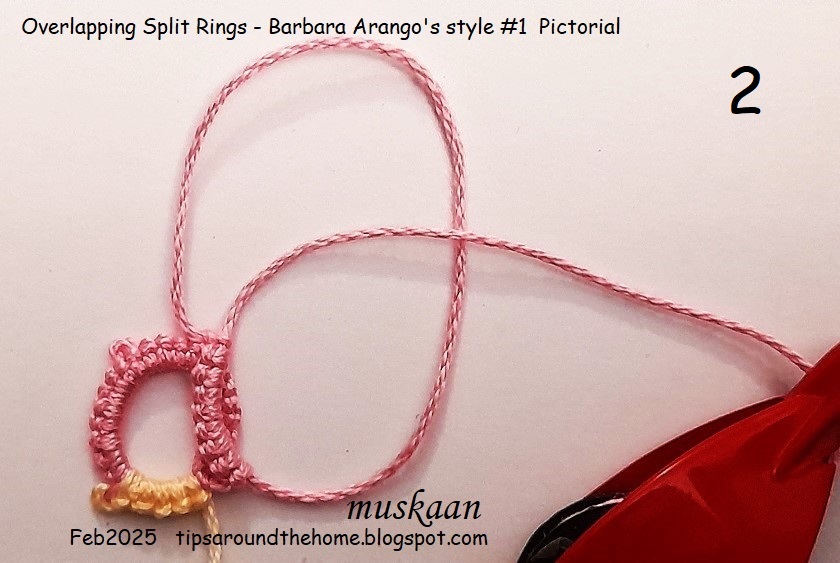
2. Start SR2 leaving a very small false picot.
SR2: 8 +(SR1) 5 vsp 8 / 5.
3. 2nd split ring tatted and is being closed.
4. Two split rings made and you can see the overlap between them.

5. Repeat SR2 for desired length, joining to previous ring as you go.

Practice Pattern for ring, bracelet or choker - 
6. Above is the braid I had shared in the post, using the same count. This can be started CTM as a normal ring, too.
After tatting a few more rings, I joined the last ring to the first, keeping the overlap consistent. Think of this as an ANKARS joining, positioning one ring above the other before joining. 
Pre-string beads to embellish as desired and use as jewellery.

I like the rectangular shape created by the rings with the above count. Got to thinking how even SRs would overlap. 
So, here I used 8ds between each vsp. Rings are rounder, but the overlap is consistent. To get them to overlap more, the overlapping segments need to be longer.

And here are Barbara's projects (2019-2022) using the braid style -

Notice how the rings get smaller?

The applique and embroidered designs on the left inspired her to recreate it in tatted lace and she used the overlapping SR braid effectively.

And to remind you of the practice pattern I shared in my previous post: 
💦💦💦💦💦💦💦

B]  Overlapping  Split  Rings , Barbara Arango style #2 (2021)

The same technique as above but used in a kind of onion ring formation, in one pass. Here Sh1 has cream and Sh2 has pink thread.  If working with single colour, use continuous thread.

1. SR1: 5 vsp 10 / vsp 5.

2. Leave a very small false picot and start 2nd split ring.
SR2: 10 +(SR1) 5 / 5. Switch shuttle
3. With Sh2 in hand, continue for chain...
Ch: vsp 10 - 10 LJ(SR1) 10 - 10 LJ(SR2). Switch shuttle
4. One motif of overlapping split rings made, all worked from the front.
5. Start 2nd motif with Sh1 in hand, leaving a very small false picot.
SR3: 5 vsp 10 / 5.
6. Repeat from SR2 onwards for desired length. 
TIP: Instead of a lock join  through the false picot, one can make an under-over or alligator join from the 2nd motif onwards.

Wouldn't this make a lovely bracelet or choker when embellished with a few choice beads!

And here's how Barbara applied it in a doily (2021) -
This is the doily inspired by a design behind a hand mirror. And to get the effect, she cleverly used this formation of the overlapping split rings! Since then she has created several more designs which you can view in the Just-Tatting FB group.
💦💦💦💦💦💦💦

 Overlapping Split Rings , Muskaan (2016)
It was back in 2016 that I first shared my nascent trial and coined the term Overlapping Split Rings. As you can see from the pic below, my method involves a braid of uneven split rings which are folded and joined back to create an overlap in the center. The SRs remain free in the center creating a distinct 3D and faux Celtic effect. 
SR-A: 9 / vsp 12.
SR-B: 4-1-1-4 / 12.
SR-C: 9 / 12.
Lock join to vsp of A.
One motif created. 

I used this motif to design a snowflake. Despite the immediate help of my trusted test-tatters, I haven't published the pattern here. I called it the Mutant Snowflake. Following are respective posts - 
We can also increase the number of rings to get polygonal shapes and interesting overlaps!

I realise this is a long post. However, if I didn't post now it would further get delayed. Thanks for your patience in reading this and hope you try and experiment with some of them.
💦💦💦💦💦💦💦

In case you wish to use leftover threads for trials, here are a couple of pictorials that will help you start knotless with a split ring without CTM - 
How to start a split ring with a picot - PDF: https://drive.google.com/file/d/1OS_9VdZSoWVSsOtQYT8UVb4nV6exmf2p/view
💦💦💦💦💦💦💦

Many thanks to Barbara for extending the boundaries! All in the eye of the beholder!

Tuesday, 20 August 2024

veg patch game

Pin It now!

Game of the month in the Endrucks 1920 Project FB group this month is to tat either of two pumpkin patterns derived from pattern #25 - one is flat (Julie Myers) the other 3D (Daniella Galli). Obviously I would've liked to tat both, but went for the quicker option. 

Julie Myers' adaptation of E25 Extract Me Pumpkin pattern PDF for #VegPatchEndrucks Aug2024 - https://drive.google.com/file/d/1WKxGqijegF911nOvbmNjUuPVOQkHNZyF/view . Incidentally she derived this during our Sep 2022 game - ExtractMeEndrucks (as did Daniella!). Hmmm, one month shy of exactly two years!

My version reflects the type of pumpkin I enjoy eating during summer months - the green pumpkin (see next image). It is not fully ripe, has a mottled green skin and pale yellow pulp with a few scattered seeds. I visualized her pattern as a cross section of the whole pumpkin - the rings as white seeds, the pale yellow pulp, and a green skin. 

https://images.app.goo.gl/qpWbJWvj4BTVDEU5A
This is the only good image I could find which is identical to what I buy. Most images have an orangish pulp and green or brownish skin. Perhaps next season I'll remember to take a pic when I buy it.

I make the sabzi (kaddu/sitaphal) in summers till raw mango is available. Cut into pieces (one can keep the skin on or peel it), also dice some raw mango into small cubes, mix in spices, temper with whole fenugreek seeds and asafoetida, cover with plate and microwave for 3 minutes, stir and zap for another minute or so as required! It is such a quick-cooking dish and tastes wonderful with roti, puri, paratha, rice. 
I have a traumatic experience with the kaddu raita, though! Mummy once made it and it was horrible. But she insisted we finish it and I shudder ever since, despite enjoying various kinds of raw or cooked/grated veggies in beaten curd, LOL.

Wanted to use beads for seeds, and had even selected the pearls. Then decided to tat in 3 colours. 

NOTES - 

  • In Gopi size 40 threads, the main body is 4.5cms high and 4.2 cms wide. 
  • I used a single shuttle wound with the white thread. Yellow and green remained on their respective ball. 
  • Started with false ctm - pulled out a short length of yellow, and finger-tatted the first chain, leaving a starter picot. Then continued with white shuttle, hiding & snipping off the extra yellow length.
  • Tatted continuously, all clockwise. I didn't feel the need to turn work after every round. Especially since I was using the one shuttle and the colours positioned themselves as needed. Just left a very small picot at the start of each round to join back to.

  • Treble tatting on the outermost round. While not strictly realistic since the actual peel is thin, but tds is fun and gives a nice finish and texture I hope. Would look good for a floral effect!
  • I didn't count the tds, eye-balling the length of each segment by placing it along the corresponding chain segment below it. 
  • TIP: After the required tds, I worked in 2ds, lock join, 1ds, p, 1ds. Now join simultaneously through both the hidden picot of last tds and the picot of new segment, and continue this as the 1st tds of new segment. Repeat at each join. This gives a nice, clean dip (You can see the difference on the join between 2nd and 3rd chains on the right side. The dip is not pronounced because I experimented without the picot, joining directly). Another advantage is that there is no 'gap' at the base of the join. I think it came off nicely.

  • The stem encapsulates all the tails and since I had used leftover thread, I simply ended with the long tendril, without extending the stem further. 
  • I had intended to add leaves, but one of our participants has already done a stellar job of it! Perhaps I will still tat a leaf or two from the same 2022 game - this would act as an incentive to share the E25 palm leaf pattern which inspired Elisabeth's Multifaceted leaves. See how the branches keep multiplying?!
I enjoyed tatting this piece despite the somewhat unorthodox colours which don't immediately identify it as a pumpkin, and hope that soon I'll get a chance to tat Daniela's 3D version, too. 

🌿🌿🌿🎃🎃🎃🌿🌿🌿

UPDATE: https://tipsaroundthehome.blogspot.com/2024/08/lollygagging-or-not.html


🌿🌿🌿🎃🎃🎃🌿🌿🌿

We do have a few other veggies in our Endrucksian garden patch as inspiration, including another 3D pumpkin (from E12) by Krystyna Mura. Check them out in the Foliage directory - https://docs.google.com/document/d/1EIgPKHH9V2Dg4gDZNefVfSVNRZQC6LbSfhiaWA_s-G8/view  

Many many thanks to Julie and Daniela for graciously sharing their patterns 

and to Ninetta for hosting the game! 

Friday, 12 July 2024

what the heart wants

Pin It now!

.... the heart follows! I hadn't planned on playing the game of this month - Pattern Me Endrucks (July2024) because I wanted to focus on other tasks and had told Ninetta. Yet the heart yearns and one gives in to that knotty call. 

E43 Pattern pdf - https://drive.google.com/file/d/1JRu7OggaSna0eXDRA2P18dRu6uE4-1J7/view

Some entries have already come in and wow, each of the participants has seen a different aspect in this motif and followed that direction! Can you blame my heart for wanting to join them? I could see an orange segment, but you know my penchant for complicating my life. So, while not a very unique idea or shape, I decided to go for a 3D flower.

Mind you, this is a prototype with a few mistakes, lots of retro-tatting, and Dr. Downplay ruling. Hopefully the next petals will turn out better.

My goal was to deviate as less as possible from the original pattern. 

My Notes, TIPS, and Future Ideas - 

Since I wanted to work with two colours, here's how I started without tying the threads together -

A] Started with false CTM, pulling out a short length (A). from the shuttle.
B] Attached a marker/luggage tag loop to the starter picot (B).
C] Using A as core thread, finger-tat the chain using thread (C) from shuttle for the stitches.
D] 2nd shuttle with thread in another colour was added at the end of the chain. The A thread is cut short and hidden in the next element (tat over tails).
For more False CTM scenarios: Part 1 ; Part 2 .

  • The tatting proceeds from right to left, unlike the diagram. I think the reason could be that if one direct tats the chain (reverse stitches), it will proceed from right to left. This dawned on me when I noticed the inset diagram showing the start! The written instructions are for normal tatting.
  • As it turns out, on reaching the other end, I decided to keep the chain maroon, hence you can see the colour difference between left and right.
  • In order to position colours lots of Reverse Join (RJ) is used.
  • Midways I decided to use the Catherine Wheel Join (CWJ). However I was tatting the return chain backside. I have done the CWJ from the back before, several times, including my cheat trick of a half-stitch shift! However this time I watched Marilee Rockeley recent video CWJ from the back side - https://www.youtube.com/watch?v=EqxTqb8UMww

  • The outer row of chains is done with Victorian sets or zigzag tatting. Continued down.
  • The left chain was made first and is a bit longer than needed.
  • I decided to use the small motifs on the sides (in original pattern) to cover some of the negative space. Added a 3rd colour to make the twin rings and cut off the thread. I've deliberately left short tails instead of hiding them.
  • Then picking up the original shuttles I continued with the chains to complete the first petal.
The shuttles are still attached and I can easily continue with the next petal. I'm thinking a total of 3 petals should complete the flower. While I'm not too thrilled with my colour choices, Dr Downplay rules! 
I have deliberately created a 3D version for the petal. Otherwise the motif lies flat.
You can find tutorial links to the terms mentioned, here - https://tipsaroundthehome.blogspot.com/p/tatting-resources.html

FUTURE IDEAS: 

  • This same petal, with a bit of tweaking can become a peacock plume! 
  • Or joining 3, 4, or more motifs in the round to create a broad round for a doily. And then design inner and outer rounds to complete the doily. This, however, will be a big project for another year!
  • And of course, orange fruit carpels/segments!

Do you have any suggestions for improvement or any more ideas? Please share ....

More to come; hoping to finish tatting this today so that I can get back to the other stuff.

Many thanks to Maria Grazia and Ninetta Caruso for the reworked pattern, and to Marilee Rockeley for her demo.

Related Posts -

Friday, 6 January 2023

tat-along doily

Pin It now!
Our new game in the Endrucks 1920 Project FB group has started. This time it's a tat-along of the cover doily. We are following Reiko Akamatsu's reworking of the original. And we are sharing 2 options. I am tatting it in 2 or more colours without climbing out. Ninetta is working it in one-pass using split chains, etc. to climb out. Of course Frau Endrucks herself tatted it in one pass using shadow/extra chains to climb out.

Tat-along of endrucks' cover doily #TALmeEndrucks jan2023 
Part 1 - Rounds A,B,C. I used the measured mock/inward picot to climb out of the central ring which can be tatted as a true ring or a mock ring.
Interestingly, this is the only pattern where Endrucks starts with a chain (aka mock ring)!!! Hadn't noticed it before. There is always something new cropping up.

Actually this was my 1st attempt where I used false ctm to climb out of the central blue ring. I kept the blue on the shuttle and continued with green ball. So not happy with the work which becomes even more glaring in the pic. 
PART 2 - Rounds D,E.  This is where the difference between individual rounds and continuous tatting emerge. Details are in the notes in the Part 2 pdf.
I tried Frivole's Ending on a Chain to avoid hiding ends but the thread broke and I had to start over.

Tatting as separate rounds gives us the freedom to increase our colour palette. Both rounds can be tatted with one shuttle and ball, including block tatting.

I am going for a peacock rendition, hence the choice of these colours. I chose size 40 and this time all 3 colours I used are from different brands! Green - Swati; Purple - Anchor; Blue - Gopal.

Doesn't the top make a nice little basket?! Would love to tat it separately and fill it with flowers. 

All links in the top right panel of my blog. You are welcome to participate. 


Monday, 28 November 2022

teachable moments

Pin It now!

or learnable moments! 

 We are having a fun time playing games in our FB group, and surprisingly several teachable moments have arisen especially in our current event #tagmeEndrucks! Sharing tips, sharing resources, sharing options, ... There is even a hashtag #eptutorials in our FB group to locate them.

These short games are a good opportunity to learn and apply a 'new' technique, try something different, improve one's skills, experiment, find solutions.

#1. If you run out of thread in one shuttle before completing the project, simply do a shoelace trick (SLT) and switch threads if there is plenty of thread in the other shuttle. (SS - switch shuttle)
Or choose a convenient element further down the line to add new thread (false CTM).
Add new thread, knotless or with a knot, and hide ends simultaneously.
(a huge curated list of situations, options, tutorials - http://tipsaroundthehome.blogspot.com/2016/11/beginning-or-ending.html).

My resolve to never share the length of thread required in shuttles has strengthened after this project - my personal learning moment. Too many variables to factor in!

#2. We decided to use 2 colours to tat the model in order to clearly show which shuttle was in use. However, this meant the split rings were bi-colouted while their corresponding rings on the other side were a single colour, See the encircled areas.

Solution - Double core SSSR Karen Cabrera's lesson #43 - https://www.youtube.com/watch?v=bfILdiZ2C20&t=4s  

#3. Alternatives to Lock Join - Lock Join is needed when joining to a picot below our line of tatting or below the core thread. It is basic, convenient, and tiny. However it leaves a little dip and it also locks the core thread (the colour of the picot below is also more visible - see image below). For a smooth edge, there are alternatives such as Catherine Wheel Join, Anne Dyer's Join the Smooth Side, and the Slope and Roll Join, to name a few.

In the first pic, 3 white arrows indicate where the Lock Join was replaced with a Slope & Roll Join for an unbroken rows of stitches.

SLOPE & ROLL JOIN (SRJ)
[This was all meant to be part of the Joins in Shuttle Tatting series (2016!)... perhaps some day].

WHEN TO USE -
1. when the joining picot is below the line of tatting/below core thread.
2. when we want a smooth, unbroken line of stitches.

ADVANTAGES -
1. easier to accomplish than a CWJ
2. can be done with shuttle and ball
3. keeps the core thread sliding freely
4. can be used for ring or chain. Especially useful for Onion Rings or Concentric rings, hence also known as the Onion Ring Join
5. If the join is followed by the 2nd half-stitch, it resembles a double stitch. Hence it is a seamless or invisible join.
6. in 2-colour tatting, it creates a blipfree join.

DISADVANTAGES -
It is sometimes difficult to hold a picot space, especially a vsp, immediately before or after the SRJ since it appears to twist. After completing the 2nd half-stitch, ensure the space is intact and a slight tug with a hook/pick helps prop up the picot.

RESOURCES -
Debbie Arnold (coined the term SRJ)- https://www.facebook.com/photo/?fbid=4089642167730639&set=a.3691414670886726
Karen Cabrera (video Lesson 25) - http://www.youtube.com/watch?v=x6o3RT4bb9
Ninetta Carusoo (diagrams Simple Joins) - https://www.flickr.com/photos/ninettacaruso/6896834805/
The Online Tatting Class - https://www.theonlinetattingclass.com/technique-tools


Teaching or Learning are interchangeable, just as we have tons of options to choose from our tatting kitty and can change when needed!

Tutorials to all terms and techniques mentioned in this post can be found here - https://tipsaroundthehome.blogspot.com/p/tatting-resources.html

Monday, 9 May 2022

single motif bonanza

Pin It now!
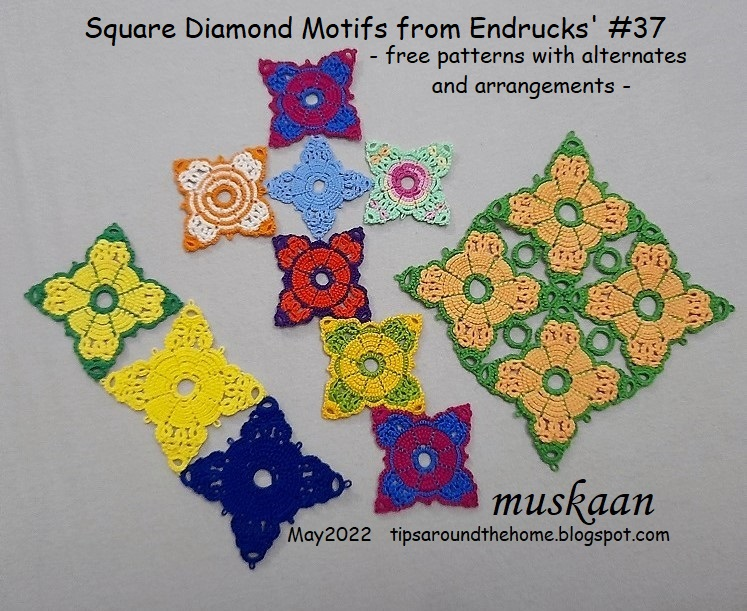
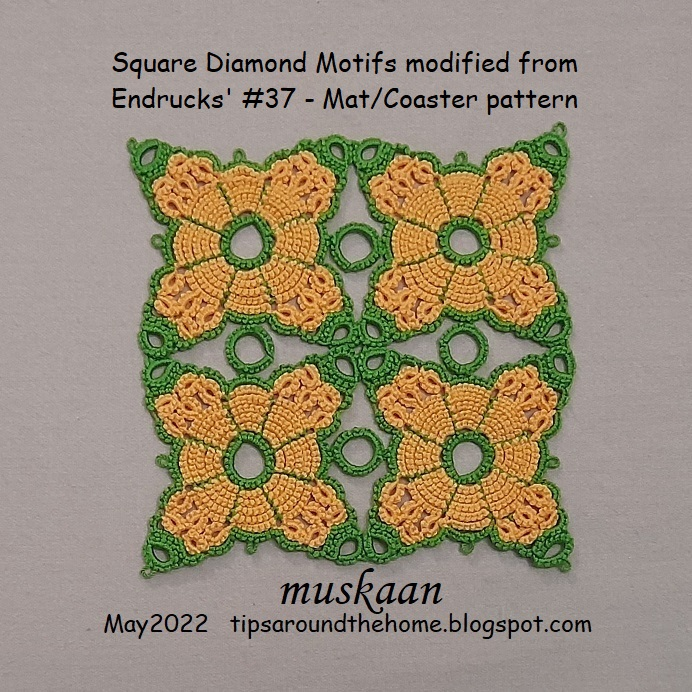
Square diamond motifs and mat with pattern 
from endrucks (1920) doily #37

pattern pdf (click to download) : 

My love affair with this motif started a long time back and the tatting started in November 2020. It is the central motif of a doily - pattern #37 from Endrucks' 1920 book. What caught my interest as I tatted, was the versatility in terms of sequence/paths resulting in diverse colour and directional effects.
For the most part I kept the inner Rosette unchanged, focusing on the arms.

1. Original: This is the original unaltered pathway from Endrucks. The 2 small middle rings (lateral) face the same direction - to the right. The asymmetry is not too visible since the rings are tiny. However it intrigued me, and as a study in design, I decided to go ahead with my variations....

alternate pathways and variations ---
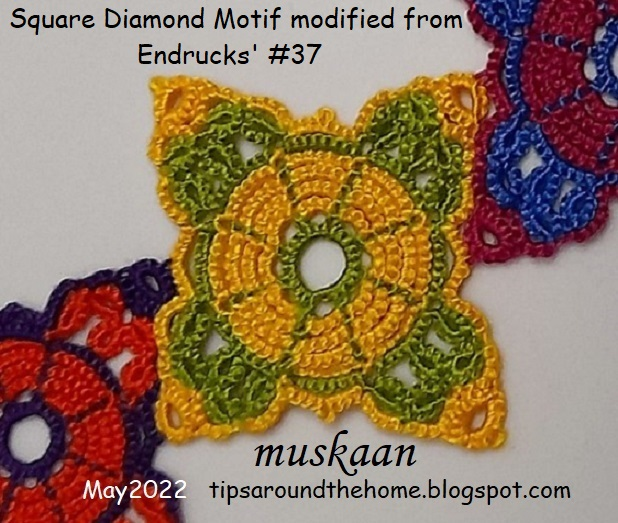
2. Modified: My modified pathway where the 2 small lateral rings face each other for symmetry. This is used to present the stepwise pattern, loading 2 shuttles with contrasting colours.
In Anchor size 20 (~ Lizbeth 10), it measures 5cms sides and 6.5cms diagonally.

3. Trefoil Version: This entire motif can be worked with one shuttle and ball, except for the single thrown ring at the tips, provided we decide before working the penultimate round. 

4. Flipped Ring version: While following Endrucks' original pathway, I merely swapped the direction of the thrown ring at the tips, working it on the way up rather than on the way down. Look closely to see that I alternated the flip.

5. Colour medley 1: Using Lock Join Plus aka Repositioning methods, I alternated the colours/shuttles within the rosette. (https://drive.google.com/file/d/17zsM3JaLO7r0ajg8VOnv5IcJ-kLNqEiU/view). You can choose any method you like, including changing colours between segments rather than rounds.
6. colour medley 2: I started with ball and shuttle for the rosette and added the green thread later, using False CTM, and snipping off the ball thread. (false ctm tutorials Part1 ; Part 2).
In Lizbeth 20 (with one less rosette round), it works to 3.5cms sides and 5 cms diagonally.

7. Reduced Round: If you remember my travails with cupping, this motif was my solution by removing the final rosette round and increasing the size of the 4 joining picots.
In Anchor Pearl cotton size 8 (~ Lizbeth 20), this works out to 4cms sides & 5,5cms diagonally.

8. New Motif for Doily: While the doily worked fine with the above modifications (in #7), I needed to make sure it will hold up in crochet cotton thread. Hence started this new motif (but forgot to reduce the round!). I'm still a bit apprehensive about continuing .... let's see.
In Anchor size 40, this works out to 3.75cms sides and 4,5cms diagonally.

arrangements and tessellations ---
The motif can be used as a square or a diamond and joined for various arrangements. Several arrangements and ideas have already been showcased here - https://tipsaroundthehome.blogspot.com/2020/11/arranging-motifs.html

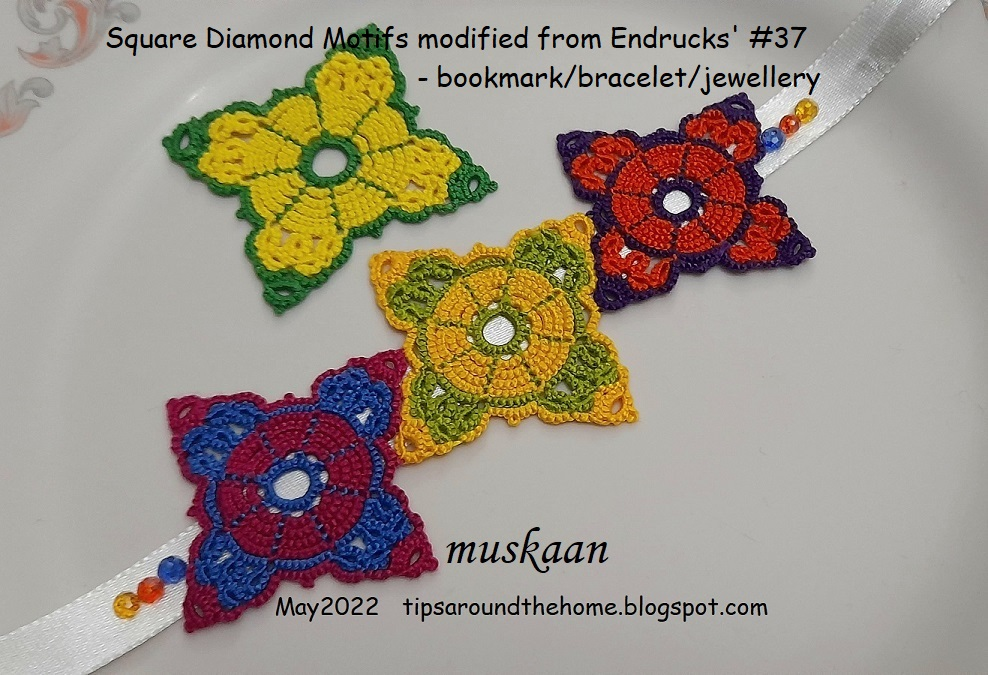
bracelet, bookmark, jewellery, charm, ....: Above is the bracelet idea. I really like this offset arrangement! Bookmark with a single motif as charm at the end of a tail is another practical idea. 
Single motifs with beads and findings can become jewellery pieces,...in fact an entire parure can be tatted.
9. Modified for Mat: The single lateral ring at the tips are larger here (7+4-4), and used for the Mat (below). 
Hubby had chosen this yellow and blue combination for the mat/coaster I wanted to make him. But the solid colours didn't work out (the 2 joined motifs can be seen in the topmost group pic). However, after seeing the cute 3D Flower Cube by Lillian Yeung, I hope to convert it into one, too!

mat/coaster/table runner/table cloth ..:  I was tired of working with yellow, hence chose this peach colour and the green went nicely with it. One can increase the tatted fabric to deserved size by joining as many motifs as required.
In Anchor size 20 it measures 10cmsx10cms.

Wondering whether we needed to cover up the blank space a bit, the sequins were hubby's idea and he got the blue he'd had in mind! One can use buttons in place of sequins.

For the purpose of sharing the pattern, I decided to see how large a ring would be required and worked these 4 rings in later. However, they can be worked as thrown rings. I was prepared to snip off the rings, but hubby liked it just fine and is using it!

alternate tessellation or cross: If a size 40 motif is joined like a diamond to the 4-motif open arrangement (worked in perle size 8 or Lizbeth size 20), we get another variation for a mat or fabric with alternating squares and diamonds!
In the above, if we join a couple of motifs to the orange one for a longer arm, we get a cross!

So there it is - a bonanza of choices and effects from one single motif!!!
All pattern notes and/or diagrams are included in the pdf (click to download): https://drive.google.com/file/d/1wqAPnOUZwLJ9tEUk55wDZhAMw2qCNFSj/view

All pattern pdfs and more, in modern style as well as links to the original book can be found in the Endrucks 1920 Project doc here -