Thursday 29 August 2024

lollygagging or not

Pin It now!

Whatever it is, I'm sure happy to pause and share this slightly mixed bag of fun and possibilities! Let's start with the Tatted Fringe and adaptations and practice pattern I shared in my last two posts.

Yesterday Elisabeth Dobler wrote to me and sent me some photos which I share here with her kind permission. And this is what she says - 

Today our tatting group met again and I showed them the new technique of Corina Meyfeldt and you. It was so funny - we had so much fun! Some members of my group were so creative and tried new ways to apply this new technique. Initially I wanted to teach them the various possibilities of the captured picot but we didn't have enough time - we tatted 3 hours only the new technique! 
Thank you very much for sharing this new skills!

From the top and the side!
Oh the possibilities of colour, size, and form!

She and her group are so creative! Soon I will share her beautiful application of the captured picots.

💖💖💖

Almost simultaneously I received this message from Stephanie Wilson -
I like your fringed star. The colors are pretty and I don’t mind ‘messy’ fringe. It looks nice to me.
Got me thinking – do you think we could do something similar using the daisy picot technique? Long picots *between* the daisy picot stitches, then cut them after we’re finished? I don’t have time to try it now, but it sounds like it would work….in my head, at least.

And the answer is yes! sorry I didn't get time to try it out, but this is the only caveat to keep in mind - if we attach the fringe to the core thread, it will take up space like any stitch. Hence if a pattern is not written with a fringe in mind, one must take care to adjust the total stitches accordingly. Of course, this can be countered by adding the fringe to the picot thread, and if one wants the fringe facing down/inwards, then tat a downward or inward facing picot on which you attach the fringe!
💖💖💖


I didn't mention it in my last post, but I had used the spot fringe as thorns in the tiny Thorny Wreath from 2015. (https://tipsaroundthehome.blogspot.com/2015/12/thorny-wreath-pattern.html)

And this Christmas Troll (Ruth Perry's pattern) where I frayed the picots for an afro, could well have had additional fringe to give it a denser style (https://tipsaroundthehome.blogspot.com/2016/12/a-new-look-or.html)

And of course, the recent Fringe Star practice pattern and ideas was shared in the last post.
💖💖💖

Unrelated, but I wanted to update, hence adding it here. While looking for something in my choco-tatting boxes one leaf fell out which I noticed after the box was kept back.It was the same leaf I'd wanted to tat for the pumpkin, but didn't have time. Serendipitous! Of course I simply tied and whip stitches the tails to hide them and voila it looks kind of complete now. This is the E25 Extract Me Pumpkin by Julie Myers with my little tds variation and the addition of E25 palm leaf. (details - https://tipsaroundthehome.blogspot.com/2024/08/veg-patch-game.html ; https://tipsaroundthehome.blogspot.com/2022/09/palm-or-plant-help.html

💖💖💖
Related Posts - 

💖💖💖
Many thanks to all for sharing your joy, thoughts, and ideas ladies! It's always satisfying to see interest being generated and tatters at play.
💖💖💖

Monday 26 August 2024

starburst fringe

Pin It now!

In my last post I had shared several adaptations of Corina Meyfeldt's Tatted Fringe. Lots of ideas swirled in my head to try out a quick practice pattern, applying all three adaptations viz., tatted fringe, spot/luggage tag fringe, and tatted fringe picot. While I am not fully satisfied with the outcome (it looks especially messy in photographs), there is a lot of scope to play and try something better and different.

This is the Fringe Star - a kind of practice pattern with a lot of possibilities. 
I got so involved that I forgot to take some process pics.

I started by tying the white (Anchor size 40) shuttle thread with metallic Madeira (Astro 2, No.40) and tatting a chain with measured adjoining picots. This took longer than I bargained for coz the metallic thread is really really fine. However the colourway is beautiful with a range of shades.

Now since the thread was so thin, I feared the picot might turn out to be too small. Hence, after snipping off the tips and dividing them into 5 clusters (eyeballed, not counted!) I divided each further and added a luggage tag in the center of each using Sanbest #34. 
And I wanted a small cluster in the joining picot as well. So, I direct tatted 3 adjoining long picots at the start and between the 5 clusters. 
Future Idea 1 - My original idea was to make layered rings with graduated fringe picots. But somewhere along the way, I decided to simply add the fringe between rings for now.
  
With all the prep work finished, I pushed the clusters further into the shuttle and started tatting. The star body is a simple rosette of 5 rings (6 - 8 - 8 - 6)x5 joining to adjoining ring(s).

However, before starting the ring, bring forth the fringes (Fr) into the loop for the ring.
    For first ring tat 6ds, Fr, 8ds, FrPicot, 8ds, Fr, 6ds. 
    For next 4 rings, tat 6ds +(join to ring: push the Fr towards the top of the picot and join below it), 8ds, FrPicot, 8ds, Fr, 6ds.
    Join last ring to first.

Insert sequin and bead and sew down with the tail and hide the tail end or use it to suspend the star. Trim the fringes.
I wanted a starburst kind of shining aura, hence the long fringe. It is very sparkly when seen in person.
I repeat, it looks especially messy in pics, but there is always room for improvement. 
Future Idea 2 - Use a circle of tatted fringe for the base of a rakhi!!! Or how about fireworks?!

OBSERVATIONS - I'd like to point out that each adaptation has its advantages and this little pattern will help you realize this. 
  • For a fringe picot it is advisable to tat the chain as in Corina's original. 
  • But for spot treatment or to sprinkle a different colour randomly, luggage tags are preferable. 
  • Now if you need fringes on both rings and chains in FS/BS tatting, then you will have to decide and plan beforehand. Decide the number of fringes needed. Then tat the chain in segments of DS and RODS (reverse order DS). 

Future Idea 3 - Tat a motif with spot fringes in rainbow colours! 

Saturday 24 August 2024

on the fringes

Pin It now!

 Or not so much on the fringes? 

FRINGE(s) is a kind of decorative edge made of lots of hanging threads.  

FRINGE TATTING usually involves very long adjoining picots at the outermost edge of the piece, which are then cut and trimmed to size. These may be frayed if needed. (thanks to Anita Barry, who also shared a pic for the Glossary)


TATTED  FRINGE  AND  ADAPTATIONS -
Then came the Tatted Fringe shared by Corina Meyfeldt in November 2015 here - http://cmhandmade.blogspot.com/2015/11/fringe-sort-of.html . 
Unlike the former, the tatted fringe requires an auxiliary or spare thread.
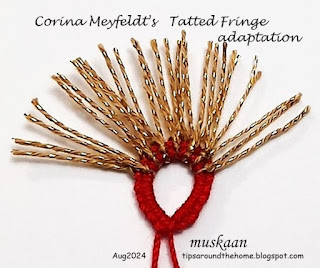
She first tatted a chain with long adjoining picots on the main core thread; then snipped and trimmed the picots, spread them out and wound the shuttle to start the project. Snipping the picot tips separates the individual stitches.  Corina brought forth each fringe from the core thread as required. 

Tatted Fringe on Picot -
Notice that in the above WIP ring, I placed some of the fringes on the ring loop or left-hand thread while others remain on the shuttle thread. Thus we have the option of placing the fringe on the picot as well as on the core. Just like one would do for beads!

The above tatted fringe (made of metallic thread) is positioned on both the core as well as picot threads.
An extended application of Corina's method.
This can be done on rings as well as chains and gives a thicker fringe.

Spot Adaptation (using luggage tags) -
In December of the same year I shared my spot adaptation, with pictorial, here - https://tipsaroundthehome.blogspot.com/2015/12/fringe-benefits.html
Instead of tatting a chain of long picots, I used luggage tag loops to make a lark's head knot on the core thread wherever and whenever required. These scraps can be tied frontside or backside (see next pic).
Besides, we have the freedom to include as many colours and threads as desired. Again, though not shown, the tag can be tied to the left-hand thread (on picot) or the core thread.

Seen together on a chain. Look closely and you will see that I brought the left-hand thread over and between the luggage tag, thus securing the fringe. 

NOTE: Since the tatted fringe makes a stitch on the core thread, care must be taken with the total stitch count in a pattern not written for a fringe. 

Tatted Fringe Picot! -
Now this is probably something new. Or at least I haven't come across it yet.
Since I had a few fringes left on the shuttle after tatting the first sample, I tatted a second ring but put all the fringes on the loop around the hand. And made a picot! 

So, that's all for now folks. Editing (and tatting samples for) the book Six T's of Shuttle Tatting, by Net Best, is taking me to the fringes of the tatting world and tatting literature! It is making me delve deep and wide and sometimes inspiration strikes and I go off on a short explorative excursion. Hope you enjoyed this short journey and can find some applications for these fringes. And if you have any new  technique or effect, please let me know so that it can be included in the Glossary. 

Tuesday 20 August 2024

veg patch game

Pin It now!

Game of the month in the Endrucks 1920 Project FB group this month is to tat either of two pumpkin patterns derived from pattern #25 - one is flat (Julie Myers) the other 3D (Daniella Galli). Obviously I would've liked to tat both, but went for the quicker option. 

Julie Myers' adaptation of E25 Extract Me Pumpkin pattern PDF for #VegPatchEndrucks Aug2024https://drive.google.com/file/d/1WKxGqijegF911nOvbmNjUuPVOQkHNZyF/view . Incidentally she derived this during our Sep 2022 game - ExtractMeEndrucks (as did Daniella!). Hmmm, one month shy of exactly two years!

My version reflects the type of pumpkin I enjoy eating during summer months - the green pumpkin (see next image). It is not fully ripe, has a mottled green skin and pale yellow pulp with a few scattered seeds. I visualized her pattern as a cross section of the whole pumpkin - the rings as white seeds, the pale yellow pulp, and a green skin. 

https://images.app.goo.gl/qpWbJWvj4BTVDEU5A
This is the only good image I could find which is identical to what I buy. Most images have an orangish pulp and green or brownish skin. Perhaps next season I'll remember to take a pic when I buy it.

I make the sabzi (kaddu/sitaphal) in summers till raw mango is available. Cut into pieces (one can keep the skin on or peel it), also dice some raw mango into small cubes, mix in spices, temper with whole fenugreek seeds and asafoetida, cover with plate and microwave for 3 minutes, stir and zap for another minute or so as required! It is such a quick-cooking dish and tastes wonderful with roti, puri, paratha, rice. 
I have a traumatic experience with the kaddu raita, though! Mummy once made it and it was horrible. But she insisted we finish it and I shudder ever since, despite enjoying various kinds of raw or cooked/grated veggies in beaten curd, LOL.

Wanted to use beads for seeds, and had even selected the pearls. Then decided to tat in 3 colours. 

NOTES - 

  • In Gopi size 40 threads, the main body is 4.5cms high and 4.2 cms wide. 
  • I used a single shuttle wound with the white thread. Yellow and green remained on their respective ball. 
  • Started with false ctm - pulled out a short length of yellow, and finger-tatted the first chain, leaving a starter picot. Then continued with white shuttle, hiding & snipping off the extra yellow length.
  • Tatted continuously, all clockwise. I didn't feel the need to turn work after every round. Especially since I was using the one shuttle and the colours positioned themselves as needed. Just left a very small picot at the start of each round to join back to.

  • Treble tatting on the outermost round. While not strictly realistic since the actual peel is thin, but tds is fun and gives a nice finish and texture I hope. Would look good for a floral effect!
  • I didn't count the tds, eye-balling the length of each segment by placing it along the corresponding chain segment below it. 
  • TIP: After the required tds, I worked in 2ds, lock join, 1ds, p, 1ds. Now join simultaneously through both the hidden picot of last tds and the picot of new segment, and continue this as the 1st tds of new segment. Repeat at each join. This gives a nice, clean dip (You can see the difference on the join between 2nd and 3rd chains on the right side. The dip is not pronounced because I experimented without the picot, joining directly). Another advantage is that there is no 'gap' at the base of the join. I think it came off nicely.

  • The stem encapsulates all the tails and since I had used leftover thread, I simply ended with the long tendril, without extending the stem further. 
  • I had intended to add leaves, but one of our participants has already done a stellar job of it! Perhaps I will still tat a leaf or two from the same 2022 game - this would act as an incentive to share the E25 palm leaf pattern which inspired Elisabeth's Multifaceted leaves. See how the branches keep multiplying?!
I enjoyed tatting this piece despite the somewhat unorthodox colours which don't immediately identify it as a pumpkin, and hope that soon I'll get a chance to tat Daniela's 3D version, too. 

🌿🌿🌿🎃🎃🎃🌿🌿🌿

UPDATEhttps://tipsaroundthehome.blogspot.com/2024/08/lollygagging-or-not.html


🌿🌿🌿🎃🎃🎃🌿🌿🌿

We do have a few other veggies in our Endrucksian garden patch as inspiration, including another 3D pumpkin (from E12) by Krystyna Mura. Check them out in the Foliage directory - https://docs.google.com/document/d/1EIgPKHH9V2Dg4gDZNefVfSVNRZQC6LbSfhiaWA_s-G8/view  

Many many thanks to Julie and Daniela for graciously sharing their patterns 

and to Ninetta for hosting the game! 

Saturday 17 August 2024

bingo, found it

Pin It now!

 My tatting-related activities are so scattered. And I feel quite scatter-brained. Wonder which came first, hmmm. Over the past several months I have been tatting samplers for the Glossary. Since it is progressing in sporadic bursts, I tend to either forget I've tatted it or misplace it. The pile-up does not help at all, neither does the various steps involved in saving and processing if not done sequentially and soon.

However I had a lucky breakthrough! Finally found the sneaky little Double Pearl chain sampler, whew. Incidentally, the PICOT Bingo game has one box for this technique, which is why I am sharing it here. 

My initial objective was to tat a short sample. However, the rhythm became quite addictive and I enjoyably continued till one of the threads ran out. What was meant as a short chain turned into a necklace.

Pearl Tatting is the double-sided technique with picots and stitches facing both sides. We are more familiar with the Single Pearl, worked with 3 threads instead of 2 for chains and it's counterpart the Maltese Ring worked with 2 threads instead of one. Pearl is the vintage term for picots. There are a few tutorials listed under Chains 🠆 Pearl Tatting, here. Mlle Riego wrote a book dedicated to this technique in 1867! 
Double Pearl tatting/chain, consequently, is an extended single pearl using extra auxiliary threads - a total of 5 threads for chains which tend to be straight.  

Double Pearl tatting requires 5 shuttles (or at least 3 or 4 shuttles + 2 or 1 ball, respectively) and encapsulation. Numerous permutations and combinations are possible, but I stuck to the basics.
You can change
  • the number of colours and their relative position,
  • the number and size of picots,
  • the addition of decorative elements thrown off the chain,
  • the thickness of threads,
  • the stitches used (double and reverse stitches) and thence the number of shuttles used,
  • embellishment with beads, etc., and so on.
● We can even have decorative chains instead of the long bare thread picots! For instance, dot picot string, bullion knots, JRs, Josephine knots, scallops, etc. 
On the left part in above image, you can see the thrown Josephine rings instead of the small picots.
TIP: If you wish to add such elements on each segment, ensure you have 5 shuttles.

I deliberately used 4 different colours. But imagine the confusion one can create if working with the same colour throughout! Even experienced tatters might find it difficult to identify how it was done, LOL.

I then continued as before, enjoying the rhythm. Josephine rings tend to break that working rhythm.
Threads used - Anchor mercerized cotton size 20 (equivalent to Lizbeth size 10) in 5 colours 
TIP: Only 4 colours are visible. The core thread can be of same thickness or thicker than the outer threads for a stiff cord. The core thread can also be made visible by simply bringing it forward, or by using Repositioning methods such as SLT, etc.
Picot gauge - 2 cms
TIP: It was easier to hold the gauge horizontally while measuring.

Starting the chain was tricky. I knotted the 5 threads together, but leaving the right length of bare thread took some trials.
Also, initially I made mistakes in maintaining a consistent overlap between threads. However, once I understood where the thread of last segment should be held while tatting the new segment, it became smooth sailing and addictive. 
TIP: Immediately after tatting a segment, I would place the shuttle to my left at the front of the work. Thus, when its turn came again, the picot overlapped from the front.

Directional or FS/BS tatting was maintained throughout. I didn't block the finished piece, except for shaping with fingers since I wanted to keep the gracefulness of the sinusoidal arches intact. 
I could've added more picots, including graduated picots, in each segment; or embellished with beads. However this was a relaxing, enjoyable tat, and I wasn't in a very adventurous frame of mind.

Since the core thread is of same thickness, it was easy to curve the straight chain. And it had become long enough to become a necklace instead of a bracelet, LOL.
TIP : Another way to ensure curvature is to shorten the picots on one side. 

I do wish I had added a few highlights such as beads and findings to finish off the 'necklace' properly. And one can use metallic threads for stiffness. Otherwise one might need to stiffen the piece for the picots to hold their shape when worn as a necklace or bracelet. So, I hope Natalie forgives me the lethargy.

Submitting this for two blocks in the PICOT Bingo
Double Pearl Chain, and 
Tat a Necklace.

And 💥Bingo💥! I have completed my first horizontal strikethrough! The middle row consisting of Tat a Necklace; Add Beads; Free Space; Graduated Picots; Catherine Wheel Join.

Wednesday 7 August 2024

smiling together

Pin It now!

Ninetta recently surprised me with a thoughtful and gorgeous gift on my birthday. She sent me the pattern for her cute little flowers which she named after my moniker Muskaan which means Smile! What an honour! This sweet Hiding Lady knows how to impress and she shared the Smiling Flowers (rose) pattern here -- https://ninettacaruso.blogspot.com/2024/07/smiling-flowers.html 

This is my adapted application into a rakhi/bracelet choosing to represent our tricolour (tiranga) Indian flag. This month we celebrate our Independence Day and Raksha Bandhan just days apart.
Saffron Marigold impression - Marigolds are considered pure and auspicious flowers and you will find them during any Hindu festival or ceremony.
It largely follows Ninetta's instructions except for the petals on the 2nd row where I used graduated treble tatting with 4 wraps. 
 
White Lotus impression - Lotus is our national flower and also symbolizes purity and peace. 
Although not very clear in the pics, the 2nd round petals have distinctly graduated tds with a pointed tip. Instead of 5tds, there are 7 tds with 1tds(1,3), 1tds(1,4), 1tds(1,5), 1tds(2,6), and ditto on the other side with 5, 4, 3 wraps.   
Blue Center - Clear blue bicone faceted crystals at the center for the Ashok Chakra in the center of our flag. I didn't have any blue bead larger than this.

Tempted to tat one more round of petals for the marigold but I desisted for two reasons - one, I ran out of thread; two, how can a marigold be larger than a lotus, LOL.
( Find treble tatting tutorial/video links here - https://ninettacaruso.blogspot.com/p/blog-page_95.html and on my Tatting Resources page.)

Green Leaves - The third colour of our tricolour is green which symbolizes prosperity, vitality.
Ninetta used the tds rings as calyx for her flowers. I used it to make leaves with more tds and some graduation.
Tatted continuously with a single shuttle, the leaf clusters are connected with a ring braid with pulled loop joins (leave bare thread at the back of the ring and make a lock join to the picot). This will act like a frame to secure the flowers.

Assembled together and attached to a doubled string of beads (12 on one side, 14 on the other for that 'gap'). All sewn in.
The beads are actually silver - like silver lining clouds against a blue sky.

So this is my Rakhi/Bracelet 2024 from Ninetta's beautiful pattern! Over the years, I have often used the tricolour to celebrate August 15th (including Har Ghar Tiranga with the 75 year old coin), and have also shared some of my tatted rakhis. 

And making short work, I am submitting this for Natalie Rogers' PICOT Bingo game, crossing off three boxes --- Treble Tatting Stitch , Add Beads , and Tat a Bracelet

Oh, and I used Anchor Pearl Cotton, size 8, throughout. 
I find the treble tatting stitch quite addictive! I honestly didn't want to stop tatting. If it weren't for the thread and time running out, I would've continued!
In my haste, though I forgot to add a clasp to the beaded ends!

Small 3D flowers always remind me of Carollyn Brown who had made it her personal goal to tat one floral sprig every month for a year! She always managed to amaze me. You can find her blog here - https://tennbrown.blogspot.com/2020/11/

And adding to the all-encompassing nature of this post, this rakhi/bracelet in flag colours is my August submission to splocik's Small Decorations game. Please do head over to the July gallery to check out the talented and diverse submissions compiled there - https://splocik2.blogspot.com/2024/08/male-dekoracje-2024-galeria-lipcowa.html

Thank you my dear partner in crime, Ninetta, for the honour and friendship you bestowed on me. It is precious! Keep smiling, always :-)))