Monday, 23 December 2024

a no glass ceiling

Pin It now!


This is something I pulled out from my art archives, LOL. Made around the turn of the century and lying unused in a box in my now almost defunct yet stuffed art closet. 

I needed something for the Small Decorations game organised by splocik and for the last 11 months I've submitted various specimens of tatted lace. For this final month, too, I had a few small pieces and a to-tat list of a few more, which I was going to put together as tree decorations to hang as simple ornaments, to cover baubles, etc. However, this value addition didn't happen when I suddenly remembered I'd never blogged about this project. Had to look through several of my containers to finally locate them, but the search did throw up so many forgotten memories!

 
These are mostly leftover glass paints on transparency sheets cut into rectangles for bookmarks. All are freehand, free-style, painting outlines directly over the bookmark and then filling with colour.

 
The black outline is not fine and even in many of them because the nozzle wasn't cooperating ...perhaps because the squeeze bottle was running low on the colour. Yet I enjoyed giving myself a free hand, LOL.

 
These bookmarks remain unused because at times the paint tends to stick to the page especially in the hot summers we have here. Would a coat of varnish help? While I didn't try varnish, I did try to cover up the painted side with cling wrap. Nah, unless laminated, the wrap just spoils the look.
A failed idea and experiment.

The box contained another painting on an A4 transparency sheet - lot more detailed and fine, but the paint has peeled off in several places. Another one has remained fine, though. My largest glass painting (a Medusa), this one on glass was framed and adorned the study for several years. Now it is wrapped up and closeted.

Would the newer generations remember what a transparency sheet is? Are they still being used for presentations or put to some other use? 
I could've punched a hole at the top and tied a satin ribbon for a tail. But I was just plain lazy to collect the materials and put in those few extra minutes and effort. Part of the reason is that these are not going to be used as bookmarks and are too long to stand in for tree decorations. Hmmm, I could cut around the outline of a few of them, though! Now that's something for next year.

So these bookmarks are my submission for December. You can scroll through the beautiful range of  November submissions here - https://splocik2.blogspot.com/2024/12/male-dekoracje-2024-galeria-listopadowa.html

As requested by splocik, above is a collage of all my submissions for the entire year (there were two submissions in October).

I had tremendous fun thinking of what to present each month! And I didn't always have to make something special, though the game was instrumental in several. Glad I could complete the game!

Many many thanks, splocik, for organising such a fun event in a supportive and creative way. So much talent was on display through all the submissions!

Happy holidays to one and all!

Thursday, 12 December 2024

fulgent and folly

Pin It now!

This month Ninetta has hosted the Bead Me Endrucks game in the Endrucks 1920 Project FB group. Simple and single rule - to choose any pattern from the original or derivatives and bling it with beads. Here's my fulgent attempt...

I extracted a motif from Endrucks' pattern #10 and worked it into a complete circle. Since I haven't decided what to use it for - so many possibilities - it's a medallion for now.

I used Wally Sosa's version (page 4) in the reworked pattern presentation by Ninetta Caruso here - https://drive.google.com/file/d/1YFBYqbgssthqDKYi8YkTX-fvAPmIYbm-/view. After taking the length of bugle bead into account, I doubled the stitch count in the rings. Since the bugle bead covers the chain length, there are only 2ds on the ringside and 1ds, p, 1ds, bead, 1ds, p, 1ds on the inner side. See TIP below.

Materials - This is a pic after I gathered all the supplies needed. I chose to go with a ball and shuttle instead of 2 shuttles. Red Heart metallic thread size 40; yellow seed beads size 16/0; red beads size 5/0; twist bugle beads #4. And beading needles and crochet hook #11. I selected beads from my stash, though I do need to buy more in different sizes.

As per my visualisation, I pre-strung the bugles on ball thread and the red and yellow beads on the shuttle. However, the shuttle beads didn't work out the way I had hoped. Hence all the beads were removed and re-strung differently. One yellow bead between a pair of bugles on the ball thread and alternating 1 red and 2 yellow beads on the shuttle.

This is how I ended up doing the effect I had in mind. On the ring, a long picot holding 14 yellows...
I loaded the beads using sewing thread and size 28 tapestry needle as seen in the background. 

Followed by 1ds, red, 1ds, join to the beaded picot, continue. This centered all the beads beautifully.

Can't say how much of the brilliance and shine the camera caught, but in real it is quite the shining medallion!

Folly - not one but many! If you look closely, most are easy to spot.

  • I should've used pure metallic thread instead of this single metallic strand twisted around perle cotton, size 40. Tons of trouble with the metallic strand breaking while closing the large ring even after I started working the stitches loose. Had to start afresh many times! Took the shortcut but tying a slip knot and tatting over both tails. The number of rings you see in the final medallion are only half the rings I tatted, LOL. 
  • Once I forgot to work the twin ring and had to cut off two repeats. 
  • Not making a lock stitch at the end of the bugle bead to avoid the core thread from being pulled too tight. Did it for the last few beads. 
TIP: If the bugle bead is not on the core thread, it may be a good idea to add an unflipped stitch at the end before continuing, so as to lock in the core thread and bead.

  • Noticed the difference in bugle bead size in one arm only in the pics, LOL, though I kept wondering why it wouldn't stay even. And not to mention the space between two rings where the thread got pulled while closing the ring and I didn't notice in time. Dr Downplay at work here, though lessons learned for future.

It measures a wee bit over 7cms across. 

Mr Meticulous is not happy at all, but Dr Downplay rules the day. What's your verdict?

Many thanks to Ninetta and Wally for their work on the main pattern and thanks for organising the game, Nin!

Tuesday, 10 December 2024

incomplete

Pin It now!

Suddenly the month is slipping away fast and I have ton of tatting to do. I hadn't been able to tat for almost a month due to life interruptions which put me back a whole lot. Prioritizing is the need of the hour or what's remaining of this month. 

This is the Vandkye Border in Tatting by Mrs. Ollie Romesha which I had hoped to complete before showing. I've decided to postpone it's completion hence sharing the WIP pic. It was published in Needlecraft Vol. VII, No. 8, April 1916 and the PDF can be downloaded here -https://www.antiquepatternlibrary.org/html/warm/tatting.htm   

Vandyke formations are inspired by portraits painted by 17th century Flemish artist Anthony van Dyck and refer to the distinct peaks or points like in the V-shaped chevron strips. I decided to go with this edging despite the bare thread space that kind of terrifies me. Then there was the headache-inducing task of transcribing the old text into short notations or diagrams. I took the plunge! 

However I tatted the flower medallions first unlike what the instructions stated. Decided it would be more comfortable when joining. 

There is one minor omission in the written pattern (part of the pattern is missing). The image of the tatted model was of great help.

The sewing side consists of single shuttle work with lots of bare thread. I started at the right to gauge the length of bare thread. It turned out to be a wee bit tight when the final row is tatted above. Started afresh at the left end, but have left it for the present. Once my other time-bound commitments for this month are done, I'll get back to this and share more details. 
Worked in Anchor size 40.


I am submitting this for Natalie Rogers' PICOT Bingo game, striking off the block - Tat an Edging. Now this game is another project I probably won't be able to complete despite starting in January itself. At least not in the way I wanted to. But never say die, LOL. 

Friday, 6 December 2024

and more

Pin It now!

 After reading my posts, Elisabeth Dobler took up the challenge and quickly sent me her version of the DAL Celtic Snowflake, designing a third round and also tweaking the first motif to incorporate Celtic knot picots! And she graciously shared the pattern, too, becoming our 21st participant. It took me some time to diagram it, though. But here it is ....

I realise only now while inking and uploading that we forgot to mention the beads in the center. It looks like she used two beads on each picot and made a swirl join at the end. 
There are Maltese rings at the tips and the thinner metallic thread picots fill the ring.

Elisabeth has a way with picots! If you are on Facebook or Instagram, you should look up her work and how she elegantly transforms the models. Her impeccable tatting is so inspiring, too. She frequently sends me pics of her work and I will soon share a few here.

Before I forget, you can find the pattern and all details in this Google Docs -https://docs.google.com/document/d/1pVqM6S5Ng49xk6erSsDyRm3y7SdV2tCIUOCgltze4lM/view

❅❄❅❄❅❄❅❄❅

And I also know of two other tatters who tatted the snowflakes -
and Padma M chose to tat Mariola Siwek's version which she shared in her FB account - 

Many thanks to all for your participation! Being inspired and inspiring others is an unending cycle of creativity! 

Related Posts - 

Saturday, 30 November 2024

SOUP catcher

Pin It now!


I haven't touched my shuttles for almost 3 weeks now, but I needed a small decoration for splocik's monthly game. So, I did a quick search in my stash and found motifs I had tatted in September. I hastily put these together to create some kind of ornament. It resembles a dreamcatcher somewhat, but could just as well be a suncatcher, a window decoration or a tree ornament. And overall, it could've been better! This will have to do for now since only a few hours remain of November.

Being made of pieces in my stash and with no clear identity, I was tempted to call it my SOUP* catcher! Remember what SOUP stands for? - Sewing On / Using Pieces of tatting. However a few of my friends say it does look like a dreamcatcher. And these are the component pieces ....

Motif #1 Mituko Ikuta's 1994 book 'Shuttle Lace: Tatting and Beads 1' has several picot effects which became popular as 'Ikuta Picots' through Georgia Seitz's tribute to the designer. The above motif is from Ikuta Picots Diagrams 1  by Georgia Seitz (https://www.theonlinetattingclass.com/technique-tools). Worked in Lizbeth size 20.

Motif #2 And this is from Diagram 2 same link as above. In the first motif the long picots appear like adjoining or continuous picots, being joined at the same distance. These are double picots and the two threads can be arranged to better resemble them - I did not. Worked in Anchor Pearl Cotton size 8.
In this 2nd motif the very long picots are joined to adjoining elements (rings here) and form overlapping layers with careful interweaving.
This time I pinned the long picots in 2nd motif while blocking in order to achieve the points. I like this better since it opened up the picots - what about you?
My pictorials for her overlapping picots effect - https://tipsaroundthehome.blogspot.com/search?q=Ikuta+picots
Motif #3 I was inspired by Corina Meyfeldt's beautiful Sakura pattern (https://cmhandmade.blogspot.com/2014/11/pattern-sakura.html). I had started out to tat the sakura, but pre-stringing the beaded picots (notice I put 3 yellow beads at the tips?) was quite time-consuming so I went freeform with only 5 stamens. Worked in Anchor Pearl Cotton size 8.

There's a backstory to this. When I did the post about Tatted Fringe (https://tipsaroundthehome.blogspot.com/2024/08/on-fringes.html) Stephanie W told me about her beaded fringe which she made using Nina Libin's 'single file beaded picot' and even sent me a pic! It reminded me of Corina's Sakura which had been taught in Georgia's class. The method is exactly the same, though for a fringe the picots would likely be longer.
Motif #4 The large mustard 4-petalled motif in the center of the bangle is an adaptation of Eliz Davis' motif (https://tatknot.blogspot.com/2016/05/mock-ring-by-joining-chain-back-to.html) which I made before in blue (https://tipsaroundthehome.blogspot.com/2016/05/of-long-chains-large-rings.html). After everything was assembled, I realised I hadn't taken a pic of the motif separately. Worked in Anchor size 20 (¬size 10).

Motif #5 There was a prominent negative space in the 4th motif so I sewed in the Fringe Star 

I wanted to take a short video of the SOUP dreamcatcher but it wasn't to be. 

How fast this year has slipped by! Only one more month left, one last submission left. Do check out the range of October entries in splocik's 'Small Decorations' game - https://splocik2.blogspot.com/2024/11/male-dekoracje-2024-galeria.html

Many many thanks to all mentioned in this post!  

Thursday, 21 November 2024

a collective gift 2

Pin It now!

Life has taken on this unhealthy habit of getting in my way! It took me way longer to publish this post than was required. I also apologise to all my blogger friends for not commenting, even though most times I read the posts. Without much ado, here's part 2, with patterns. Read part 1 here - https://tipsaroundthehome.blogspot.com/2024/11/a-collective-gift-1.html

12. Mariola Siwek - drew her visualization overnight and her tatted replication did full justice to the diagram! 

However, the stitch count numbers on the image were not sharp, so I had started diagramming it first. I am happy to say that at least this diagrammed pattern is now in the Google Docs. Link at the end.
 
13. Ninetta Caruso - designed Rounds 3 to 5 and tatted two models with options and also prepared a PDF!

This version has treble tatting in Round 3.

14. Paola Bevilacqua - designed Round 3 and converted her model into an ice drop!
Watch her short video showing work in progress -https://drive.google.com/file/d/1iXWwtyBrJp2o5Sb2GUMh8FO5MAKk-QFt/view

15. Silvana Buonvino - designed Round 3 with onion rings!
It has that fractal feel, doesn't it?

16. Stella Marina - designed Round 3 but with the models coming in, she decided to go for a bit more stylish decoration and overlapping chains!


17. Vani Kattoju - designed Round 3 and tatted two models and then went on to design a 4th round in her third model!


Nice dendrites in the fourth round!

18. Wanda Salmans - designed Rounds 3 & 4 and shared her journey, thoughts, and process in her blog post (https://www.wandasknottythoughts.com/2023/06/old-edging-and-a-dal-snowflake/) and also spoke about it in her inaugural YouTube video - https://www.youtube.com/watch?v=SsD-3AkFODQ&feature=youtu.be.
The snowflake looks good even after Round 3.

Such a difference in shades!

19. Dan Grady - started tatting his Round 3 design but the work is still not complete; obviously discarded a long time back.

20. Muskaan - designed Round 3 and shared pics and design journey in the following posts -https://tipsaroundthehome.blogspot.com/2023/05/problem.html 


And as promised, I am sharing the article (I removed the QR codes and added an Author's note) which has the pattern as well. 
Designing with Friends article and pattern PDF - https://drive.google.com/file/d/1peQYjewL79RsmXEpx_-XU1fxlPIYJNvt/view

*******************

AND now for all the patterns you are hopefully waiting for and have kept your shuttles/needles ready-- 

Feel free to join in the challenge by designing your own rounds or choose and tat any of the 25 patterns listed in the doc above. Do send me pics and feedback to be shared with the respective designer or to add you to the 20 designing friends!

 
Notice that you can interlace the first two motifs as you wish. Some designers chose one, some the other although to keep things simple I had shared only the model on the right in my invitation.

Many many many thanks to each and every participant for your wonderful and inspiring work(s) and for sharing it with the tatting community. It is indeed tremendous fun designing with friends!

Saturday, 16 November 2024

a collective gift 1

Pin It now!

... of so many snowflake variations and patterns in one place, from a talented group of generous designers!  Perhaps you recall my invitation to design the next round(s) for a Celtic interlaced center - https://tipsaroundthehome.blogspot.com/2023/05/lets-design-round-3.html... the DAL Celtic Snowflake 'challenge' as several called it. I loved the response and the models that turned up, some almost overnight! And later, when I requested each participant to share their pattern, they readily complied. I compiled them all in a Google Doc, listing them chronologically as they came in. 

The main reason for this inordinate delay in sharing with you is two-fold: 1) I wanted to synchronise the patterns, adding a diagram to each or filling in any 'gaps', and 2) I wrote an article on this project for the IOLI Bulletin and wanted to wait a decent amount of time. The first objective hasn't been achieved, unfortunately, though I did begin diagramming. For this I sincerely apologise to my designers, but hope to work on it in future.

I have decided to share the document as is since it is the season of tatting up snowflakes! Please note that the patterns are not tested and there is diversity in presentation styles. We hope you enjoy the individual flavour and range of effects, tools, and techniques and also the story behind each! All details are in the doc, the link to which I will share at the end of the visual display of models. Between my article and the Google docs, the entire backstory is laid out . hence I will not repeat it here.

Presenting them alphabetically ---

1. Aleksandra Pawlik - Round 3 designed and tatted within a day!


2. Anita Barry - Two different versions, both with Round 3 designed!
 
The difference in backgrounds brings out the mandala effect differently.

Clever use of split rings.

3. Anna Bonelli - Rounds 3 & 4 designed. Makes a nice wheel impression.

4. Antonia Lai - Round 3 designed in single shuttle with bare thread spaces!

5. Barbara Slodka - Round 3 designed with Josephine rings and pleasant pastels

6. Daniela Galli - Round 3 designed and tatted in two shades of metallic threads

7. Donna McDade - designed Round 3 for Five versions! All 5 models have been appliqued on a quilted wall hanging (pic in the doc).


8. Jean Inglis - Round 3 designed. Appears like a flower or wreath.

9. Ladyphoenix tatter - designed Rounds 3 & interlaced Round 4 after discarding two other attempts since it caused cupping.

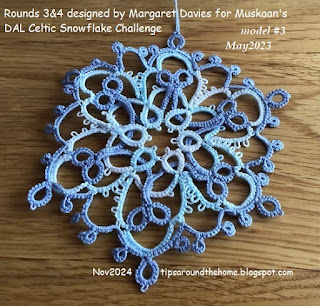
10. Margaret Davies - designed Rounds 3 & 4 and tatted multiple models till she was satisfied! 


11. Lella Loops - designed Round 3 and also styled a Celtic shuttle to work the interlacing in this round! She is a needle tatter.

continued in next post along with links ....