Wednesday, 13 December 2023

snowflake me roundup 1

Pin It now!
It is so difficult to choose just one lead pic as you will see scrolling down!

And so the roundup for our November event is ready, although tatters are still uploading pics from time to time - the latest being just a couple of hours back! 

Pattern by Muskaan: Antiks Snowflake with an adapted E42 center: https://drive.google.com/file/d/1U5J5sjuAA7D0qGPOGnK9RJ83MKdNkWSZ/view
Supplement with stepwise pictorial and other tips, options, and tutorials: https://drive.google.com/file/d/1VFk4ZnBT9ObJxnEKgI6hUkk2wtd_gOD4/view 
It gives us immense pleasure to see that several of our participants took the time and effort to learn 'new-to-them' techniques through our Supplement!

Join Ninetta and me as we share the talents of our participants -

1. Ada Marie Diaz - chose to tat the flake in individual rounds using different colours for each! A Christmasy effect.

2. Amanda S Lohnes - her first attempt at split chains and mock rings!

3. Anita Barry - test tatted the snowflake several months back (https://tipsaroundthehome.blogspot.com/2023/11/flaky-antics.html). 
She wrote -
Loved tatting this project in HH Lizbeth and Handy Hands metallic thread (although I had to pull hard to get the rings to close using the metallic thread).
And this is her 8-arm version. As I had said in the above post, I forgot to change the 8-point repeat (as in original Endrucks' #42) to 6 repeats in my written instructions and she went ahead and worked this beautiful version.

4. Anna Bonelli - pristine tatting as usual!

5. Anna Tedesco - always the multiplier, with a beautiful triplet in different colours.

6. Antonia Lai - a regular and enthusiastic participant learned split chains from Ninetta's video (https://drive.google.com/file/d/1hKfqa3LHnUor9UAen7sdqPgzZe0elU2I/view) and her first attempt at ANKARS, too.

7. Catia Lemmetti - pleasantly surprised us with this beautiful bounty today!
The two trees are from our Dec game. 

8. Debra F Cox - wrote - 
...what a fun motif to make! ANKARS technique is new to me and I am still mastering split chains. All in all so fun to learn. I am told no 2 snowflakes are alike lol and mine is extra special with 7 points. Thank you for your patience and helping me learn new techniques on my tatting journey!
The small stars are designed by Ellen Lai. All motifs worked in Lizbeth color 190 silver thread size 20.

9. Jane McLellan - tatted this back in June when I had gifted her the pattern, and wrote about it in her blog - https://janemactats.blogspot.com/2023/06/in-which-there-is-tatting.html

10. Jiamrat Supapol - has quick shuttles, too! She tatted two flakes in different colourways.
Beautiful colourway - like a pond with reflections.
This one reminds me of corn fields!

11. Katie Verna - worked her cheerful magic using AltinBasak, #50, color 3053.

12. Krystyna Mura - worked two models in her pristine style ...
She used beads in the center and around the central ring.

And wowed everybody with this spectacular rendition in several different shades of metallic threads and strategically placed beads!

Hungry to see more? Join us again in part 2 of the #SnowflakeMeEndrucks roundup.
...to be continued

Many many thanks to all our wonderful participants! You make us want to do more!

Sunday, 10 December 2023

about Helix Tatting and more

Pin It now!

In late October, while working on the Dictionary part of ‘The Six Ts of Shuttle Tatting’, Anita introduced me to the term Helix Tatting and the developer of the technique, Richard Embrey. We worked on a definition or description to include in the dictionary and I also tried my hand at a quick trial to get a feel for it.
My very first trial (with mistakes) without shuttles

While I don’t want to reveal the definition, I will certainly do a sort of comparison to put things in perspective. Richard came up with this technique in 2019 while trying to make an I-cord in tatting when he couldn’t find a tatted equivalent. It started out as a tatted tube or cord but has since evolved and diversified into many more shapes, including a coronation cord and a fish! As always, it is our imagination that gets us soaring into new skies.

UPDATE - https://tipsaroundthehome.blogspot.com/2024/01/helix-tatting-pictorials.html  -- Includes PDF OF HELIX TATTING Pictorials 

Let me list down the major characteristics of Helix tatting (HT) as well as include links to visually similar techniques. Please note that a lot of these are my own thoughts and notes. Feel free to critique or suggest.

1. It is basically a 3D hollow cord or structure, made solely of chains, using multiple shuttles (4 or more). The outward appearance is like a spiral, especially visible when different colours are used.

2. Each shuttle alternately and sequentially acts as an active shuttle to become the core thread, and then  as a ball thread to form the stitches.

3. It is NOT bauble tatting, though it can be considered to be a variation. No separate ‘ribs’ are added for a scaffolding. Instead, each shuttle, in turn, acts as a core thread and provides the necessary stability to the structure. It also 'locks in' the previous segment when shuttles are switched.

4. It is NOT a continuous spiraling chain since short segments are made with a sequential change of shuttles. Each segment can consist of merely 1 stitch or as many stitches as one desires to create a broader shape. Two or more stitches give a more distinctive spiraling of the colours. The spiral is directional and there are ways to determine beforehand which direction one wants the spiral to run.

For instance this 3D Pond Reed prototype I had made back in 2014 using 2 shuttles– it is a continuous chain spiraling around itself, where I used the slope and roll joins to hold the shape. Clearly it is very different from HT.

5. It is NOT block tatting, though chain segments are apparently ‘stacked’ over each other. No lock joins are used. However the outward appearance can be confused with tatted ropes, with or without beads. Ninetta has done a wonderful study of various ways in which these 3D tatted ropes can be made, with links to respective tutorials. A couple of them even create a spiral effect! https://ninettacaruso.blogspot.com/search/label/stacking

6. HT is not limited to merely spiraling chains. With so many shuttles in play, it is easy to throw off rings and chains, use beads, add picots, and so on. Versatile.

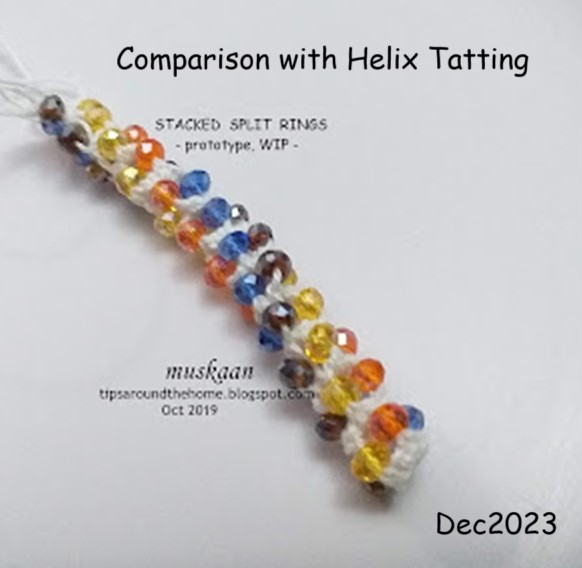
7. There is another tatted tube example where we use stacked or layered split rings. No chains involved, only rings. And if the picots are shortened, the stacking will be that much closer. Clearly this is not HT in any sense of the term, except that it is also a form of continuous tatting for a 3D hollow tube.

tatted beaded rope made with stacked or layered split rings - https://tipsaroundthehome.blogspot.com/2019/10/tat-beaded-rope.html

See Ninetta's version of a spiraling tatted rope made with interlocking rings - https://ninettacaruso.blogspot.com/2020/08/gold-rope-chain.html 

8. BUT, there is something that definitely follows the same principle and concept as HT, and also gives a directional spiral! It is called Mac-Tatting (MT) and was first developed by Usha Kota in an attempt to imitate a crochet braid in tatting – it was a flat braid, worked too and fro. However, when I understood what HT was, it immediately crossed my mind that MT could be similar if worked continuously. And YES, it is the same, except that we work with unflipped or reverse stitches rather than flipped or double stitches! And you get a spiral, though the stitches face down while in progress. 

Helix tatting & Mac-tatting trials, together
In my first attempts, I found it easier to work the Mac-tatting version - I had a better control of the threads and there was no tension issue. Helix tatting is fine once you get into a rhythm, but it requires more finesse. And managing all those shuttles can of course be an issue.


A couple of weeks back, Richard was invited to TOTC as a guest teacher to demonstrate the Helix Tatting technique. You can watch the video here - https://youtube.com/live/DXO9Pm0fq1U
Bonnie Swank shared her notes on how to do HT with needles. Richard also shared a practice pattern called Watermelon Dreams, with the class. https://www.theonlinetattingclass.com/patterns
Creative members have already shared a couple of clever ways to organize their shuttles to avoid tangling. I simply laid them down spread-eagled, on my bed. I did find that it is better to leave a longish length of thread to avoid frequent winding/unwinding; and since it is only 1 or 2 stitches each, the long length is not a bother. 

I am test-tatting a pattern for Richard for his upcoming book. It is called Watermelon Dreams Beaded Helix Embellished Earrings. 
It took me a few hours to find and empty all my shuttles, glue the numbers (I did it on both sides, LOL), string beads and wind the shuttles. 
In progress.
I've completed Round 7. My version is a Caps In spiral where the double stitch faces inside the cord and tatting progresses in a clockwise circle. 

That’s it from me for now ….. Welcome your thoughts.

Many thanks to Richard, Anita, and all the creative minds mentioned above! 

Monday, 4 December 2023

the power of 15

Pin It now!

 Technically, the power of a single motif extracted from Endrucks' pattern #15 (E15). Over time several patterns from her book have created a vast range of derivatives, eg., E1, E3, E12, E17, E31, E37, to name a few. E15 falls under the same category!

I've been having tremendous fun tatting up small doodles over the past few weeks. While it means I have side-lined my book editing (which I will take up in earnest again in 2024), I can't feel guilty over the brimming ideas and my largely neglected shuttles trying to give them form. Some pattern pdfs have already been shared with our FB group for the Dec game; others are in the works.

It all started when I spotted a ready-made tree motif in Endrucks' pattern #15 which Ninetta has updated with diagram and written pattern - https://drive.google.com/file/d/1hl1EuK-E7tChkL4OsohWjtGLafhp7hcY/view

I quickly tatted up a prototype with size 10 thread and as you can see there isn't much room for change, right! 
Model #2 in metallic cotton size 20. I had started this just like in the prototype, from the lower side ring on the right. This is an easier pathway to tat since the two sides remain unattached till you reach the trunk part. Later I strung beads to brighten it up.
Model #3 - Here I wanted to avoid hiding ends and also make it a tree ornament. Hence started at the top inner ring and ended with a split ring at the tip.
The same with a star to showcase an idea.
E15 TREE DOODLE Pattern PDF : https://drive.google.com/file/d/1oq9kkuSN2e0Qnh0N1fUr00MT8HrZ7-cz/view

Hubby saw a bell in the tree! So out came more thread (size 10) and this stylised bell pendant or ornament was born.
The same but this time in metallic thread size 40.

A comparison of the sizes. Hubby wanted an inward curve at the bottom for a more realistic look. Another version for a future project ....

E15  BELL  DOODLE Pattern PDF : 
https://drive.google.com/file/d/17m9gxw2vG1oS_mrawfmZI27PpLZ9xFhK/view

Inverted, the bell looked like the bodice of a lady's gown or the torso of an angel. Rough sketch to tackle in the future.
If the sides were brought closer together, the motif would work as a flame!
 
Tatted with one shuttle and the two threads combined.

Flame needs a candle (or a diya), and these were my first trials

E15 Candle version 1 using block tatting. Can be done with ball and shuttle.
It was Ninetta's idea to add a little base ring to the flame.

E15 CANDLE. MOTIF pattern PDF :

Version 2 of the candle is worked alternately with treble stitch chains and double stitch chains. This is still incomplete as I got sidetracked with other motifs 😁

My objective was to create a slight slant in the block tatted chains, but I couldn't achieve it. It will take more experience than I have to get the chains to tilt.
However, my 3rd version is going to use Helix tatting - not only will I get the spiraling effect, it will also be 3D!

Meanwhile, leaves cropped up, too! This is the first model with a mock chain acting as the central vein, and ending with a Josephine chain stalk. 
This is how it looked fresh off the shuttles. However, it flattened after blocking and has stayed flat, although I like the 3D option.
E15 Leaf Doodle #2 using two types of twisted picots - one for the tip and one for the stalk.
The 3rd model started off with a different idea but midways I let my shuttles take over and ended with this. Lock chains make up the vein and stalk. I don't like the picots here!
All 3 together, and I still have so many ideas I'd like to tat!

What are leaves without a flower and its the season for Poinsettias - a no-brainer.
After the first layer of 3 petals, I continued with a lower layer of slightly larger petals. This is still a WIP where I need to add the yellow center, etc. 
QUESTION: Are 6 petals enough or should I add one more large petal below? I don't want it to look too symmetrical and adding another petal will move them slightly. 
I value your opinion.
After tatting the first 2 petals of the poinsettia, they looked like a great idea to tweak into a Butterfly or wings for an angel!

TIP: In all models I have deliberately used a self-closing mock ring (SCMR) at the tip for 2 reasons - 
1. in most cases the doodle or motif can be worked without the need for a 2nd shuttle;
2. more importantly, I find it sits much better than a thrown ring would have without anchoring picots at its sides.
I made a hitch (unflipped half-stitch) after closing the SCMR.

Meanwhile, one of our prolific members created a Star with the same motif! Ninetta and I quickly compiled a pattern pdf for it and included it in our Dec game. There are several more patterns to choose from in our game this month. Hopefully you will join us. All links in the side panel of my blog at the very top.

I will try to share the pattern for these remaining models, too.