Showing posts sorted by relevance for query the flower within. Sort by date Show all posts

Wednesday, 7 September 2016

multiplier effect of mistakes !

Pin It now!

Doubling the Fun …

Mistakes can double the enjoyment; can double the opportunity. That's the reason you see 4 'snowflakes' instead of the desired 2. There is a common thread running through both ‘mistakes’ which involves a thread size mismatch.

The Snowflake Within
Remember ‘The Flower Within’ series where I tried to highlight the flower within various snowflake patterns ? Well, this time I reversed the trend, trying to bring out the snowflake within – oh what a cold heart this snowflake flower has ;-)
The Twenty-First Day of December Snowflake
Lene Björn

Threads : Anchor embroidery 4615-1335 ; Anchor MCC size 40 (4054) black & white.
Techniques : Josephine Rings (JR), thrown/floating rings, Lock join (LJ), Catherine Wheel join (CWJ), directional tatting, 2 shuttles

Mismatch of threads !
 
I started with 2 strands of the variegated embroidery thread . Only one black JR could fit in the cramped center space! Further, the size 40 white in Round 2 was much stiffer & thicker. Made a few stitch adjustments - decreasing chains by 1ds. Interestingly, black thread is 'normal'.
Yet, I realized that continuing on to Round 3 with 2 strands would’ve definitely cupped the piece. It was looking so pretty, that I went ahead to complete the present round, and stop at Rnd 2. I like the smaller size as well – just over 2 inches.
Measurements : Rnd 1 : ¾” ; Rnd 2 : 2¼”  

 
Started a new one right away, this time with 3 strands of embroidery thread along with the size 40 crochet cottons. Went smoothly & lay flat.
Measurements : Rnd 1 : 1” ; Rnd 2 : 2½” ; Rnd 3 : 3¾” 

TIP : I used 1 CWJ to anchor the trefoils in Rnd 3. This was counted in the chain stitchcount. Experimented with placement, & found that it did not matter whether the join was made before or after the trefoil.


  • Perhaps the JRs in last round could’ve used fewer half stitches. They are too close to each other; compounded by variegation it all looks too dense & busy :-( 
  • This is a great pattern to showcase fancy variegated threads or expensive HDTs because a lot of the tatting is on chains. 
  • One thing that escapes me is why the black JRs seem to fill the inner space. Need to see whether it is a matter of using 2 different threads/colours or just my own tatting goofs.  


The Twenty-Second Day of December Snowflake
Lene Björn
I’ll start with the correct version (left one in pic), and then recount my mistake, which of course occurred prior to this & was shelved for over a month.
Threads : Anchor Mercer size 40 (4054) – black, tinted pink – 1203, & green - 00229
Techniques : Josephine Chain (JCh), thrown/floating rings, Lock join (LJ), Catherine Wheel join (CWJ), 2 shuttles
 
  • A Lock Join causes a slight dip in the chains & this would’ve given a more petal-like effect in round 2, but with the black core thread blip showing. In order to avoid this colour blip, I chose to do a CWJ. 
  • Again, as in previous snowflake, it made no difference whether CWJ was made before or after the thrown ring. CWJ was counted as 1ds here.
  • I couldn’t get the star-like points that Lene has in her tatted model. Probably had to do with smaller size of green thread. 
Measurements : Rnd 1 : ~2⅜” ; Rnd 2 : ~3¼”  
  • For the Josephine Chains, I went for a mirror effect, using all 1st half stitches on one side, a very small picot, & all 2nd half stitches on other. (In the correct version I did the opposite - shs on the way up & fhs on way down).
  • The pattern doesn’t call for a vsp since the thrown rings are on the Josephine chains of round 1. Since I wanted to play with colours, the ring was thrown to 2nd round & a vsp was needed in round 1 for joining.
  • This is a pretty straightforward pattern. However, to keep tabs on the half stitches, I drew tally marks for every 10 half stitches, while dropping & 'posting' the shuttle after every 5 !

Now for the "forced adaptation" due to mistake in first attempt ....


The Heart Within
Day 22 adaptation

Doubled Up !!!
So here’s what happened … I got confused about the stitch count for the Josephine chains & got no answer when I asked on Craftree. Was the number meant for each side of the chain or for the complete chain ?! I went with the former, resulting in Double the chain lengths !!!
This pic shows the correct version on top. Inset, to the left, is round 2 which required doubling of the stitches too.
But doubling also brought an opportunity to try something different.
I played around with the long Josephines (they actually looked like a large flower - it is over 4" wide across)! Folded them over, and I saw Hearts being formed !!! 

The collage showcases the process I went through - very very fiddly, since this was an afterthought. If one has to make it again, one can add picots for joining & securing as one tats. In the collage below, I used sewing thread to join temporarily, snipping it off in the end.
In this case, though, a mismatch in thread sizes actually came to the rescue ! It is probably the first time I’ve tatted with different thread sizes in a regular pattern. The larger size 20 for round 2 helped me keep the same stitchcount that was used for size 40, but it spanned the distance & avoided the cupping issue. Easier to change thread size than to rework stitch count.
Threads : Anchor Mercer size 40 (4054) – black & tinted pink – 1203 for round 1
Size 20 vintage maroon (022) & black for round 2. The new black thread is much thicker than the vintage thread.
Techniques : Josephine Chain (JCh), thrown/floating rings, Lock join (LJ), an adaptation of Join on Smooth Side (JSS), shoe lace trick (SLT), very small picot (vsp), split ring (SR), reverse join (RJ), 2 shuttles
Measurements : Rnd 1 : >4” before folding ; 2½” after folding . Rnd 2 : 3¾”  


Pattern for Round 2 of adaptation :

Shuttle (SH) 1 – black ; Shuttle 2 – maroon
abbreviations listed in Techniques above ; fhs - 1st half stitch ; shs - 2nd half stitch.


Join to a folded arm of chain from the previous round . (refer to enlarged pic above)
With SH1
Ch : 6, 4shs, vsp, 4fhs, 6. JSS to next arm BUT instead of completing the JSS with a shs, make a SLT in order to switch shuttles.
With SH2
SR : 8/7 .
R : 8-8 .
SR : 8/7 . RJ to next arm thus switching shuttles.
Repeat from chain all around.

NOTE : If only 1 colour is used, simple LJ can be made instead of JSS & RJ. The latter were used only to regulate the colour blip.


Okay, I’m off now … apologies for boring you out of your wits … but you know I’ll never learn ;-p

happy tatting
&
happy Tat Days to all who are attending

Saturday, 15 August 2020

free together

Pin It now!

The florets fell off the tree and got threaded into a bracelet! This is my Independence Day bracelet, with a stylised representation of our tricolour (or Tiranga,  as in Union Jack or Stars and Stripes).

I remember using the Indian flag colours in tatting twice before - unintentionally in the Spring Garland , and intentionally in Ninetta's Girotondo . But neither had any blue in it.

Each colour has a meaning attached to it. Saffron for strength and courage; white for peace; green for growth and prosperity. The blue crystal in the center represents the Dharma Chakra - wheel of truth, or righteousness.

I'm sure you can choose colours to symbolise your own flag if you end up tatting it.

FREE  TOGETHER  BRACELET (aka Tiranga bracelet)

This is a very simple pattern. Worked in Anchor Pearl Cotton size 8. 

Each of the 12 rosettes is tatted separately. 5 rings of 5-15-5, linked in a circle, made with one shuttle.

The 'toggle' is made as follows :

Rosette : [4-12-4]x5 . To reduce tail ends, work the last ring as a split ring (4+12/4), joining to 1st ring. Then add new colour to make the chains. Each chain is 14ds, lock join. After completing the round, snip off one thread and add 3rd colour. Each chain here is 16ds, lock join.

Tat over tail at the start of each round, and hide previous tail within new element or whip stitch. Refer False CTM and/or Adding new thread to chain (tutorial links In case a link does not work, substitute .in with .com)

I had to improvise a lot while assembling the flowers! Lots of false moves and backtracking, but I am more than happy with the result - the overlapping of flowers is exactly how I'd visualized it.

Without boring you with details, here's how the final assembly happened - Start 3 spiral or Josephine chains, one in each colour. At the beginning, I held open each chain with a paper clip. In the end, it was through these tiny open spaces that thread was inserted to secure the tassel.

We no longer need the shuttles. Beads and flowers are strung through these 6 strings in this order - blue crystal, flower, 2 pearl beads. Repeat till all 12 flowers are strung. End with desired length of pearl beads, 1 blue crystal, the 'toggle' flower, 1 more pearl, knot together, leave a length like a stem for the flower, and knot again. Snip. 

This bunch of threads makes it easier to grip and insert through the spiral chain spaces and pull the flower through, to hold the bracelet in place.

Now here's a behind-the-scenes solution. It turned out that the blue crystal could carry only 4 threads, and was small enough to pass through the flower center. My solution : Depending on the colour of the flower which follows the blue bead, thread the crystal and flower with 4 threads of the other 2 colours. The 2 remaining threads are inserted Between 2 rings of the flower, on 'opposite' ends, and knotted securely Behind the flower. This holds the beads in place, takes care of the unstrung threads, and maintains the overlap!

I could've snipped off 1 thread in each colour, but I liked this solution and nothing is visible. Hence, make sure you have everything pre-planned and pre-measured ;-D

@@@ 

Almost every Indian household starts the day with "utterly butterly delicious" Amul butter ;-P

As I scroll through this 50th year celebration book (2012) - Amul's India - it is like refreshing and revisiting the various facets of India and Indians - a fun way to review history through their weekly slogans! It would not be an exaggeration to say India's Amul. 

They usually avoid controversial topics, focusing more on the positives and achievements. To tell a story in a few short words using clever puns, portmonteaux (mostly bi-lingual), and wordplay - just too good! It is a great book to spend some moments with any time of the day!

To my Indian readers, how many of you look forward to Amul's ad every Wednesday? I still remember almost leaning out of the train on my way to college, to catch a first/early glimpse of the new hoarding every week! Now of course, I quickly skim through the newspaper to see what the polka dotted girl has to say.


Friday, 5 September 2014

Tatting Pattern: Tiny Heart Poppy part 2

Pin It now!
Tiny Heart Poppy
 A  3D  Tatted  Flower (contd.)
Tiny Heart Poppy - spot the difference ;-)))
The 2nd and final part of the Tiny Heart Poppy pattern. The first part of Flower (petals) pattern is here. 

We’ve completed the 3 red petals. Now to add ‘embellishments’ to bring it to life ;-) : the flower centre made of yellow & black, a couple of free-standing buds, a leaf sprig, & then the main stem. 

Poppy Flower Centre :

Materials
AMC Size 20 , Yellow 0289 , Black
2 shuttles OR 1 shuttle with yellow tied to black ball

Techniques & abbreviations :
JR – Josephine Ring , with Perpendicular arrangement of Rings
Floral Picot   (click for tut)
Ch – chain
fhs –  1st half stitch of ds
shs – 2nd half stitch of ds
Wind yellow thread in one shuttle & black in 2nd shuttle/ball & tie together. No need to hide the tail ends as these will be required to provide stiffness to encapsulated stem later.

Yellow Pistil/Carpel :
With shuttle 1 (yellow) :
JR 1 : 10 hitches / half stitches

Perpendicular Arrangement of Rings : (click for detailed tutorial)
Before starting JR2, try to turn JR1 at a 90° angle on Y axis. So instead of making a concentric, onion-ring type of overlap, we will get an overlap Across the 1st JR, vertically, at right angles. Hopefully the image & diagrammatic representation below, will give a clearer idea.

JR 2 : 15 hitches …
Before closing, adjust this ring over the 1st JR so as to snug neatly over & around the latter. If required, add or subtract the half stitches. Since there is no picot in JR1 to which JR2 can be joined, one needs JR2 to fit snugly over, yet without distorting, JR1, Nor falling over itself !
I kept positioning the open ring stitches over JR1 till I felt the length was just right, then close JR2, keeping it positioned perpendicular to JR1.
Yellow Pistil in center
 
Black Stamens :

Place/position the yellow centre over the space between the 3 petals. (Pass the tail ends through this open centre, so that they are now Under the flower). 
Working from top, join to picot at the base of any petal, keeping the yellow JRs centred.
Now start a chain made up of medium length Floral Picots (I have used the term described by Ring of Tatters)
Ch : ** ( 2FHS , p , 2 SHS , p ) …. Repeat ** for desired length, joining to the picots at the base of each petal at regular intervals. The chain should be long enough to go all around the yellow core. Lock join into place.
I made the length slightly longer so that it overlapped a bit, before ending. If you look very carefully, this overlap of picots can be seen towards the right side in image. Overlap ensures that the black picots will never show any gap.
Pass all the tails through the center, to the back of the flower, to be encapsulated later.

The Poppy Flower is now complete ! 
If one is looking for only a flower, one can stop here (hiding all tails). This can be sewn on to decorate or adorn headbands, bracelets, rakhi, gifts, etc. etc. Add a green calyx, if desired.
I decided to add some stem, leaves, & buds to the flower to make it a stand-alone entity such as a nosegay (spritz your favourite perfume ;-) ), a lapel flower, brooch, or a boutonniere for men. Add a couple more flowers & paraphernalia to make a cute spray !


Buds, Stems, Leaf Sprig
AMC Dark Green : 0844
2 shuttles, wound CTM

Buds :
JR 1 – Josephine Ring with auxiliary thread
JR 2 – Josephine Ring using Jane Eborall’s alternative technique
Perpendicular Rings arrangement
JC – Josephine Chain or Spiral chain
Encapsulation with JC / spiral tatting

UPDATE : For detailed tutorials click : Starting with Auxiliary Thread & Ending with Auxiliary Thread

2 Shuttles wound CTM.
Here is something I hadn’t tried before, hence a detailed log :
  1. Wind an extra (auxiliary) piece of green thread along with the thread in shuttle, just enough for the 2 JRs.
  2. Make JR1 (15 half stitches) using this double thread, for added thickness.
  3. JR2 (20-22 half stitches) made with Jane Eborall’s method of Josephine Rings   
  4. JR2 is made perpendicular to JR1. Before closing the ring, make sure it sits over the 1st ring just right, without falling over.
  5. Cut the extra length of auxiliary thread & hide it in the JC that follows, or keep it for encapsulation.
  6. JC for about 5½ cms (or as desired).
  7. Note : Since one is encapsulating, the half stitch of JC/spiral chain will remain unflipped.
  8. End JC with a small picot with which to join to main stem later. Do not cut. (This step can be skipped. After leaving a short tail, cut threads. Repeat from Step 1 for 2nd bud).
  9. JC going back up for 2nd bud. This stem is shorter ~ 4 cms long.
  10. Unwind shuttle & double up the remaining thread (or wind another auxiliary thread).
  11. Use this doubled thread to make the 2 perpendicular JRs as before.
  12. Tie, cut & hide the tail or sew it in.

Note : The 2 buds have been made in one pass. But looking back, it is better to make them separately, each one starting from the bud end & moving down to the stem. Threads can be encapsulated later.

TIP : JCs can be done with 1 shuttle & ball. But the ball (working) thread tends to twist a great deal & untwisting the ball after every few stitches, becomes cumbersome. Hence it is advisable to use 2 shuttles. I speak from experience ;-((


Leaf Sprig :
Twisted Picots (unjoined)
JC – Josephine Chain / Spiral tatting
3½ cm stem which is again a JC
Twisted picots at regular intervals (2½ - 3 cms long each)

Start with a twisted picot on a JC. The picots are closer initially, then the spacing increases slightly. Do as many as you want. When desired length is reached, stop & cut threads, leaving a tail of 2-3 inches.

TIP : JC stem spirals around, so the twisted picots spiral around too, instead of sitting flat on a single plain.
Another reason I used a JC chain, is to replicate in an abstract fashion, the fuzziness of a real poppy stem.

UPDATE : Refer to Tutorial for Twisted Picots (Floating) 

Main Stem :
Encapsulation using JC ( spiral chain)
< 5 cm long.

Preferably 2 shuttles, CTM
Hook the green thread to any one picot at base of petal. Then make JC, encapsulating all the floral thread tails.
Note : Since one is encapsulating, the half stitch of JC/spiral chain will remain unflipped.

After about 2 cms from base of flower, start attaching the buds’ stem & the leaf sprig. Make sure to encapsulate these from a little higher than the point at which the tails start; this will ensure free-standing stems that hold the buds & leaves.
Also start cutting off tails, at different stages but After at least 1 inch of encapsulated main stem, for a tapering kind of stem. If an evenly thick stem is desired, then encapsulate all tails right till the end.
Continue the stem further to desired length. Tie & cut.

When encapsulated with all the tails, the stems remain stiff enough & no extra stiffening is required. It is also essential that a short part of the buds & leaf sprig stems be encapsulated within the main stem from the point where they are joined, so that they stay erect & in place without any support.

NOTE : Each element holds it's shape. However,  in case thread specifications demand, one can add an extra/auxiliary thread for encapsulation of stems.


Final Dimensions : ( ” – cms ; ’ – inches )
Flower : ~ 4”/ 1½’ across
Yellow centre : ~ ½” x ½”
Black centre : picots are ~ ½ cm long each, with slight variation if desired.
Buds & Stem : 1st pair : 1”x 1”, on a 4”/ 1½’  long stem.
2nd pair : >1”x 1”, on a 5½”/ 2’ long stem.
Leaf Sprig : Twisted picots vary between 2½”-3”/ ~1’-1’+ in length, along a 3½”/ 1½’  long stem. The total length from tip to base, comes to about 6”/ 2½’ .
Main Stem : <5”/ <2½’ long, from base of flower to end.

Total length of entire Spray : 9”/ 3½’


Some Variations :

For a fuller, more ROSE-like look, add another layer of 3 petals below the 1st three, before starting with the stem, etc. (in pic below)

One can add a calyx at base of flower. A set of long twisted picots, joined to the free picots at base of flower, might look good.  It will also make the flower “complete” in case one does not want to follow up with a stem, etc. Once the sepals are in place, start with encapsulation for stem.
A potential ROSE ?!  2 layers of petals.

In Remembrance of all those from whom I have learned,  & am learning, 
all who have graciously shared their knowledge, patience, & skills .... 

Thursday, 31 March 2022

a happy day flower

Pin It now!
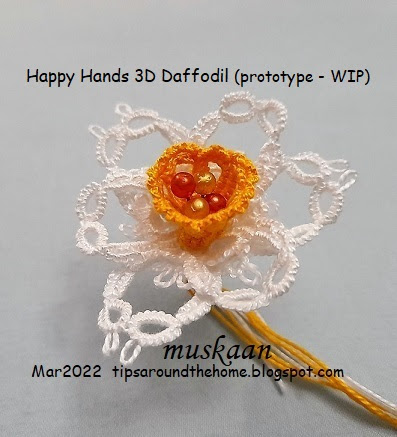
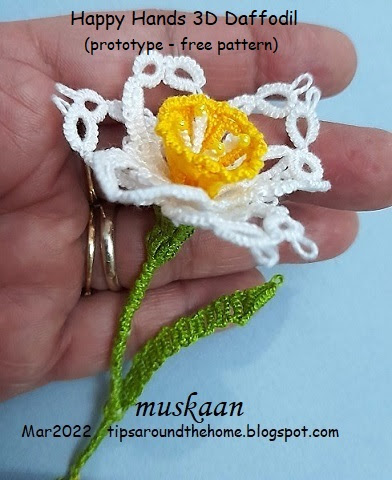
After the grumpiness last time, this flower seems to have settled down for now as a daffodil, which happens to be the flower of the month! She understands that there is a lot of improvement as well as diversity possible, but this is my little gift to all tatters on the eve of International Tat Day, 2022

Happy Hands 3D Daffodil  (prototype pattern continued)
adaptation of Endrucks' edging #1
The odd one out, but continuing the pattern for this prototype .....
After the first 3 petal fiasco, I chanced upon a superb daffodil pic posted by Coretta L where 3 petals were curved and the other 3 were pointed. This is the reason I chose to go with daffodil and after a bit of Googling, it turned out that it was the flower for March-born, besides having more meanings. Timely, huh!

Some abbreviations : ch = chain; LJ = lock join; fhs = 1st half-stitch; shs = 2nd half-stitch

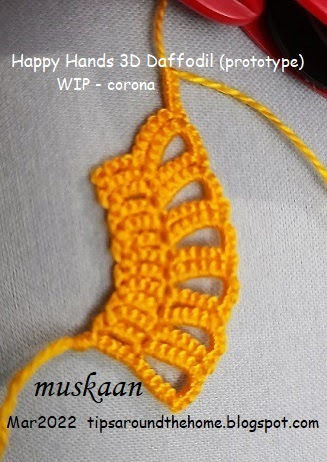
Corona : Use your preferred method of block tatting. I have followed Endrucks' style, using 2 shuttles, turn work (tw) and switch shuttle (SS). I simply knotted the threads, leaving the tails to add to the stalk.
ch-1: 1 - 4 - 6, tw SS
ch-2: - 4 - 6 LJ 4 LJ, tw SS 
ch-3: [ 1 - 4 LJ 6 LJ, tw SS
ch-4: 4 - 6 LJ 4 LJ, tw SS ]x6

Make one last chain and remember to join it to BOTH the 1st and previous chain at 2 points respectively. This creates a conical structure, with both threads emerging along the top edge. Continue ... 
Corona Frill : is made with a row of Node stitch or Victorian Set chains, lock joined to the picot below. You can choose a different colour. 
Victorian Set Chain: [ 3fhs 3shs 3fhs 3shs, LJ ]x7

This is how it looks after the corona and frill is finished. I simply put in a few pearl head pins in the center. All tails have been inserted through the center space of the petals, and before snipping off, join the base of corona to the base of petals. If desired, we can use one of the tails to sew and anchor it.

TIP: We can add a 2nd row for a wider and more pronounced frill. This could be with sets of 4 or 5 half stitches each.
Anthers : Each is made separately with a bead at the tip of a lock chain. Use leftover thread, short lengths are sufficient, and single shuttle. String bead and work the lock chain below it. You can decide the length of each stamen. I varied the lengths using between 6 to 9 lock stitches, for 4 stamens.

Again, insert the tails through the center space and cut off, leaving a few inches of tail. After inserting the last stamen, make an overhead knot at the base, encapsulating all the tails.

Calyx : Block tatting. Start with a paper clip to hold picot or a lock stitch (without paperclip, which is what I did here). 2 shuttles, ctm. 
TIP: You can make a join to the base of a petal midways through the calyx 
ch-1: - 6 - 4, tw SS
ch-2: - 2 - 4 LJ 6 LJ, tw SS
ch-3: 1 half-stitch - 6 LJ 4 LJ, tw SS
ch-4: 2 - 4 LJ 6 LJ, tw SS   
ch-5: 1 half-stitch - 6 LJ 4 LJ, tw SS 
ch-6: - 2 - 4 LJ, tw SS   
ch-7: 4 LJ, tw SS
These are the 7 chains seen in the image above.
Repeat chains 2 & 3 twice. Wrap the open calyx around all the tails at the base of the petals. Make one last chain joining to BOTH 1st and last chain at both joining points so that we have a cone.
I used a drop of fabric glue to keep the tails and the calyx in place since I had not anchored the calyx. At the base, I made 2 overhand ties, keeping all tails within the knot.
Do not cut threads. Continue for stalk and leaf.
Stalk : Here we are encapsulating all the tails while covering it with unflipped stitches. You can choose to do a Josephine chain or simple direct tatting. I used an odd method to make a Lock Chain for a straight stalk. 
Lock Chain encapsulation : Always keep the tail ends encapsulated while making each half-stitch. Make unflipped shs, slightly rotate the stalk towards you, make a manoeuvred fhs, rotate stalk back to original position, and repeat this process for the desired length.

TIP: We make a manoeuvred half-stitch in Twist Work, as follows : https://drive.google.com/file/d/1To6YwZSkh2ffQH3XBcKZ-Ed3l4myW34c/view 

Stalk worked to the point where I now want to start a leaf. Continue without cutting threads.
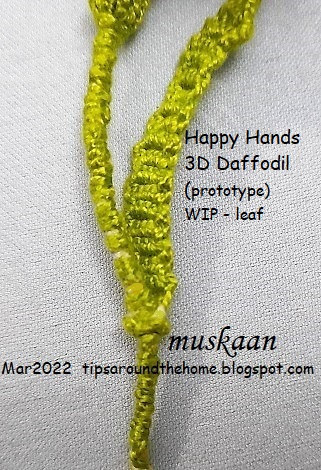
Leaf : is made with ring (forming a node), followed by a kind of phase-shift block tatting, ending in a folded ring.
ring: 4 - 6. Before closing, pull all tails through this ring and adjust the position.
ch-1: [ 1 - 3 LJ(to ring) 1, tw SS
ch-2: 1 - 4 LJ, tw SS ]x10-12
folded ring: 8 - 2fhs 8 2shs. 
You can either cut and hide ends, or whip stitch them back to the base of the leaf if you wish to continue with the stalk. I ran out of thread despite keeping the shorter length as core thread for the final chain, otherwise I would've liked the leaf to be a wee bit longer.
Having run out of thread, I joined new thread at the base of the leaf....... and continued the stalk for a short length. Then I tied and snipped off all tails and put a drop of glue to hold them together.
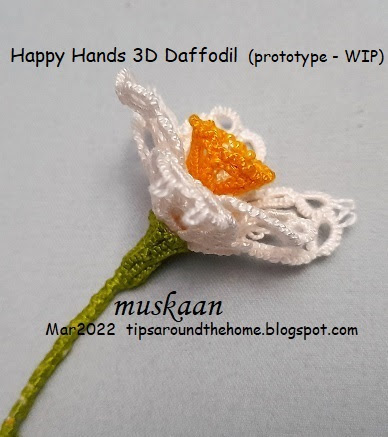
The stalk is semi-stiff and when held at the base of the leaf, it can hold the flower up. I have not done any kind of finishing here. This entire flower is as it is when it came off my shuttles.
I wanted more of a slant in the block chains for the leaf, but not quite successful. Will require more trials and testing.
A side view with displaced leaf. Yes, as I said in the beginning, this is a prototype and I have made several mistakes besides not being as neat as I would've liked. But hubby really likes it and I am happy for now. 
If there is sufficient interest, some day I will draw diagrams and create a pdf presentation.
Worked entirely with Anchor Pearl Cotton size 8. The flower spans 5cms, and the complete sprig is 8cms high; leaf is 4.5cms high.
Beware, some of the elements can be a bit fiddly, being small and 3D. Satisfying result, nevertheless.

Wishing you a very happy, chatty, chocolatey Tatting Day tomorrow. 
I have received such a wonderful gift and will share it as soon as I take pics!

All patterns from the Endrucks 1920 Project can be found here as pdfs - https://docs.google.com/document/d/17LEVftXweztBIOWh4sL4BB7bX65ssoOsOn4oXIgCepY/view


Friday, 8 May 2015

Tatting Pattern : Morning Glory 3D flower

Pin It now!
Morning Glory
A 3D Tatted Flower
An “extension” & 3D application of the Thérèse de Dillmont  Plate V, Fig 25 Motif which was modernized & diagrammed by Ninetta here
A freeform rings-only 3D flower that can be customized easily.

As I mentioned in my last post, this is an “Extension” of the original Dillmont Motif which Ninetta modernized & diagrammed. All I did was ‘extend’ the pattern in all dimensions : layer upon layer in the center ; lower layered ring extending beyond the one above ; extended petals under & over the layered rings ; and so on.
I managed to write up the pattern in pdf & upload it along with the post (scroll down), Yay ! Hence this post is more an album of photographs of the Morning Glory Flower from different angles, at various stages.
The Layered Center
For the first time in my tatting life, I actually used blocking ! I used blocking for the yellow center long picots. One of them was adamantly twisted. So I simply pinned the picots on a wet kitchen napkin & after a few hours, it was Great !!! Now I’ve lost my fear/hesitancy of blocking ;-D
These center rings, however, are a bit fiddly to handle .
Adding the Petals
Without Patty Dowden’s instructions, handling the large petal rings neatly & smoothly 
                          would’ve been impossible for me. And this time, I used Both the steps !
This flower measures just over 1"x 1"
  

Although the broad arch of each petal has 16ds, I might've made a couple with only 15ds. 
Adding all the "accessories"
Ninetta's Curled Rings were used to make the calyx & 
thread ends were encapsulated within the stem.
However, one long tail of pink thread was left uncut. This was used to make the Folded ring bud.
And again the pink thread was encapsulated within the stem.
One can safely say that this flower doodle is also a kind of Ring-play. Many different types of rings 
have been used in this all-ring pattern (all rings except for the stems !) : 
Layered, Curled, Folded, Large, …
For the tendril, an auxiliary thread was added. The ends were cut & frayed. The stitches in this long chain were tensioned just enough to get a kind of rolling twist. If sts are snugged more tightly,  we get a curlicue, as in the main stem.

This entire doodle does not require any blocking. 
The large rings, long chains & encapsulation hold their 3D shape very well.
It is extremely difficult to get a good perspective photograph of 3D freeform pieces. 
What I see with my eyes - the angle, the depth, etc. is not always captured with any fidelity !

_________________________________________________________________________________

Click to download the pattern (pdf) : Morning Glory 3D flower Pattern
_________________________________________________________________________________
UPDATE : I have changed the pattern link from Dropbox to Google docs for greater reach.  The earlier Dropbox link has been removed, altho' it will still work,  since the file hasn't been removed .

Tutorials for Layered Rings (links at bottom) ; for Curled Rings (upcoming)

Feel free to use the pattern as you see fit ; to tweak it, to overhaul it, …. play & enjoy :-) 
Would be nice, though, if you could drop me a line/comment showing me your work, if you do make it.

My sincere thanks to Ninetta & Patty

& to great masters like Thérèse Dillmont.


Motif #18/II for 25 Motif Challenge

Related Links : Layered Rings Part 1