Monday, 24 September 2018

hitch the loom

Pin It now!
I’ve been a real dolt – a blind one! Last year Georgia had sent me a 2-page pdf of Edwige Renaudin’s diagrams (with instructions in French) as a possible layout for my colour Cluny presentation. “Edwige is a master cluny tatter and author…”
I will start diagramming if many of you are interested – 
please let me know through comment or email.

But anyway, the point is that she starts her tally weaving in a way that finally led to my perfect Cluny leaf! You have all been very supportive, overlooking the imperfections in my tallies, and I appreciate it so very much. Now, however, I am finally happy myself! Look for yourself (the Before and the After) - 


I have prepared a short pictorial to show the step and the difference it makes.

Cluny Tatting Basic : Hitch The Loom
(Hitch is the term used for an unflipped half stitch).

Winding the loom and weaving remains the same. Before weaving actually starts, there is one additional step where we capture all the loom threads within an unflipped half stitch (a hitch). 
This step can be used in any Cluny tatting ranging from basic single colour to 2 or more colours.

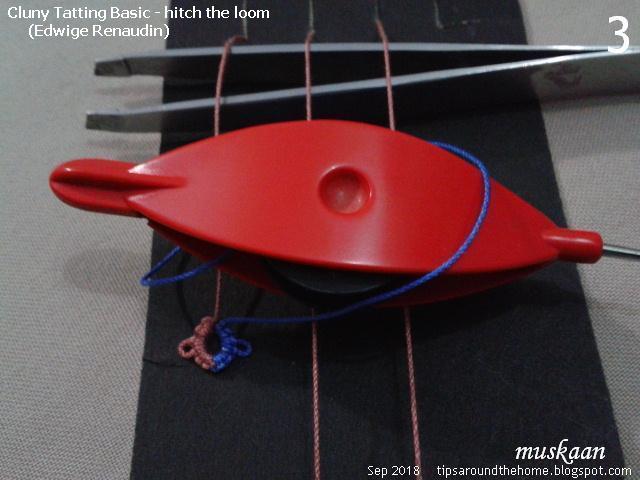
 1. Wind the loom as usual and bring weaving shuttle to the right.

2. Move shuttle to the left Under the Warps. *

3. Move shuttle to the right Over the Warps and through the loop.

4. Pull shuttle to tension and ...
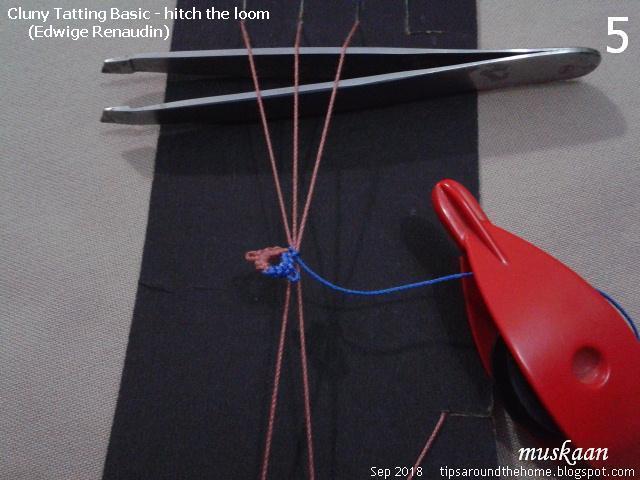
5. Slide the unflipped half stitch (hitch) to the base, 
as close to the previous element as possible.
With the Warps tied snuggly together, weaving and shaping becomes easier!

6. Start weaving normally : 2 passes = 1 weave/wrap.

1 tally or Cluny leaf made !

* Edwige takes the shuttle Over the 3 threads in step2, then Under and through the loop in step3, before tensioning.
Both ways work equally well, though I find moving the shuttle Under, then Over more convenient.

No colour blip at the base AND the leaf is centered.
The top braid shows the colour blip at the base.
I made some weaving errors in the 2nd tally of the lower braid, 
but the other 3 tallies are pretty close to 'perfection'.

Remember I said the half stitch (both flipped and unflipped didn’t work for me earlier – it would sometimes lock the tally when I started to close it. This happened because I was making that half stitch on only 1 Warp thread, instead of all 3. I may have misunderstood the instructions at the time, but even now they are not clear enough.

When I shared my excitement with Anita, she kindly sent me a video link of Edwige tatting a Cluny leaf on a box loom. I watched it many times but she seems to be starting her weaving directly (without the unflipped stitch). Nevertheless, it is worth watching – she makes it look so quick, easy and perfect! Notice how she removes the top loop and places it on the knob while closing? So the top loop remains on the loom, making it easy to close! Like I showed with the card loom, using the ‘one small step’.


I have found resources that were not listed before or links that no longer work. I will update my Resources page to include them all soon. 

Don’t you love how so many tatters weave their strengths and ideas,
sharing to create perfection around ! 

Saturday, 22 September 2018

twist n twirl, spiral n swirl

Pin It now!
doily tat-along and pictorial
Completed the tat-along a week back but too many presentations swirling around in my compy vying for attention! Without much ado, let me 'jive' in ….


Swirling Butterflies Tat-along 

I made a few tiny tweaks and here are my notes –

1. Treble as a twisted picot : The 2nd part of a treble is actually just a twisted picot!!! Well, well, well. I tried it on some of the tds. Pictorial at the end.

2. The double leaves : It is a very clever design where the leaves are asymmetrical but with graduated segments – from 3ds through to 6ds - creating a swirl of their own!
But my conjoined double leaves just wouldn’t stay flat. Finally I settled with a ring of (3+3) and 2nd ring (4+6), leaving them unattached to each other.

3. Bare thread under the butterfly. My little indolence served 2 purposes :
visually, I felt that the entire body on the twig made it seem more like a caterpillar ; tatting the butterfly was normal - only the double stitches of 1st & last trebles were encapsulated (2 core threads).
And instead of 3 shuttles,  I used a ball and shuttle,  ctm, for green, and 2nd shuttle for pink.

4. An idea – one can make the butterflies separately (single shuttle only – see here) and join to twig normally. Which means, we work the twig with shuttle and ball only! But the butterfly will need 2 picots on core thread held by paperclip.

5. Long picots made and snipped for the antennae.
6. Mutilated Wing – I made only 4tds on the wing instead of 5tds. I did not count the TJ (treble join) as a tds, hence the goof-up. Some of the butterflies look like elephants to me! If I hadn’t blogged, it would’ve gone unnoticed even now ;-P

7. Directional or fs/bs tatting: My way of doing the treble backside is simple – only work the ds part of it backside, keeping the rolled part as usual. Ninetta shared her method here. Always good to have choices!

8. Measurement : Worked in Anchor size 20 threads, the doily works to 4” with butterfly ; and 3” if one leaves out the butterflies.

9. Techniques used : fs/bs tatting, tds (treble tat stitch), spiral rings, floating/thrown rings, encapsulation (direct tatting with unflipped stitches), 3-shuttle tatting (I used 2 shuttles and a ball).

10. Spiral Rings : I believe the best effect of tds is in these spiral rings!


This new stitch is really catching on J 
The fun part is that it can do Everything that a normal double stitch does - 
including half tds, padded tds, and picots of all kinds !


For those who consider the treble a bit of a mystery, perhaps it’s similarity to a twisted picot will help? Most of us know of or have done the twisted picot. So, here’s how we can use the same movements to make the 2nd part of a treble tat stitch !!


Treble Tat Stitch worked as a Twisted Picot
or
Twisted Picot In the Treble Stitch !
Click on any image for enlarged view.
This is a alternate method of working the 2nd part of a treble stitch. 
It can be used as an eye-opener to show the 'common threads' running through 
seemingly different tatting techniques.  

4 tds can be seen on a chain, of which the first 2 were made normally 
and the next 2 were made using the twisted picot method/movement.
See Twisted Picot video here.

 1. Start next tds with a double stitch

 2. Pull loop through picot (not shown), tighten and pull another loop through it.
BUT do Not pass shuttle through this loop.

3. Twirl shuttle and Twist loop ! 
Now here’s where the twisting starts and the direction is very important. 
Hook/hold the loop on the shuttle and
rotate the shuttle clockwise like a ferris wheel – 
moving towards us from the lower side and away from us on the upper side. 
The loop gets twisted once.

If we rotate in counterclockwise direction, this is how the tds turns out -

 4. Repeat this movement again and now there are 2 twists in the loop.

 5. Repeat this movement a 3rd time so that we have 3 twists in the loop.
Keep the loop hooked at all times to avoid untwisting.

 6. Now pass the shuttle through the loop. 
This is the tricky part since the loop should open up sufficiently to allow shuttle to pass through.
If needed, tug the loop to lengthen it.

 7. Start pulling the ball thread to close the twisted loop. 
Then pull the shuttle/core thread to tension the stitch.

 8. Treble stitch all snugged and complete using the twisted picot method!

 9. 3 more trebles made in similar manner.

This method works well with this size 10 knitting cotton as well as Anchor size 20 threads. Does it work equally well for finer threads? Try it and let us know J


UPDATE : Check out My Tutorials page for more Treble tatting pictorials, variations and analyses 

That’s it for now, but I am super excited to show you my perfect Cluny leaf – finally happy with it – and absolutely no colour blips on either end. Will share the trick soon. 

Thursday, 20 September 2018

Clunied !

Pin It now!
2-Tone Cluny Bracelet
aka 
Ganga-Jamuni bracelet

This bracelet is based on the basic Cluny tatting with colour variation pictorial. I chose these 2 colours in order to complement the beads I had – notice the subtle colour striations? And the name was chosen accordingly, though it’s Indian name could be Ganga-Jamuni bracelet – symbolising a fusion of colours and techniques (taking off from a fusion of Hindu & Muslim cultures symbolised by the rivers Ganga & Yamuna).

One can work it in one colour with no need to think of where the shuttles should be. Working with 2 colours brings a degree of interest and apparent complexity since one has to ensure the colours are switched correctly. I’ve employed various little tricks to smoothen the transition between colours, as seen in the process pics. I make the ‘switch’ within the previous element itself. But it is all optional – you can work at will, using SLT if you like.

Materials :

·         2 shuttles (or needles)
·         Anchor size 20 thread in 2 colours 
(I used the light 00366 in shuttle1 & the dark 00896 in shuttle2).
·       Seed beads : 14 beads size 16/0 per repeat. 
For 8 repeats load 112 beads. String 56 beads in each shuttle.
·        2-tone beads : 1 per repeat (+1 for end) size 5/0. 
For 8 repeats, 9 loose beads required.
·         A Cluny loom of your choice.
·         A crochet hook to load the loose beads.
·         Findings for the bracelet.

Techniques :
  • 2-shuttle tatting ;
  • Add findings ;
  • Lock stitch (1 unflipped half stitch; 1 flipped half stitch)
  • Under-Over or Alligator join ;
  • Slope and roll join
  • Cluny tatting ;
  • Working with beads.
Measurements :
3 repeats (including beads) = 5 cms long
Final bracelet (end to end): 1½cms wide and 7 inches (<19cms) long

Abbreviations :
          Sh – shuttle ;  vsp – very small picot ;  b – seed bead

Pattern
Pre-string 56 seed beads on each shuttle and join both shuttle threads.
All tatting is done from the front, progressing from the left to right end.

With Sh1 -
End Ring1 : 10, with finding.
Join Bead.
With Sh2 - Lock stitch to hold bead in place.
Wind loom with Sh1 and weave tally with Sh2 …
Tally: 12 wraps. Emerge from the right side, hiding the colour blip. This ensures that the shuttles automatically switch positions.

With Sh2 –
Chain: vsp, 2 b 2 b 2 bbb 2 b 2 b 2 rotate , Under-Over join across base of tally ,
2 b 2 b 2 bbb 2 b 2 b 2, join to vsp as shown in pics. This method of joining automatically switches the shuttle positions & hides colour blip.
Join Bead as before.
With Sh1 - Lock stitch to hold bead in place.
Wind loom with Sh2 and weave tally with Sh1 …

Repeat tally and chain motif for desired length, switching colours.

To Finish :
Join Bead as before.
With Sh1 –
End Ring2 : 10, with findings.
Tie and cut and hide threads. 

Process
 1. Start first end ring with finding and continue from pic #2.
I tatted 4 repeats before deciding to take process pics. 

 2. Pull up a Sh1 loop through a loose bead, pass Sh2 through this loop …

3. …pull Sh1 such that both threads are now within the bead. Adjust tension.
I first saw this in Usha Shah's Lanyard #4.

 4. Pick shuttle2 and make 1 lock stitch. 
I made unflipped 1st half stitch, and flipped 2nd half stitch.

5. Wind loom with Sh1 and start weaving with Sh2.

6. Ensure that Sh2 is on the right side before closing the tally.
Hide colour blip as described in A6 & A7 .
Pick up Sh2, move seed beads forward on Sh1 to start chain.

7. Make a very small picot at start of chain.
To cross over to other side, rotate work and make an Under and Over join.

8. Complete the chain and make a slope and roll join to vsp as follows :
Pull a SH1 loop through the vsp and pass Sh2 through it…

 9. Tension the threads such that the SH1 loop is NOT pulled back through the picot.
This method ensures that there is no colour blip And the shuttles switch positions.

All odd numbered motifs are worked in above manner.

 10. Repeat Steps #2 to #9, but with the shuttles switched.
All even numbered motifs are worked accordingly, 
starting with shuttle2 in place of shuttle1. 

Continue for desired length, switching colours/shuttles accordingly.

End with another 10 ds ring with finding attached.

TIP : Continue for a longer length to make a necklace. In the middle, after a chain around a tally, add another beaded chain(s) on one or both sides, to act as a pendant.


Clunied !!!
I am so thoroughly Clunied! Earlier this month I bought a set of bathroom mats – not my style, not my colour, and it took us a few days to get used to that large print and relatively bold colour! But guess what – don’t you see Cluny leaves there? Freudian slip or serendipity?! 

happy tatting J