Sunday, 7 June 2020

opening more petals

Pin It now!
Continuing the Peony from my last post, here’s how far I have come. Despite the risk of boring you, it is more efficient to share the pattern for the 3 new rounds, than let my work pile up ;-D Not to mention how excited I am to show the flower blooming!
These 3 rounds, like the previous one, are all dimpled chains, lock joined to previous round. They can be worked in one pass, although I have cut after each round since I am guessing and tweaking the count as I go. Hence if any one round does not work out, I have the option to snip it off rather than unravel it. I haven't had to resort to the former yet.

PEONY (DIP)
pattern continued - Rounds 3 - 5
NOTES -
  1. Folded chain technique is used to create the dimples – a set of 1st half stitches (fhs) followed by a set of 2nd half stitches (shs) creates a beautiful dent.
  2. Although starting each round afresh, I used false CTM, adding the chain thread after tatting the 1st chain, so that the tails are hidden in different chains.
  3. Rounds 2 to 5 can be worked in one pass, climbing out with split chain.
  4. As the chains get longer, ensure the stitches are snugged properly at regular intervals before making the lock join.
  5. I count the lock join, followed by 2nd half stitch as 1 double stitch.
  6. Pattern for Rounds 1 and 2 can be found here

Each round is worked with one shuttle and ball (Anchor crochet cotton, size 20), continuous thread. Attach to free picot on previous round.


ROUND 3 -
Chain : 2 vsp 5 - 3, 4fhs 4shs, 8 vsp 2. lock join to next space.
Repeat all around, 10 times, joining to previous chain and last chain to the first.
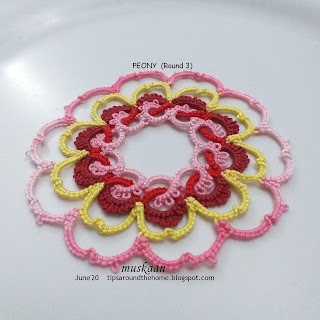
Measures 3”

ROUND 4 -
Chain : 2 vsp 10, 4fhs 4shs, 4 – 6 vsp 2. lock join to next space.
Repeat all around, 10 times, joining to previous chain and last chain to the first.
Measures 3½”

ROUND 5 -
Chain : 2 vsp 8 - 6, 4fhs 4shs, 6 - 8 vsp 2. lock join to next space.
Repeat all around, 10 times, joining to previous chain and last chain to the first.
Measures 4¼”

As you can see, I am having too much fun to stop the flower from blooming further! Let's see how far I can take it ....


Pictorials and practice patterns for Interlaced Rings - https://tipsaroundthehome.blogspot.com/search/label/interlaced%20rings


Friday, 5 June 2020

peony interlaced

Pin It now!

Moving beyond linear designs, my next interlacing project is circular. It is still a work in progress since I want to go beyond a single round. I have an idea of what I want, but the exact number of rounds is still a mystery.
And this time there are 4 shades, one in each shuttle. Here’s how I started the first split rings without any knot(scroll down to 'C')

A short while back Anita sent me a photo of her peonies, and I have tried to capture the flower as best I can in the shades I have.
Anchor cotton, size 20.
4 shuttles. Shuttles 1 & 2 have the darker reds; shuttles 3 & 4 have pinks.


Basic pattern :
SR1 : 12 / 11, do not close. Pass shuttle #3 front to back through SR1.
SR2 : 10 / 10. Pass Sh3 front to back again, close both split rings and repeat, joining back to first pair.

Peony Wreath pattern
For a floral effect, as seen in the model, the outermost edge has graduated picots and the pattern is as follows –
SR1 : 1 (–1)x11 / 11, do not close. Pass shuttle #3 front to back through SR1.
SR2 : 2 (–2)x4 / 2 vsp 6 vsp 2. Close both SRs after posting Sh3 again.
Repeat these 2 SRs, joining to the vsp of previous ring, and back to first pair. There are 10 pairs in total.

This can be a standalone project. Add beads and findings for earrings or pendant, or use as a tree ornament. Perhaps a miniature frame? It measures 2" across.

If you wish to continue, here’s the next round with petals….
Peony pattern (DIP)
Folded chain technique or Victorian Sets is used to create the dimples – a set of 1st half stitches (fhs) followed by a set of 2nd half stitches (shs) creates a beautiful dent.

Worked with one shuttle and ball, continuous thread. Attach to space between outer split rings.
Chain : 2 vsp 8, 4fhs 4shs, 3 – 5 vsp 2. lock join to next space.
[Chain2: 2 + 8, 4fhs 4shs, 3 – 5 vsp 2. lock join to next space.] Repeat all around.
Note: I count the lock join, followed by 2nd half stitch as 1 double stitch.

Since the next rounds are going to be in variegated pink, yellow was chosen to break the excess of pink (not a shade I am fond of). However, one can continue with pinks or any colour of your choice, and climb out using split chain.
At this stage it measures 2½” across.

So, what do you think? I’m pretty happy at how it’s shaping out, though there is ample scope for improvement in all areas. But I'll let it be for now. 

Wednesday, 3 June 2020

why tatting is thriving

Pin It now!
...and will continue to do so long into the future. The reason lies in the huge generosity and willingness of tatters to share their knowledge, skills, experiments, tips, and tricks… be it through text, video, live chat, classes, etc. And the icing on the cake is that most of this is for free!
rainbow - May 31, 2020
I share, with utmost gratitude, shining examples of such selflessness and enthusiasm….


Remember the recent QnA segment on how to attach tatted lace to handkerchiefs?
tatted edging and corner for handkerchief

Kathleen Minniti sent me her own pdfs to share with my followers! She had “prepared some handouts for a Shuttlebirds Annual Workshop class” back in 2018! ( https://sbspokane.wordpress.com )
Such detailed and clear images and instructions – helpful for all tatters! 
Without much ado, here are the links to the 2 pdfs :

preparing to sew cornered edging to picoted edge hanky

And then Ninetta Caruso sent a link to her own post on this subject, which has her drawings as well as further links. And here’s what she said - “If you enlarge the picture at the end, you can see the various stages of the sewing at the border.”

tatted edging sewn to saree

And a few months back, Anita Barry played a magical card and on my request, Bonnie Swank prepared a wonderful video on how to change direction of curving chains in Needle Tatting !!!
Needle Tatted Changing Chain Curves : Convex and Concave
My original pdf was in shuttle tatting obviously - 

Here's part of what she wrote -
“I hope the video is helpful to you, I really enjoyed finding six ways to tat one chain and the reverse/unflipped method was my favorite! I contacted Anita several times and we had fun conversations on the differences between needle and shuttle tatted changing chain curves and thread orientation when reversing!  I actually made the video 5 times! Once I tatted the whole thing and then realized the camera did not turn on, once I taped the entire thing upside down and twice the video cut off on me after 30 minutes! So I have lots of chain segments, I'm thinking of putting them together to make flowers.”

Her Facebook page is Straight-Laced Tatting and she has another needle tatting technique for making floating rings!

I cannot find words to thank all my dear friends in the tatting world who come together share bit by bit so that the beauty of Tatting will thrive for generations and centuries. They are all building on the foundations laid by our previous generations!
With utmost gratitude and thanks …


Patterns/Posts : 
Jane McLellan's Leaf braid edging for hanky and saree ; Blossoms corner for hanky