Saturday, 27 August 2016

antique pattern, modern presentation

Pin It now!

A couple of weeks back, Georgia asked if anyone could check for supposed errors in her modern notation of this vintage snowflake pattern. That very evening, I sat down to test tat it, making my own errors in adding wrong threads, but finally ending with a diagram, written pattern & a pictorial, alongside 3 tatted models ! Yes, I need to get a life beyond tatting ;-P

Louise Hauck ©1915 in ‘Tatting of To-day
*free pdf d/l of the modernized pattern with diagram
I like the pattern, especially how the arms are filled in - a breezy center with dense middle !

It is a 2 shuttle, 4 round pattern, all done in a single pass using mock picots to climb out to next round !!!
Except for one small bit (chain), all tatting is done from the frontside, moving in clockwise direction.

This is the diagram, with colour-coding of each round. To download the complete 3-page pdf which includes written notation, diagram & a pictorial, click here.
The pictorial collage in the pdf has fewer pictures. Hence, I am sharing pics of each round here, indicating major points of each round alongside.

Pictorial of Snowflake
In Georgia's pattern, each round is notated in letters (A-D), which was kept the same ...
Climbing out with a mock picot. The long picots in this round were made with a ⅜ inch gauge held horizontally/parallel to core thread.
TIP : When starting the chain after mock picot, I did not make any unflipped half stitch. Instead, start tatting normally after leaving picot space, and while snugging the chain stitches, simply ensure that the core thread retains the picot length (see pic below). This is especially useful when working chain in another colour - no colour blip will show !
The picot at the tip of chain is a small picot, but the one at the base (after the lock join) is a normal picot. The difference in picot lengths helps to bridge the next round so that the short chains lie neatly. If the base picot is small, the chain tends to turn.
2 thrown rings spanned by a chain. This is the only time when we Reverse Work (RW) in the entire pattern; otherwise, it is all tatted from the front. Of course, this chain can be worked in Direct Tatting using unflipped/reverse stitch.
I used a Catherine Wheel Join to bring continuity to the chain, but it is optional & can be substituted with a lock join. The CWJ is not included in the stitch-count of the chains. Consider it a way to span the distance.
The snowflake ruffles a bit, but is easily flattened with fingers. Picot lengths/sizes play a role in this piece.
The Trefoil is thrown off the chains. Hence, to anchor each ring, as well as the trefoil, in place, I used very small picots keeping the overall stitch-count same.

These tat up very quickly & most of the thread used is from shuttle 2 since it is mostly chains & thrown rings!
I used Anchor crochet cotton size 20 (white - model #2) & size 40 (white model #1 & 4054-0185 for model #3).
It measures 3" in size 20 & 2" in size 40.

It was Rakshabandhan on the day I completed tatting, so how could I not play around, especially since my resolve to put up a rakhi bracelet pattern this year did not materialize. So here's a pic of how 2 snowflakes in different sizes, topped with a long-picoted ring, would work as a possible rakhi centre ... we cord/twine attached under. Of course, the colours are too 'icy', but the idea is use-able, don't you think ?

So, here's hoping you like the modern presentation & download the Snowflake pdf for this Christmas :-)

happy tatting :-)


UPDATE (Jan 2017) : Check out what I did with the 3 snowflakes here
UPDATE (Jul 2019) : FYI. Since the pdf link got corrupted, there is now a new workable link in place.

Monday, 15 August 2016

picking on picots

Pin It now!

I’ve sensed this for a long time & this medallion confirms it. Anchor Crochet Cotton that is made in India by Madura Coats is thicker than the size 20s & 40s (of any brand) that I see you tatters using. In fact, it is thicker now than the old thread I have ! Makes it very difficult to follow a pattern with long picots.

(aka Woven Center Flower)
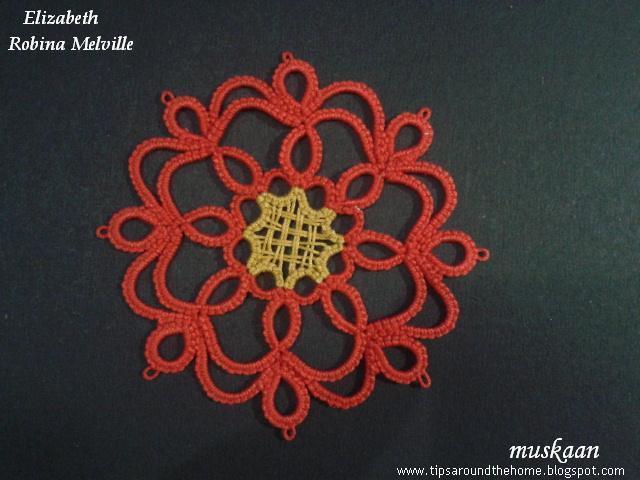
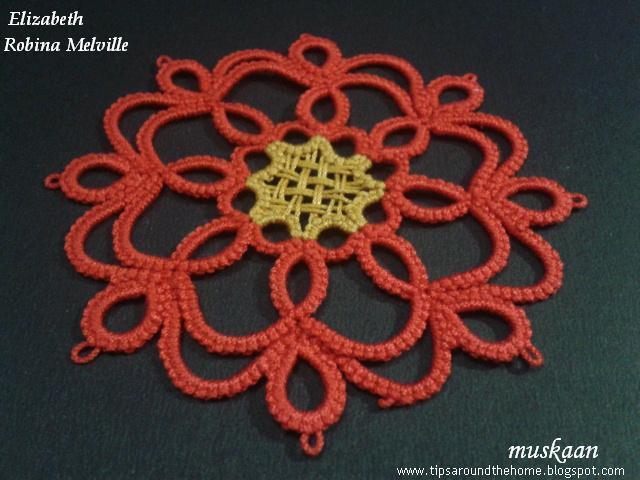
Robina Melville
first published in Ring of Tatters Newsletter #72, Spring 2016
This is such an elegant pattern !

Materials : Anchor Cotton size 20, Art. 4054. Golden yellow – 0307 ; red – 046
2 shuttles ; picot gauge : 2.5cm & 3 cms
Techniques I used : long picots, woven picots, split rings, thrown rings, lock join, SSSR to climb out.

Round 1 : 1⅛”
My first attempt failed, as I had sensed, due to difference in thread brand :-( The last ring didn’t even have any space to fit in (top right in pic) !
Increased the picot sizes & the 2nd attempt worked.
TIP : I used a threaded tapestry needle to easily weave the picots, otherwise it was a bit fiddly in the cramped centre.

Climbing Out
For my own recollection, there many ways 2 colours can be used in 1st round & still climb out to next round without tying & cutting both threads.
1. Climb out with a SSSR in red, while hiding the yellow tail in first half of the SSSR.
I had to do this, because I didn’t think ahead & I wasn’t sure what colour(s) I wanted for next round.
2. Wind 3 shuttles : Sh1 with yellow; and 2 shuttles wound CTM with red. Thus while climbing out, we hide the yellow within a split ring. This is what I could’ve done.
3. Double Core SSSR to hide the yellow within & keep the SSSR red. This, in fact, gives us the option to continue with both colours for next rounds, yet keeping the ring a single colour – either red or yellow. I had tried this for the first time here, with a slight adaptation.

Round 2 : 2¼”
Round 3 : 3” 
I absolutely Love this medallion & enjoyed tatting it. Hey, even my long chains behaved !

Although, I did make a mistake – a picot in one of the outer chains – an expected outcome of trying to watch the Olympics & tat. Noticed too late, so folded the picot behind & glued it. Will sew it in later.

Flashback to May 2014

My very first attempt at woven picots was when I saw these lovely earrings by Lilas Lace. I was going through a phase of learning different picots & effects - the net kept throwing up such gorgeous tatting ! 
So these earrings both inspired & intrigued me & using her basic idea, I attempted to tat it.
The stitchcount is my own & I included 2 colours & Josephine Rings. Didn't have findings/hooks... This can work as a pendant, too.
This is the 'before' pic. More practice with picot gauge was needed then, but blocking the piece now has helped a bit. 

and this one is for Michelle !
Remember this, Michelle ? A while back I had tried to duplicate the look of that tatted model in pinterest that you shared. Tried a few things in size 40, but don’t know where I’ve misplaced them. Will turn up some day. 
Before posting, I usually do another round of online research for resources. And guess what - Karen already Has a video of these !!! They are called Interlocking Picots (why do the tutorials turn up After I've gone through the grime ?! I need better perception & recognition).
Had some thread left on the shuttles after the medallion, and quickly tatted another for this post before I forget again. 

Many thanks to Robina & Georgia, 
to Lilas, & to Karen
happy tatting :-)


Related Posts : Snow Doily  


Sunday, 14 August 2016

a mixed dream

Pin It now!
It wasn’t intentional, but a lucky coincidence – the symbolic resemblance to our flag colours ! We are celebrating the 70th Independence Day on 15th & these are the colours I see all around (with the white, of course).
Floral Fantasy Doily

Kathleen shared a few tatted rounds (& pattern) of this doily but a complete sketch on Craftree. It was still a work in progress, including pattern-writing, but two features called out to me instantly & I began tatting along …So far she has shared stitch count for 6 out of the 9 rounds.
Following the name & the pattern, I wanted this to be a bit colourful. In order to increase my colour choices, I have tatted this in a combination of size 40 Anchor crochet cotton (Art 4054) & 2 strands of Anchor embroidery thread (Art 4625).
Many rounds can be done with single shuttle & ball & while I used 2 shuttles for the most part, I have mentioned which rounds can be tatted with ball & shuttle.
Only Rnds 1&2 were blocked before taking pics. All subsequent rounds are unblocked &/or un-ironed/unpressed … will do it after completion, for the final presentation.

Round 1 – 1½”
Rings : 4054-020 ; Chains : 4625-0314 (2 strands)
Techniques: Swirl Join, down join, directional tatting, picot gauge 3/8" for the long picots, last ring SCMR, ball & shuttle.
Actually a swirl join would hold them all together, since it is a proper join. But with these very very long picots & fine thread, it became extremely difficult for me to manage. Hence, after very many failed attempts, I started the last ring as a SCMR; then cut off a length, pulled the end through all the picots, and completed the ring. This can be seen in the more open picot towards the bottom right in later pics.
TIP : I should've taken the thread back through all the picots again to secure them in the center ! Now, however, I am planning on weaving the picots after completing the doily, as in the old vintage patterns, An opportunity to try it out :-)


Round 2 –  < 2”
CTM or shuttle & ball : 4054-0293.
Techniques : lock join, reverse join, RODS. Ball & shuttle CTM.
I loved this overlap of the chain & chose a light colour to highlight it.
TIP : Probably better to start with the ring at the LJ position. Now I had to cut off shuttle thread in the end and pull it through to the front for overlapping, before completing the last segment.

Round 3 – ~ 3”
Rings : 4625-0204 ; chains – 4625-0879 . 2 strands each
Techniques : directional tatting, long picots, down join, ball & shuttle.


Round 4 – 3⅜” 
Rings & Chains : 4625-254. 2 strands each
Techniques : directional tatting, long picots, down join, split rings, 2 shuttles.

Round 5 – 4”
Rings : 4625-314 ; Chains : 4625-0359. 2 strands each
Techniques: directional tatting, long picots (for frayed picots later on), down join, lock join, 2 shuttles (ball & shuttle possible), SCMR to use up ends.
Although the pattern did not call for this profusion of picots, I visualized these as flowers & have chosen long picots for a reason. Yes, you guessed it, I want to convert them to Frayed Picots !
After a few repeats I noticed that my fs/bs tatting was ‘wrong’ & I continued in correct sequence, which led to an interesting observation while joining these flowers ….
TIP : Using a down join to connect the flowers to previous rounds makes the central picots lift up to the front of the work !!!! (compare with the 2 bottom right flowers in the 6th round pics) are not really visible, but one can get rid of them by tatting the rings RODS.
It is cumbersome & time-consuming to separate the strands of embroidery thread. To make full use of the thread in tatting, I used SCMR for many of the rings, thus using up the last lengths of thread. I had first used this in my Wiosna last year (lengthening the functionality of thread & SCMR instead of normal ring).


Round 6 – 4¾”
Rings : 4054-229 ; Chains : 4625-0204. 2 strands
Techniques: directional tatting, down join, ball & shuttle possible.
This is a very quick round & I love the overlap of rings at the base of the scallops.
 
Colours are fun to work with, but it takes me so much time to choose them :-(  As you can see, I attempted a few combos but snipped them off, ending with a repeat of earlier round colours.
Not sure whether I’ve lost the colour plot here, but these were chosen keeping in mind the next round & it’s colours …. 

Kathleen is still in the process of developing & writing this pattern & will be sharing it in a proper format soon. I will update accordingly.

happy tatting :-)