My
Italian Connection is at play again, splitting chores! Couple of days back Elisabetta De Napoli
shared a picture of her filet tatting in an Italian facebook group. On request, she readily created a series
of pics and explanation to share through my blog. Ninetta, ever
gracious, did the translation and added her notes. Yours humbly had the
privilege to assemble, 'polish', and present. So without more ado, here’s her split chain
method of filet tatting.
At
the end is her Italian version, verbatim.
Filet
Tatting (split chain method)
by
Elisabetta De Napoli


Ch: picot, 4ds, [1 picot, 4ds]x5

Row 1: consists of 6 split chains, joined to the foundation row picots.
SCh: 4ds, 1 picot, 4ds / 4ds.
To make a Split Chain (SCh) leave
bare thread just enough for 4ds, lock join to nearest picot of previous chain, tat
4ds.
(see tutorials - https://tipsaroundthehome.blogspot.com/p/tatting-resources.html )
(see tutorials - https://tipsaroundthehome.blogspot.com/p/tatting-resources.html )

[SCh: 4ds / 4ds]x5

This creates an Open Filet or mesh.
To Fill a Square: Plan ahead in the previous row to include small picots for joining. As can be seen in the image, the 2nd
and 5th chain segments in Row2 have very small picots. This is how
it is done here …
Picoted Chain segment (pCh): To fill a
square in the next row, in the previous row a plain 4ds chain includes tiny
picots as follows -
pCh: 1ds and 1fhs, 1vsp, 1reverse
order ds (1shs and 1fhs), 1vsp, 1shs
and 1ds.
(basically, 4 ds is divided into 1.5ds at the ends and 1rods in the center flanked by 2 small picots. The picots are made within a ds rather than at the end of a ds - as in backside chains)
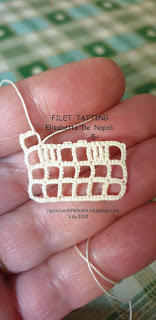 Fig5) Row 3: Of the 6 squares, the 2nd and 5th
squares will be filled here, which means there are 2 extra split chains within the
square.
Fig5) Row 3: Of the 6 squares, the 2nd and 5th
squares will be filled here, which means there are 2 extra split chains within the
square.
(basically, 4 ds is divided into 1.5ds at the ends and 1rods in the center flanked by 2 small picots. The picots are made within a ds rather than at the end of a ds - as in backside chains)

Make 1st open square: 4ds, 1picot, 4ds, SCh: 4ds.
Filled square: [SCh:
1ds / 4ds]x3
2 open squares: [SCh: pCh / 4ds]x2
1 filled square: SCh: 1ds / 4ds.
Last open square: SCh: 4ds / 4ds.
Move up to Row 4.

For Filled Square Over Filled Square:
If next row has an empty square over this filled one, tat normal ds between split chains (total 4ds). If next row
has a filled square over this filled one, tat the same sequence as in the picoted
chain segment in this way:
the chain is 1ds and 1fhs, 1split chain (4ds), 1reverse order ds (1shs and 1fhs), 1split chain (4ds), 1shs and 1ds, all in place of 4ds.
the chain is 1ds and 1fhs, 1split chain (4ds), 1reverse order ds (1shs and 1fhs), 1split chain (4ds), 1shs and 1ds, all in place of 4ds.
∞∞∞
This
is what Elisabetta says, for our Italian friends –
Ciao Ninetta, ti invio le foto che ho fatto e le spiegazioni:
2 navette e filo continuo
1° lavorare un arco di 1 pip 4 nodi fino a raggiungere il
numero di spazi vuoti
che occorrono;
2° girare e lavorare 4 nodi 1 pip 4 nodi e agganciarsi al primo
pip lasciando lo spazio per uno split chain di 4 nodi e ripetere, 4 nodi
e split chain di 4 nodi, fino all'ultimo piop;
3° girare il lavoro e ripetere come il primo giro agganciandosi
al piccolo pip che si crea tra i gruppi di 4 nodi;
4° per avere degli spazi pieni occorre prevedere, nel giro precedente
dei piccoli pip nei gruppi di 4 nodi. (*)
Spero sia sufficiente, in caso contrario io sono qui.
Ti abbraccio e ti ringrazio anticipatamente **
∞∞∞
Filet Tatting - some other methods (with updates):
I
have little experience with actual filet tatting. But here are links to a
few other methods –
- 'Reversing Chain' method in John’s and Jeff’s blog. Read the comments, too, for answers.
- Mary Konior's rings/floating rings and chains method in Margaret's blog (image only).
- and a similar 'Filet-Ochhi' rings and chains method by Christel Wutzmer and Agnes Focke from "Doppelknoten" Nr. 7 (2005) in Jeff's blog (image only).
- Shoe Lace Trick method by Mandatory (my notes on this method here- https://tipsaroundthehome.blogspot.com/2016/06/something-new-something-old.html ) She has done quite some experimenting with filling effects (pics in her Craftree album)
- Sue Hanson's tiny split chain basket (taught at Spokane, 2008 and pattern shared in many facebook groups) is a bit similar to the above method and uses 2 colours.
I
have been working on a tutorial series about lock join and chains, and this fits right in, especially if you take up a 2-colour challenge – I had forgotten
about filet tatting! Life has intervened major-ly hence the delay in polishing
it up. But soon – Anita has been proofing it …
Many
many thanks to Elisabetta and Ninetta – share the joy!
It’s interesting, but my first reaction is that it’s much easier to crochet! Perhaps I’m missing the point.
ReplyDeleteI agree, Jane :-D I like the challenge of conversion, though.
DeleteIn truth, I don't like the look of any kind of filet work - too rigid, too symmetrical, .... I like free-flowing spontaneity ;-P
Thank you very much for sharing it! 🌹🌹🌹🥰
ReplyDeleteCouldn't have happened without you, dear Nin :-D
DeleteWow! Super!😍
ReplyDeleteThank you, Agnieszka 💕
DeleteCool
ReplyDeleteI hope you will use it in a future pattern, Vicki 😃💗🌹
DeleteI am intrigued! I had just begun exploring filet crochet when I developed CTS and had to switch mainly to tatting as that does not inflame it as much (for me). Filet work isn't my favorite either because it is art without grace, but I love the freedom in it to create any picture you want!
ReplyDeleteInteresting points, thanks.
DeleteThat is certainly true, Emily! Easy to create one's own designs or borrow any cross-stitch pattern 😃
DeleteWell, crochet's loss became tatting's gain - glad you found an outlet to continue creating 💕🌹💕
You're welcome Jane. It would be much easier to crochet it though. 😉
DeleteYes! I have thought how easy it would be to convert cross stitch charts to filet work, and have also created a few designs with graph paper. Two that I worked and one that I never got to.
I do miss crochet at times, but am glad it made me focus on tatting more because they were always in competition. And now I am excited to pull out my graphs again and give it another go via shuttle instead of hook!
How wonderfully interesting! Thank you!
ReplyDeleteIt sure is, thanks Michelle 💗
DeleteVery interesting and I love the look!! :)
ReplyDeleteI like this look the best, too, Sue! :-)))
DeleteGreat explanation! My thanks to you and your Italian friends. The sample looks so much nicer than my attempt using twisted picots where Elisabetta uses split chains.
ReplyDeleteRemember Ninetta's Treble stitch? Could that be used in place of the split chain?
How about beads to add color?
What lovely ideas, Mel :-))) The treble should work beautifully! And beads, too. Now you make me want to pick up my shuttles and give it a whirl.
DeleteSuper!
ReplyDeleteWygląda jak koronka wykonana szydełkiem. :)
Pozdrawiam ciepło.
That is where Elisabetta got the idea and inspiration, splocik :-))) And her tatting is always impeccable.
DeleteYes! Appears so much easier than twisted picots!
ReplyDeleteNow I'll have to try it with twisted picots, too, Anita ;-P
DeleteTerrific idea! Split Chains! Thank you all for making this available & sharing the idea!
ReplyDeleteSue Hanson told us that she taught a somewhat similar method in Spokane 2008 - a tiny basket in 2 colours for split chain practice. She has shared the pdf in many facebook groups, but has not granted me permission to create a url here.
DeleteCudownie wygląda- choć myślałam, że to szydełko;)
ReplyDeleteThat is such a huge compliment to Elisabetta's work as well, Renata :-)))
DeleteInteresting we had this conversation on Facebook, I am going to try this pattern when I get time and in the meantime is on my to do list
ReplyDeleteThanks, Margaret :-))) I haven't visited FB for the last 2 days - my weekly/fortnightly cyber break ;-P
DeleteThis technique was originally known as 'bridging', for obvious reasons. It was used in the C19th, but with a threaded needle instead of a shuttle. Refer to Mlle Riego's 'bunch of grapes'. Dora Young revived it in the C20th.
ReplyDeleteThanks for the historical reference, Judith 🌹 I love the way Elisabetta has used the split chains to recreate a beautiful mesh - very precise.
DeleteI do have a question - if the SCh was already published by Mlle Riego, how did Dora Young get the patent?! Hopefully you will read this ...
Yes, Elisabetta's mesh is a precise use of bridging, using a different mindset.
DeleteMlle Riego didn't invent what we call 'split chain': she applied bridging in various places to 'bridge' her thread to another point and back, like a bar in needle lace. Dora first applied a bridging thread to create her 'knotless method ring' (with a ball & shuttle). Then she opened the construction to create the 'knotless method chain'. When Mary Sue Kuhn coined the term 'split ring' in the 1980s, tatters then happened to apply the term 'split chain' to the k.m. chain.
There is a thread, 'What is bridging?' on Craftree.
BTW, the circular, spoke-like construction in the Priscilla Book was originally meant to involve bridging, i.e. a tatted circle with bridged spokes. It has lost its shape recently. :-)
Thanks, again, Judith 💕
DeleteSeveral years back I had started a list of 'bridging' techniques in tatting - as a means of moving from one point to further away. Since then, more new and old methods have come to be added. Some day I will sit and tat samplers for each 😃
I will look up the Craftree thread as well as Mlle Riego's book. The Rose from Priscilla has been on my to-tat list for a long time.
Muskaan, the thread on Craftree is 'A word about bridging/bridges'. The Dover edition of Elgiva Nicholls' book, 'Tatting', has a photograph of Riego's bunch of grapes. You'll notice that the circular rose in Priscilla uses knot stitch on the bridges. Using Dora's knotless method (split chain) changes the shape of the circumference entirely. Progress doesn't always improve things. :-)
DeleteEvery method and effect has it's place. Never know which might be needed or become popular later as often happens in creative field 😃
DeleteI understand what you are saying, Judith, but will reserve my opinion till after I have actually worked it. From what I've read about the Rose motif in various blogs, the knot stitch does not produce an exact ds look-alike. Will I like it? Let's see 😉
Knot stitch gives you the choice of two sides, a bit like Victorian sets and node stitch. Knot stitch is also known as the 'bar knot' because it produces a more cord-like result. Re the Priscilla motif, you may have to shift your visual mindset about the construction. Do you want a wheel with spokes, or a round of curved, (apparently) overlapping chains? Perhaps you could try padded stitches along the bridged section to straighten the mock chain?
DeleteAs you say, every method and effect has its place.
So many options, Judith! We are certainly spoiled for choice ;-D I will keep all your tips in mind for the future. Thank you.
DeleteYou're welcome, Muskaan. Bear in mind that the term 'rose/rosette' = a circular design, not necessarily a floral one. Refer to Mrs Beeton's Book (1877).
ReplyDeleteYes, Judith, I'd noticed how both the outward rings medallion as well as the concentric chains motif are both called rosettes. Glad to have a point of reference now 👍
DeleteOMG I love this i can crochet filet now i can tat filet. I will be trying this soon.
ReplyDeleteLet us know how it works out, Pam 💖💕👍 Happy tatting
Delete