Fundamental Principle : Nothing is sacrosanct.
Choose what works best for you and the pattern. However, be open-minded. There
is no harm in learning new options.
This is not to say that the
evolution, history and development of tatting does not matter. It does, and we
continue to learn from these, build on these, or create independently. They
can, and do, cause duplication, multiplicity of terms, redundancy, overlap.
However, nothing may be regarded as obsolete. The following is my attempt to
make sense of it all: arrange all the joins in a conceptual framework, join
the dots.
Again, what I write here is not
sacrosanct. It is simply my attempt, with the limited resources at my disposal,
to clarify my own thoughts. It is not a tutorial, but a collation and
annotation of various tutorials and terms (with links/references provided). An
image/collage of each join is inserted as a quick visual reference only; for
detailed tutorial of each join, refer to footnotes and links provided at the end
of each Part. A tabulated chart for a bird’s eye view of the main/common joins
is also part of this study. Considering the prolific creativity of our tatting
community, I strongly sense that this will remain a work in progress. I invite
you to contribute any information to make this more comprehensive &
up-to-date.
Limitations
:
- This study is largely based on
shared online resources & popular terminology. Of the large number of
online tutorials, only a few are provided, due to obvious constraints. Any
omission is unintentional and regretted.
- Some
of the terms I have used for categorization and description may be
arbitrary – best suited or limited to this discussion.
- Some common “threads” have
emerged from a study of the various joins. I have tried to encapsulate
them into normative rules & general principles. There may be
exceptions.
- The study is limited by my own
learning & understanding at this point in time.
Abbreviations
& Explanations of Terms used :
DS – double
stitch, double knot, double hitch, double, lark’s head
hs – half-stitch
in a DS
fhs – 1st
half-stitch
shs – 2nd
half-stitch
cap – the
horizontal bar over a DS
legs – the
two vertical bars under the cap of a DS.
core thread
– the thread on which DS are made & slide.
RODS –
reverse order double stitch used in directional tatting.
FS/BS –
frontside/backside tatting or directional tatting.
RS –
reverse stitch, unflipped double stitch, lark’s head, 2nd half of
split ring stitch
SH1 –
shuttle 1 .
SH2 –
shuttle 2.
SR – split
ring
Joins (in alphabetical order) :
CWJ –
Catherine Wheel join
LJ – lock
join
JSS – Join
to smooth side
OTT – over
the top join
PJ – picot
join
RJ –
Reverse Join
S&RJ –
slope & roll join
Notes :
- The term ‘join(s)’ is used in
the noun form throughout the text. To indicate action, ‘link/linking’ has
been used, to distinguish it from the Join itself.
- Almost all joins can be made
without a 2nd shuttle (if working with 1 shuttle & ball) ;
it is just that getting the ball to pass through a loop, as required in
some joins, is not convenient !
- Throughout the discussion, SH1
is considered to be the core thread
over which DS are made. SH2 is the shuttle that forms the stitches in
chains hence also called the chain, ball or auxiliary thread. Where the
join can be made easily with a ball, it is mentioned. (refer to pic1 below)
- While
a join can be made directly between the legs of a DS (as in onion rings,
coils and Catherine wheels), for the present purpose, all joins are made
through a picot, unless otherwise stated. And this ‘joining picot’ is on a
previously tatted ring or chain.
- Unless
otherwise indicated, all joins have been started by bringing the loop Up
through the joining picot, as seen from the front. Make required adjustments
in backside tatting.
- For
consistency, I have counted the join as fhs throughout, continuing with
shs, wherever applicable.
- Some
alternate names that one may come across are added within brackets or at appropriate
place.
About
Pictures :
 |
| Pic 1. Explaining the visuals |
- All tatting is accomplished
with Anchor Mercer size 20 thread.
- Black thread represents
previously worked tatting which has a ‘joining picot’.
- Yellow thread is the SH1 or
core thread.
- Aqua Blue thread is the SH2
thread which represents the stitches formed.
- 3 colours have been used only for visual differentiation & clarity.
********************************
WHAT
IS A JOIN ?
It is a method to link, bring together or connect two or
more elements/pieces and secure them in place. Over 160 years ago, tatting was
done with a single shuttle. Motifs were worked individually and then joined
together with tiny knots or with a needle and thread to create a fabric.
Directions for joining at a picot (PJ) were published in 1851. This was a
revolutionary step in the evolution of tatting as one could “integrate the
tatting in progress with a piece of tatting previously accomplished” 1
Basic
Movement :
This
requires three simple steps :
- Pull a loop through the picot
or point where linking is required,
- Pass the shuttle through the
loop.
- Tension and snug.
From this basic
movement arise various modifications and adaptations. Hence the plethora of
terms and techniques.
Variations
in Step 1 :
1a. Pull loop up from back to front
(Up join)
1b. Pull loop down from front to
back (Down join)
1c. Loop
pulled is from SH1 (eg. LJ, S&RJ, RJ)
1d. Loop
pulled is from SH2 (eg. CWJ, JSS, LJ, S&RJ, RJ, ball thread joins)
1e. No loop, just threads across an
element (eg. Over & Under, Wrap, Alligator, OTT joins)
Principle :
Most joins can be
made by pulling the loop either up or down. This provides the flexibility
needed in directional and 2-colour tatting.
Rule : Thread/shuttle closest to
the point of linking is used to make the join.
Variations
in Step 2 :
2a. Pass SH1 through loop (eg. PJ, LJ, S&RJ)
2b. Pass SH2 through loop (eg. CWJ, S&RJ variation)
2c. Thread from Other shuttle is encapsulated within (eg. CWJ,
RJ,)
2d. Thread from Other shuttle is not encapsulated within (eg.
LJ)
Principle :
Any, & I stress,
entire project can be completed with just TWO joins – the picot join & the
lock join, preferably working with two shuttles for a free-sliding core thread throughout.
All other joins are a modification of these basic joins for the purpose of beauty
and perfection; smoothly curved chains; even-looking and complete stitches; avoiding
colour blips in 2-coloured tatting; ease of switching colours; etc.
Rule : Encapsulation of auxiliary
thread eliminates the colour ‘blip’.
********************************
CATEGORIES
I have tried to divide joins into three categories for
better understanding. However, there is still a lot of overlap and variation
within a join. Think of it as a Venn Diagram or Olympic Rings where certain
characteristics of individual joins can be common.
I.
Above
: when the caps of both the joining elements face each other
II.
Across
: when one element needs to cross to opposite side
III. Below : when the caps of both
joining elements face in same direction (parallel).
Each type
of join discussed below is accompanied by one or more links in the form of
original source, tutorial, or description arranged chronologically at the end,
along with additional references. This is not an exhaustive list.
I. ABOVE - when the caps of both the joining
elements face each other
All these joins are used when we need to link to an element
that is above the line of working. In these cases, the chain/ball/auxiliary/SH2
thread is closer to the joining picot while the core thread (SH1) is further
away.
I.1 Picot Join (PJ) aka traditional
join, regular join, normal join, basic join, up join.
This is the basic of all tatted joins.
- It
allows the core thread to slide freely.
- It
can be done with single shuttle.
- A
bit of vertical thread/leg is visible within the joining picot, & may
be counted as a hs.
- It
makes a colour blip at the back, when using 2 colours.
- It
applies to both rings and chains.
- It is
used in Folded Join, ANKARS tatting, Curled Rings.
- It
is the most commonly used join when adding beads to tatting.
- When
multiple rings/chains are joined to a single long picot, PJ is commonly
used.
Rule : Some joins are considered
in the stitch count (counted either as one half-stitch or as 1DS). There are
tatters who choose not follow this practice.
 |
| Pic 2. Picot Join - Up & Down as seen from front & back |
Variations
I.1.a Down Join aka downward join
This is a PJ performed in the opposite direction, i.e.
pulling the loop down, instead of up through the picot.
- It
allows the core thread to slide freely.
- It
can be done with single shuttle.
- A
barely visible horizontal bar is formed in front. In single colour
tatting, this can be followed by shs to mimic a complete DS 2.
- It
places the colour blip at the back of work.
- It
is used in directional (FS/BS or RODS) tatting and, sometimes, 2nd
half of split-ring joining in order to keep the colour ‘blips’ at the back
of the work.
- It can
be used in the Folded Join.
I.1.b Joining in a Circle aka joining last ring to first, joining first ring to last
UPDATE May 23, 2017 :
This category can be termed Picot Join to the Right. See detailed explanation here
Inward or outward facing rings can come together to form
closed shapes or medallions where the last ring needs to be linked back to the
first ring. At times, this can cause the joining picot to twist. Following are
the ways to accomplish a twist-free join.
Also note that the same applies to a chain, when it has to be linked to the right.
Folded
Join (FJ) aka Twisted Picot
Join
This is needed when linking the last ring to the first ring
of a circle. It is simply a way of folding the tatting to get better access to
the picot, and also prevent it from twisting when ring is closed.
- Basically
employs a PJ – either Up or Down join.
- The
joining picot is deliberately turned/twisted before pulling loop
through it to compensate for the fold. The deliberate twist eases/untwists
when the join is complete & ring is closed.
- May
take some practice to master it.
- The
linking may be made from the back side 3.
- Most
tutorials show outward facing rings, some show inward facing rings 4.
Avoiding
the Folded Join 5
The last
ring can be linked to the first ring easily without a FJ, in a PJ movement.
- Basically
employs a PJ – either Up or Down join.
- It
entails a simple reorientation of last ring in relation to first ring before
linking.
- Is
applicable to both outward & inward facing rings.
UPDATE Sep 2018 : pictorials Part 1 ; Part 2 ; Part3
 |
| Pic 3. Avoiding a Folded Join |
Riego Join
A slightly
different way of achieving the same objective.
- Before starting last ring, required
length of thread is cut off & pulled through picots on both sides.
Thus the core thread is linked before tatting the last ring. 6
- Can be used to complete a
circle of closely tatted rings.
- Useful when tatting individual or
separate motifs or if one is running out of shuttle thread.
- The last ring is finger-tatted.
I.1.c Swirl Join
7
The name refers to the visual effect created by joining
multiple elements together.
- It
is a normal PJ
- The
join is made at the very end, while tatting the last element.
- It
is useful in linking more than 2 elements (usually rings) at a single
point, in one motion.
- A
single loop in pulled through all the picots simultaneously & shuttle
passed through.
- It
creates a swirling effect when the picots overlap in the centre. Hence
length of picots is important.
 |
| Pic 4. Nina Libin's Swirl Join & Wrap Join |
I.2
Lark's Head Picot Join (LHPJ)
It is an
“invisible join” since it forms a complete stitch within the joining picot. It
can be applied to both rings and chains.
- It creates a continuous/smooth/unbroken
chain or ring by mimicking a DS.
- The join is counted as 1DS and
usually included in the stitch count of segment before the linking occurs.
- It is an extension of the PJ
- The formation can be done in
one continuous motion by pulling a single loop through picot & arranging
it like a lark’s head before passing SH1 through it. Thus the DS is ‘pre-shaped’
& snugged together in correct order. 8
- Alternatively, the formation
can be split into 2 motions : each hs is formed separately by pulling a
loop through the picot once for fhs & again for shs. Each loop is
twisted in a certain direction before passing SH1 through it. Each hs is
snugged before starting the next. 9
- Useful for smooth visual
effect.
- It creates a blipless join when
working with 2 colours.
- Can also be used in SR (to be
discussed in Part II).
 |
| Pic 5. Lark's Head Picot Join |
********************************
Footnotes & Tutorials
(Part I) :
The movement is similar to
interlocked rings where instead of posting shuttle through previous ring, we
are posting cut thread through joining picots.
For a
collection of great tutorials on a range of joins, please visit :
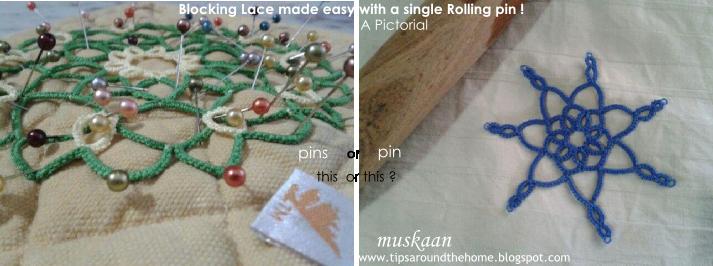

 Dunk in water till core thread is wet. Adjust with fingers. Then roll over it. I like to
place the item wrong-side up, in contact with the rolling pin. Rolling the
pin just 2-3 times over the lace, with even pressure, is sufficient to remove
excess water.
Dunk in water till core thread is wet. Adjust with fingers. Then roll over it. I like to
place the item wrong-side up, in contact with the rolling pin. Rolling the
pin just 2-3 times over the lace, with even pressure, is sufficient to remove
excess water. After excess water is removed, place over/under dry towel & gently roll again. (the water mark can be seen on the right in above pic)

 TADA !


