
There are some lovely doilies in Endrucks' book, all worked in one pass. What I find, though, is that unlike her straight lace patterns, the circular doilies tend to either ruffle or cup, and some tweaking of count is required. I think it is a matter of individual tatting tension?


Above I have traced the 'modern' path of climbing out of rounds (in blue). For this to work smoothly, I had to work a couple of rounds counterclockwise. The orange path shows how Frau Endrucks moved to the next round - simply add another chain(s) till you reach the point where you can climb out!
UPDATE: I have coined the term 'SHADOW CHAIN' for this extra chain(s) used to climb out to the next round, row, or motif, thus enabling continuous tatting.

UPDATE: Pattern for this doily is uploaded, showing both methods of climbing out - https://drive.google.com/file/d/1vG2g0JCVsy8cy2DfGKHEhxleq_7Rveba/view

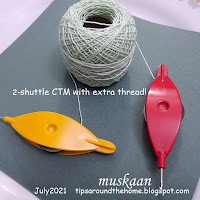 Since the first few rounds can be worked off a shuttle and ball, I used my earlier tip about extending the thread between 2 shuttles. All the extra thread in left pic was wound on to the ball temporarily, till it got used up and the 2nd shuttle was needed.
 I am busy with pattern #17, hence this pattern pdf will have to wait a bit. However, for those who'd like to try it right away, you can find the written instructions and tips by Georgia here.


Of course, one can simply keep shuttle 1 and ball thread continuous and tat till the 2nd shuttle is needed. At that point, pull out the length required, cut from ball, and wind up shuttle2.
 There was a lot of ruffling in the green model, despite adding a few stitches to a later round. So I started another in tinted Anchor size 20, with modified stitch count. Worked beautifully and lay flat. The 3rd round does ruffle till the 4th round is added, but this is a structural problem.

Ran out of thread after 5 rounds, hence added a bold violet shade to add a spot of colour. I kinda like it - what do you think?

This is Pattern #28 from Schiffchen-Spitzen 1920 by Eleonore Endrucks-Leichtenstern. You can find all the links in the Endrucks 1920 Project doc here along with all other patterns in modern format. We are hoping to have all of Endrucks' patterns in modern format by this November - a year from when we started.
I like the multicolour version best, shows off the design so well. Yes, I think tension is a neglected aspect of tatting, considering it makes such a difference to the final product. I suspect patterns should involve a tension square, as knitting patterns do. Especially considering how time consuming tatting is. Disappointing to find that the motif cups or ruffles after hours of work.
ReplyDeleteI love your idea of a tension square, Jane 😍 I had a couple of ideas along similar lines, but didn't follow up. And at least knitting and crochet are easy to unravel, unlike tatting 😅
DeleteThough I seldom unravel my tension square.
DeleteHahaha, now why would you want to, Jane? 😜 I meant tatting in general🥰
DeleteBardzo lubię takie kolorowe serwetki.
ReplyDeleteThank you, Elžusia 😍 If you want the modified stitch count, I will put the pdf link in a few weeks time.
DeleteI love the colours of that one with flowers popping out from the round.
ReplyDeleteI agree with Jane that tension is an issue, I remember my experience with the squares for Brussels, Weldon's Square (1911) taught me a lot.
I am learning a lot with this humongous project, too, Ninetta ... it's like getting into the head of a designer! Doing multiple projects by a designer, instead of only one, can be quite revealing. 😍🤩
DeleteThey all look wonderful!!! :)
ReplyDeleteI enjoyed tatting them all, Sue 😍🤩
DeleteI suspect that tatting tension - especially in chains and really LARGE rings - was looser almost 100 years ago. I've found in many of my 'vintage' books - even 50 or 60 years ago - the tension was very different from mine. Sometimes I try to adjust my tension to match my guess of what 'theirs' was, sometimes I change the DS count. On some of the really LONG chains, I often use half-double-double stitch to give super-long chains (or gigantic rings) a bit more 'body' so it/they doesn't/don't ruffle and twist when I try to close them. It involves some experimenting, but the end result is (usually) what I hope for it to be. :)
ReplyDeleteStephanieW
Love your patience and dedication, Stephanie, it is always inspiring and makes us want to do even better 😍🤩
DeleteBut this also underlines the importance of including the photo of a tatted model of and with the pattern. The pic gives us an idea of where we might need an intervention. 💝
Your study of tension in this pattern, along with your color version, led to a lively discussion in our tatting group. Our group has members that use a variety of motions to make the DS and a needle tatter. I was sorely tempted to record the Zoom session, but didn't want to stop the exchange of ideas!
ReplyDeleteThank you!!!!!!!!!!!
This is great, Mel!!! I hope you blog about some of the observations and experiences for all of us to enjoy 😍💗🤩
DeleteFun with those extra transition chains. They do not interfere with the pattern. It would be good to learn to get rid of the requirement of a regular pattern. You have beautiful colors in all versions.
ReplyDeleteSo true, Marja!!! We are probably getting too particular about 'perfection' and symmetry 😁😍💗
Delete