Yup,
I treMble in fear of how Ninetta will react to my crochet reference. But I get
ahead of myself ....
First,
a lovely triangular motif with both tatting stitches – the old ds and new tds.
Ninetta
sent me a pic of her new treble triangle and I helped in writing the pattern.
There
are 3 rounds worked continuously in one pass. However I used different colours
in each round to make it easier to demarcate stitches and counts.
I
had to pause when joining a treble to an earlier element. After a couple of
tries, I figured it out. I’m not sure if it is the right way, though it came
out fine. I will share it in my next post where I dissect this new tatting
stitch.
Ninetta Caruso’s
Triangular Motif
(treble tatting)
 |
| A tad over 4 cms in Anchor size 40 |
The
written instructions are for one-pass motif as in Ninetta’s model, climbing out
with split ring. Or each round can be tatted separately as seen in the 3
colours I used in my model.
Abbreviations (in order of appearance):
R
– ring ; ds – double stitch ; vsp – very small picot ; tds – treble ;
BTS
– bare thread space ; +
- picot join ; - - picot ; SR – split ring ; rw – reverse work ;
SS – switch shuttle ; TR – thrown/floating ring ; lj – lock join.
Notes :

SS – switch shuttle ; TR – thrown/floating ring ; lj – lock join.
Notes :
- Use ball and shuttle for each round is worked separately; use 2 shuttles, ctm, if working continuously.
- BTS - since tds is ‘higher’ than a ds, leave enough bare thread space between rings.
- How to make a tds video ; For all posts/info on Treble Tatting start here.
- For how to join treble to a previous element (round 1) pull up thread through both picots – the vsp for tds as well as the picot on small ring. Stepwise pictorial in next post.

ROUND 1: (moving clockwise)
R1: 1ds vsp
1ds, 8tds, 1ds. BTS
*R2: 3 +(between before last tds) 3
– 3 – 3. BTS
R3: 1ds vsp
1ds, 1tds +(R2), 7tds, 1ds. BTS]*
Repeat from * to
* once.
SR6: 3 + 3 / 3 + 3. mock picot
ROUND 2: (moving clockwise)
SR: 3 / 3,
*Ch 4 rw
R: 5+(after
2nd tds) 5 rw
Ch: 4 – 4 – 4. SS
SR: 1ds vsp 3tds 1ds / 6
+(after 4th tds) 6. SS
Ch: 4 – 4 – 4 rw
R: 5 +(after 6th tds) 5 rw
Ch: 4 rw
R: 3 + 3 SS
TR: 3 – 3 SS*
Repeat
from * to * around
Round1.
Climb
out with a split thrown ring (3/3). Mock picot.
ROUND 3: (moving counter-clockwise)
SR: 3 / 3. mock picot
R: 7 +(nearest
picot on chain) 9. rw
Ch: 2 – 4 – 4 – 2
lj(same picot) 4 – 4 rw
*R: 4 +(vsp) 4. rw
Ch: 5 rw
R: 4
+(after 1st tds) 4. rw
Ch: 5 rw
R: 4 +(after 2nd tds) 4. rw
Ch: 5 rw
R: 4 +(after 3rd tds) 4. rw
Ch: 4 – 4 lj rw
R: 7
+(picot on TR) 9. rw
Ch: 2 – 4 – 4 - 2 lj rw
R: 7 +(2nd
picot on chain) 9. rw
Ch: 2 +(previous chain) 4 – 4 – 2 lj(same picot) 4 – 4 rw*
Repeat from * to
* till end. Tie, cut and hide ends.
******************
A visual study of ds
and tds

But
while tatting this triangle more questions arose especially along design lines.
I wanted to put these observations to the test. So, choosing thick threads, I
set about trying to compare normal double stitches with treble tatting and a
few variations. I think the pictures, with notations speak for themselves.

Both
double and treble stitches are made of 2 half stitches, though constructed a
bit differently.
However,
a ds has only 2 ‘legs’ or threads on the core thread, while a treble has 3 ‘legs’
or threads around the core.
Reason - the first half of a tds is actually a normal double stitch (2 legs) at the base.
This makes the tds wider than the ds by a thread.
Moreover, a single tds, or a row of tds will start with [1ds,vsp,1ds] and end with [vsp, 1ds].
UPDATE: After further evolution, Ninetta has shown that there is no need to end with [1vsp, 1ds]. We can easily end after the 2nd part of the treble tatting stitch. Automatically a hidden picot becomes part of the structure for future joining. For all links and updates - https://ninettacaruso.blogspot.com/p/blog-page_95.html

When I showed Ninetta this pic, she shared her precision-based tip; something I had merely observed as explained in the above para.
NINETTA'S DESIGN TIP :
“... one treble takes the place of 1
and half ds, and the contour is spaced as a normal height picot, ...”
While tatting the motifs I sometimes made a mistake in joining to a tds. I had to
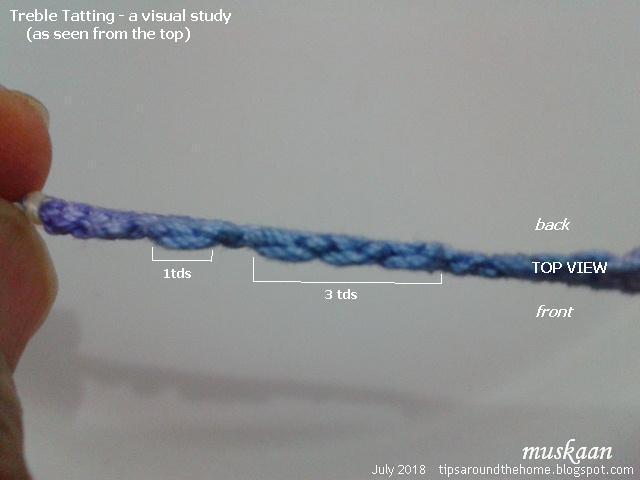
count each tds to establish which ‘picot’/space was the right one. Given my recent foray into the top view, I wondered how the treble looked from top.
The trough is one long arc while there
are 2 crests within/offsetting it !!! Wow.
In the 3tds segment in above pic, the small crest between the long trough is where the 'picot' is - where we join a future element.

Now
here’s where I go into ‘crochet’ mode and treMble to use crochet terms. But I
think it will help, so here goes.
A treble starts by pulling a loop through the vsp and again through this loop
(1 crochet chain formed). Then we pass the shuttle through this 2nd
loop and wind or wrap the shuttle thread 3 times around it before snugging
tight.
I
altered the number of loops pulled as well as the wraps made to see whether we
can create viable variations of the tds. Yes, it works. (please note that
Ninetta’s method is slightly different from the one I used here. A pictorial in
next post will show the steps better).
So,
from left to center the graduated tds –
1. like the single crochet (sc) –1 loop (no chain)
thru vsp and 1 wrap with shuttle.
2. like a double crochet (dc) – 2 loops (1 ch) and
2 wraps
3. like a treble (tr) – 2 loops (1ch) and 3 wraps
4. like a double treble (dbl-tr) – 3 loops (2ch)
and 4 wraps
This
sequence was repeated in decreasing order.
We
can see the height changing clearly, as well as the number of ‘coils’ around
the 2 halves of the treble stitch and its variations.
Please
note that this is NOT a crochet stitch as Ninetta has explained in her posts. I
have merely used it as a reference for visualization.
If all this is confusing, take a
step back and the pictorials will soon reveal all. I have actually gained a
whole lot of minute & detailed understanding even as I wrote out this post,
and am truly amazed at
Ninetta's brilliance especially the 1st half of a treble stitch! For the 2nd half of the treble, the closest similarity I could find was with her Vapor Picot.
in helping a friend, one helps oneself
Love your fantastic pictures and I so am going to get around to this, but my list get so long and with demos like this, I so move this stitch to the top :)
ReplyDeleteGlad to have motivated you, Carollyn 😇 This stitch has a Lot of potential !
DeleteI will soon post stepwise pictorials dissecting this stitch...
I can see you learn a lot by trying the technique out. Needs more concentration than I can give at the moment, but I like to read about your explorations.
ReplyDeleteThanks, Jane :-) Beauty of the internet is that once the resources are uploaded, we can choose to learn at our comfort.
DeleteWonderful explanation! I'm ear-deep in Bach etc. at the moment, but I really must explore this!
ReplyDeleteI am always awed by how you convert music to tatting, Mel! It is a fun stitch to explore, though :-)
DeleteI'm getting it! Not ready to share pictures yet, but your post has finally unlocked the concept for me! Wheeeeeeeee
DeleteI join you in the happy dance, Mel 💞👏💞🎶🎵🎼
DeleteOf course, a lot more has been done since this post, and I need to catch up as well 😆
Very beautiful motif!! :)
ReplyDeleteI did have tremendous fun tatting it in different colours, Sue !!
DeleteOkay, I've read this post twice now, and I think I understand what you're saying. The real question is, can I make my fingers and brain work together to achieve a treble? If it made you tremble, what will it do to me? ;-) I hope to find time to give this a try this weekend!
ReplyDeleteYes, it does require a bit of finger coordination, Diane, but the treble is pretty simple really, once you remember the steps. I trembled only because I was using crochet terms for a tatting stitch and wondered how Nin would take it ;-P
DeleteHope to see your trials soon
pięknie,może kiedyś spróbuję :)
ReplyDeletePozdrawiam.
Witamy, Maryla :-) Mam nadzieję, że Ci się spodoba.
DeleteDziękuję Ci
Thanks to the excellent explanation. You've seen a lot of variations that I did not know when I learned a knot like Ninetta.
ReplyDeleteExcellent explanation, thank you for sharing the pattern and explanation
ReplyDeleteBeautiful motif :)
ReplyDeleteMarja, this is quite a versatile and easily adaptable stitch and I'm sure you will come up with lots of ideas to use it :-))
ReplyDeleteI'm so glad you liked it Margaret & Anetta :-)))
Oh dear! This is something I need to study and try.
ReplyDeleteHave fun, Coretta :-)) I shared a few more insights in my latest post, along with a pictorial. One more post left to upload ...
Delete