In my
haste to upload, I missed adding some details to the pics in previous post.
These have now been notated and updated.
Continuing from previous post ….

The following are again mock rings made using the Under and Over Join. But we now have a tiny picot at the start of the chain. When the chain is joined back to this picot, it creates a mock or false ring.

1C. Under and Over Join: With joining picot; Unattached
rings

Make a small picot at the base of the chain before tatting the ‘ring’ portion.
Since the mock ring is unattached, it is easy to place
one thread above and other below the chain.


Pull up a loop
of ball thread through the picot, pass shuttle, and snug.
A simple picot join converts this chain into a mock ring. Continue tatting.
Note: Although we have made a picot join, this arrangement of joining an overlapping chain is included in under-over join.


This time the shuttle thread is below and ball thread above.
Pull a loop of ball thread down through the picot, pass shuttle and tension the join.

Two unattached mock rings made with
under-over join
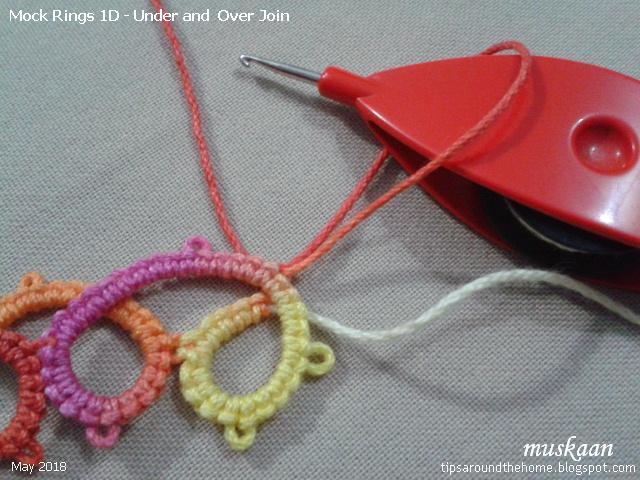
1D. Under and Over Join: With joining picot; Attached
rings


Here the ‘ring’-chain is linked to previous ring and both threads are above the chain.
Pull ball loop down through picot, pass shuttle and make the join.
This is reminiscent of the down join.

Continue tatting.

For mock ring #8 both threads are below the chain.
Pull up a loop of ball thread through picot, pass shuttle and snug the join.

Notice the change in overlap between mr7 & mr8! Continue tatting.

as seen from the back.
This above sampler, with joining picots
and overlapping chains that form loops is also known as the Running Scroll, for
it’s flowing cursive style.

 This join can also be used to
create a line of back to back rings – called a Cord of Loops. We now prefer to
work this as a split ring braid or mock rings with a flatter closure. The latter will be discussed in future posts.
This join can also be used to
create a line of back to back rings – called a Cord of Loops. We now prefer to
work this as a split ring braid or mock rings with a flatter closure. The latter will be discussed in future posts.


Observations
- In all these mock ring instances, the core thread remains free to
slide.
- They can all be worked with a ball and shuttle.
- All mock rings face the same side as the normal first and last
rings when we reverse work after first ring.
- The under and over join creates a slight overlap/layer when
crossing over, giving the mock ring a dimensional effect rather than lying
absolutely flat.
- The overlap changes depending on which type of crossover we choose.
This completes the first category
of mock/false rings using a join across a chain.
But there are so many more ways of
joining or closing a chain to create a faux ring. While I work on that
presentation, I invite you to sit back and recall all the different ways in
which you may have made mock rings. It is quite an eye-opener. Please share
your list in the comment box in case I have missed some.
Main references:
Tatting Technique & History –
Elgiva Nicholls, 1962. (running scroll & cord of loops explanation on p94, models on p96)
An Illustrated Dictionary of Tatting – Judith Connors, 2007.
An Illustrated Dictionary of Tatting – Judith Connors, 2007.
…. to be
continued
See also -https://tipsaroundthehome.blogspot.com/2018/05/mock-rings-1-under-and-over-join.html
https://tipsaroundthehome.blogspot.com/2018/06/mock-rings-2-lock-join.html
https://tipsaroundthehome.blogspot.com/2018/06/mock-rings-2-lj-mock-onion-rings.html
Thank you for explaining this mock ring further. I like MR7 and MR8, it is interesting how the orientation changes with the placement of the threads.
ReplyDeleteI can't say I'm a big fan of the Cord of Loops though... but I guess before split rings this would have been the technique used.
I don't think I have made any other types of mock rings... I can imagine one of them would be a joining down to a picot, making a chain, then joining down to the same picot.
I totally agree with you, Lavi :-) I like to give as many options as I can so that each can choose as per preference or project.
DeleteWe can now work the cord of loops much better with either split rings or going up one side and down the other (leaving a small picot on the first side). I did it for my Bonds of Love bracelet.
Lavi I'm so glad you thought of the mock ring variation. I remembered it only a few days back when I came across it in Nicholls' book.
The last post and this one are very interesting!! :) Thank you for your lessons!! ;)
ReplyDeleteSue, ... from a Dennis the Menace clip :
DeleteMom : "What did you learn in school today?"
Dennis : "Not enough. They expect me to go back tomorrow. "
Hope to see you around again ;-P Learning never ends :-D
Another interesting post, I will be back to read it and try doing this when I get back from holiday when I have time to take it all in.
ReplyDeleteEnjoy your vacation, Margaret :-)))
Delete