second of the 3 spring garland patterns ...
(the 1st can be found here)
UPDATES (April 2017) : part 3 shared here ; compete spring garland shared here ; and
Jasmine braid diagrammed pattern pdf
SpringGarland

Important Notes :
3. Keep the green thread at the back/wrong side
of the braid throughout.
Basic Pattern :
Pictorial :
Starting the first split ring .
 In order for the green segment to fold easily, leave some slack at beginning, and ....
 ... post shuttle 2 through the ring before closing it. If required, turn the green picots inwards with fingers before closing ring.
 1st jasmine bud made. Turn work as in turning the pages of a book (see next pic)
Related post : about folded rings
 TW. Start 2nd split ring. Before starting the green segment, leave bare thread space. Post shuttle. Close, lock or shuttle join to previous ring and turn work again.
 3rd split ring made and lock join being made. Ensure that the green thread stays at back of work.
 TW, and repeat ....
 Odd numbered rings (along left of braid) are worked from front. Above pic shows a close-up of the braid from front.
 Even numbered rings (along right of braid) are worked from the back. As mentioned above, these rings can be worked with backside tatting. Always remember to post shuttle.
This backside close-up shows the zig-zag of green bare thread between rings.
UPDATE (Apr 10): There was some confusion about the direction in which 3rd ring was formed, and a suggestion to add a diagram or arrows showing direction. In response, I have diagrammed the pattern, along with main instructions. This one-page pdf is a complete pattern.
(the 1st can be found here)
UPDATES (April 2017) : part 3 shared here ; compete spring garland shared here ; and
Jasmine braid diagrammed pattern pdf
Spring
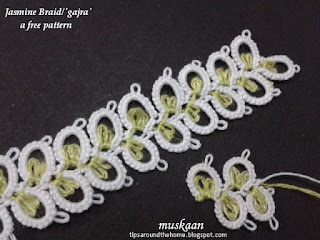
Jasmine Braid/‘Gajra’

Many Indian women love to wear a
string of fragrant flowers in their hair. The most common and refreshing ‘gajra’ is made with white mogra buds or jasmines.
This tatted version is a split
ring braid where each ring is folded inwards at the base to represent sepals.
The braid tats up straight, but can turn corners with minor adjustments (this will be shared in a later post).
The braid tats up straight, but can turn corners with minor adjustments (this will be shared in a later post).
Size 50 Anchor white. For the calyx, I
used 2 strands of Anchor embroidery thread. Besides the right shade, the 2 strands also give a fuller look.
Materials : 2 shuttles; white in shuttle 1 & sap green in
shuttle 2
Techniques : Folded split ring, long picots, very small picot, lock
join, turn work
Measurement : ½ inch wide in size 50 thread
Abbreviations :
SR
|
split ring
|
p
|
picot
|
LJ
|
lock join
|
||
ushs
|
unflipped 2nd half stitch
|
vsp
|
very small picot
|
+
|
picot join
|
||
TW
|
turn work
|
fs/bs tatting for
even rings optional
|
|||||
1. When working the next ring, do not start the
shuttle 2 stitch very close to base. Leave some bare thread space allowing the segment
to fold inward.
2. Post shuttle 2 from front to back, through the
ring, before closing it. It defines the fold and brings shuttle in position.

Basic Pattern :
Join both threads and start with shuttle 1 :
SR1:
10 p 6 vsp 2 / 2ushs (p,1)twice . TW
SR2:
10 p 6 vsp 2 / 2ushs (p,1)twice . TW
LJ to vsp of previous ring
Repeat
SR2 for desired length, following all instructions.
Optional :
fs/bs tatting: I tatted the even-numbered rings
using reverse order of stitches (RODS or backside tatting) only for the white
segment. The green segment was tatted same throughout. And I posted both shuttles through the ring before closing it.
Blocking : While the braid lies flat, I did
block it in order to pull the rings into a longish shape.
Pictorial :
Starting the first split ring .


Related post : about folded rings


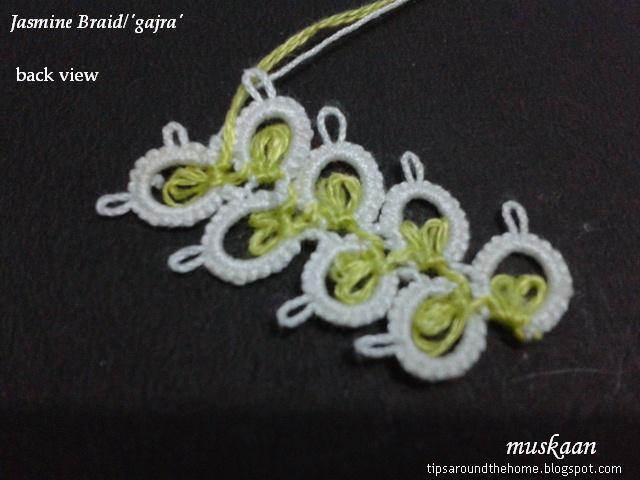
This backside close-up shows the zig-zag of green bare thread between rings.
UPDATE (Apr 10): There was some confusion about the direction in which 3rd ring was formed, and a suggestion to add a diagram or arrows showing direction. In response, I have diagrammed the pattern, along with main instructions. This one-page pdf is a complete pattern.
Click to download : Jasmine Braid pattern with diagram
Yet again, this is a basic braid
pattern and playing with beads, colours, and sizes, can broaden the scope &
effect.
Ideas for 3D :
One idea is to add a very short Josephine/spiral
chain between rings and twist the ‘buds’ around.
Another idea is to use 3D Josephine rings for buds as used here, and maybe a curled ring for calyx. I would love to give this a go sometime!
Wishing everyone a fun-filled, fragrant, fabulous
International Tatting Day 2017
(April 1)
This pattern was shared with the Online Tatting Class on April 3, 2017
Another pretty braid!
ReplyDeleteBeautiful! That's something I would enjoy tatting.
ReplyDeleteLooks great!!! :)
ReplyDeleteLovely braid I hope to try it adding it to my to do list
ReplyDeleteThis is very pretty muskaan. I'm glad you included a pictorial because I couldn't quite tell how you made this one. Clever, and very well done!
ReplyDeleteThank you so much everybody ! Love to disperse the gorgeous fragrance of these flowers :-D
ReplyDeleteRobin, it is sometimes difficult to explain in words or diagrams; so I am very happy the pictorial has done it's job.
Diane, I'll be waiting, but not with bated breath - I want to fragrance to waft in ;-P
Beautiful braid with flowers of jasmine :) Happy Tatting Day!
ReplyDeleteMakes me want to sit and tat this right now! This is beautiful!
ReplyDeleteHave a wonderful Tatting Day and a great weekend.
StephanieW
Oh such pretty flowers!!!!! Surely you there will be mogra fragrance in tatted gajra. Muskaan you made lot of efforts to explain in pictorial form. Thank you so much.
ReplyDeleteHope you all had a wonderful day of tatting, too :-)
ReplyDeleteSteph, I think this braid can be done with alternate SR & HMSR, too!
Well, Usha, I did have to tat a sampler separately for the pictorial when I realised that perhaps a simple diagram & written explanation may not bring out the nuances (and now there is a choice for every tatter!) but I enjoyed every second of it :-D
Thanks Anetta, Stephanie & Usha :-)
Lovely garland! Deceptively simple... ;-)
ReplyDeleteYou nailed it, Grace :-D But really, many Indian tatters have already made and sent me pics of their work so it might not be that difficult. I know that it is addictive for sure once you get into the rhythm - the freshness of white & sap, too !
Deleteamazing work
ReplyDelete