Tuesday, 11 June 2019

crown and sceptre

Pin It now!

I do love meandering designs! It takes some exciting moments trying to figure out the sequence, the best pathway; and then adding an additional level with directional tatting and colours. How could I not be enticed with this square that Natalia Haiduk (Наталия Гайдук) shared ?!


This time, I decided to go with single colour so as not to mess up a 2-colour placement with all that meandering going on! It is a needle-tatted pattern demonstrated in this video, and called Summer motif.
I quickly made a sketch and notated the counts. And then, as I worked, I wrote down more instructions regarding switching shuttles, reversing work, and so on. I haven’t asked for her permission to share the instructions, though. Would you be interested in the shuttle notation?


One has to tread carefully as there are rings that are left dangling for a while before being attached to a later element. I had to keep referring back to my diagram.

Love the mock ring - gives a much better shape to that crown-shaped motif. There is a slight overlapping of those large rings in the crown.

Doesn’t this square have a Victorian feel to it? Like an insignia with crowns and sceptres?! In fact the sceptre motif could so easily be an anchor!


Techniques I used: 2 shuttles - ctm, directional (fs/bs) tatting, thrown/floating ring, mock ring (with lock join to same picot), picot join to the right, lock join, common picot. 
Worked clockwise starting at one of the inner rings. 

Dimensions: In Anchor Pearl Cotton (size 8, 00134), 2½" sides and <3½" diagonally. 

There is only 1 mistake I made – the corner thrown rings are 5-5 instead of 6-6.
I also believe one can reduce a couple of stitches on the long chains leading up, or snug them even tighter. Notice how the first ones tend to curve.
I would Love to tat it again some day, perhaps in 2 colours or may be in single again, but with the little tweaks in my next.

Many many thanks, Natalia, for sharing your lovely patterns

Thursday, 6 June 2019

chipping and churning

Pin It now!
..... but chip in please.

For over a month now, on and off, I’ve been chipping at the Tatting Resources page.
It was being neglected, and also becoming disorganized what with increasing links.
Updating it seemed like a good opportunity to overhaul. Reorganising into neater compartments, more logical categories, and consistent font.


It is tedious and time-consuming. The bright spots are when I stumble on to posts with 'forgotten' tips/techniques or 'new' ones. During my search I came across plenty of interesting posts and sites (quite distracting ;-D). And this one tops them all – images of Mary Konior’s very own tatted lace, many of which are in her books. They got to actually hold the lace at Tat Days!!

Categorisation is not easy. My friend Jane McLellan readily answered my questions, clearing the path. And I now see that she has added her tips and pictorial links on the right panel of her blog. Thanks, Jane :-)))

Mind you my page is Still very much a work in progress – with loads of links still left to add. There will also come a day it will revert to draft in order to systematize the formatting before uploading again. Just thought I’d share and ask for your opinion as well as input – if you find something missing, or would like change or to add, chip in please.

Soon there will be a new page dedicated to Designing – tutorials, lessons, process, diagramming, and so on.

6 months since I asked your opinion about my posts. Time to review - do you think there has been some improvement in my presentations? I've tried to consciously reduce the text. All left-aligned now ;-D I could put fewer pics, but it is so difficult to choose! 
And sorry, Carollyn, I have too much of a backlog to leave the posts up for long ;-P 

Wednesday, 5 June 2019

back and forth

Pin It now!

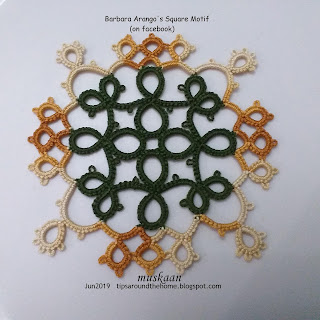
Barbara Arango spotted a bag where the fabric had tatting prints. She successfully converted the print into an actual tatting pattern – reverse-reverse engineering?!
I remember Frivolè and a couple of other bloggers have also done similar conversions.

And she generously shared a sketch of square motif pattern on facebook.

I chose colours and size to match Ninetta’s Quad 13 square which I made back in 2015. Both have a similar kind of composition in terms of tatting techniques - lots of thrown or floating rings.

I think the green kind of overpowers the tinted brown in the new motif. May be I should've made the inward facing large rings in the tinted shade to balance the colours?

TIP : It can be worked in one pass if both shuttles have the same thread. I would start with the right twin ring working clockwise and exit from the left twin ring worked as a split ring. Then continue around. Just one set of tails to hide at the end.

It is interesting how they both measure the same despite their open versus dense look. 
Both are 3” along the sides and 3¾” diagonally in Anchor 20.
Will take a pic of them together when I find Nin’s square. I liked it too much to give it away!

I enjoyed tatting this. Barbara’s are in all-white in finer threads and they look very pretty!

Many thanks to Barbara (and  Ninetta) for sharing their patterns :-)