Friday, 11 July 2014

Turn Work in Reverse Stitch

Pin It now!
Tatting Tutorial

How to Twist Work when tatting the Reverse Stitch (TwW rs)


The 6-shuttle bracelet/braid in above pic is the reason for 2 back-to-back posts. It was made by UshaKota in response to a thread started by Judith Connors on InTatters, titled : Reverse Stitch. She cleverly converted a macramé pattern into tatting (more in next post).
This little tutorial is a fore-runner to that very bracelet pattern. There is a short discussion on the Reverse Stitch & a ‘reverse’ of rs, which will be required for the bracelet.
I have followed the terms & notations subscribed in the above mentioned thread. For a  detailed & enlightening discussion, please refer to the posts in the thread.

Threads used : Anchor Mercer Crochet 4054. Size 20.
Pink : 052 in Shuttle 1 (Sh1)
Aqua Blue : 0185 in Shuttle 2 (Sh2)
(2 colors are used only to show clear comparison)
Please excuse the poor quality of some of the images – despite repeated efforts, some of them just did not want to come out right ! Also, in a couple of images the chain segments may appear confusing; however, when viewed in sequence, along with the text/instructions, it should be clear.

Abbreviations used :
Sh – shuttle
ds – double stitch
rs / RS – Reverse Stitch
FHS – 1st half stitch
SHS – 2nd half stitch
UFHS – Unflipped FHS
USHS – Unflipped SHS
TwW – Twist Work  (not to be confused with RW – Reverse Work, or TW - Turn Work )
SR -- Split Ring

There already exist very good tutorials & demos for ds & RS. The only reason I have included some instructions & images in this post, is for immediate comparison on same page, without having to hunt for them or refer back & forth. I have also included a table to compare the ds, rs & turn work in rs.

I. Double Stitch (ds) :

core thread green (Sh2) , working thread pink (Sh1).

Every tatter has done a ds ! 
Fig 1 simply shows a chain of 5 ds (pink) worked on a green core thread.


II. Reverse Stitch (rs or RS):

core thread pink (Sh1), working thread green (Sh2).

And then, there is the rs – kind of like the opposite of a ds. In Reverse stitch, each half of a ds is Unflipped.
Those familiar with Split Rings know that the 2nd half of the ring is done in RS, & is sometimes called the Split Ring Technique. However, rs is not limited to only split rings.
This is a very useful technique, requiring 2 shuttles for convenience. 
For comparison between ds & rs, refer to table at end. 

The following images show how an rs is made :


Fig. 2A . Using pink as core thread, make 1st half of rs (also called a hitch since it is unflipped) ie. USHS with green. Keep the core Sh1 thread taut while working the hitches.
In rs, since the half stitches are not flipped, the order is reversed 
Fig 2B shows the 2nd half of rs - UFHS being made.
TIP : The only thing to keep in mind while working a rs, whether for a SR or any other application, is to keep the core thread taut at All times. This will easily ensure that the stitch being made Never Flips.


Fig 2C shows 1 rs completed.  And Fig 2D shows 5 rs made.
Notice the switch in colors & direction of caps with respect to the ds.

TIP : If one is working chains, you get a Z or zigzag chain if you alternate ds with rs, as is clearly visible in Fig 2D. 
This stitch is also used in encapsulation. 
I often use rs to change direction in freeform tatting. 
There are lots of other variations, possibilities & applications, which is not the purpose of this post.

Coming to the main purpose …

III. Twist Work in Reverse Stitch (TwW) :
core thread pink (Sh1), working thread green (Sh2).
Update : I was hesitant to introduce a new term in tatting where there is already abundant multiplicity of terms. Hence I had gone with 'TW in rs or Turn Work in rs". However, Judith has since suggested "Twist Work or Twist rs" since
a) it involves more than a mere turning of page as in TW ;
b) the term TW already exists & can become confusing; &
c) it involves a full 180 degree turn/twist. I have adopted this term, & altered the text. 
The pictures, unfortunately still show Turn Work in rs & it will require major effort to alter the notations in each one. Please note the change, however.


Those familiar with TW (turn work) in normal ds tatting, will find this easier to understand. The basic concept, technique & objective is the Same. Just as one would turn work (as turning a page) in usual tatting, similarly one can twist work in rs, at a full 180O
                                                  

Twist Work in rs (TwW rs) : step 1
The next images show how one can ‘twist’ a rs. ….
Fig 3A. Take the working Sh2 (green), & pass it below/under the core Sh1 pink thread, as indicated by arrow. It is important to keep this thread-space in a tight pinch while continuing with the next 2 steps (ie. till 1 rs is made), otherwise it has a tendency to revert to former state.
Secondly, this little thread space that is passed under should not be pulled too tight, otherwise the entire work will simply get back to the original position.


Twist Work in rs (TwW rs) : step2 - start hitch

Figs 3B,C,D.  show the steps to complete the 1st reverse stitch after turn.

Fig 3B : Keeping the TW thread-space in a pinch, make an over-under loop in order to start the USHS


Twist Work in rs (TwW rs) : step3 - 1st hitch being made


& pass shuttle through this loop & snug. (Fig 3C)
1st hitch or USHS of Turned rs made (seen in next image, after snugging).


Twist Work in rs (TwW rs) : step4 - 2nd hitch being formed


Fig 3D : Make the under-over wrap for UFHS ie, the second half of the rs, pass shuttle through, and snug.


Twist Work in rs (TwW rs) : 1rs made after TwW !


Fig 3E: 1 Twisted rs (TwRS) made. 
Notice that
the core thread remains pink & hidden ;
the stitches are in green ;
the caps of the green stitches face in the opposite direction to the previous 5 green stitches. i.e., they now face the same way as the 1st 5 ds But these are RSs in green color from Sh2 !
Also, since the TwW thread was passed Under the core thread, it is NOT visible at all.


Figs3F & 3G show a 2nd rs being made after TwW.

Chain of 5ds, 5rs, TwW, 5rs

Fig 3H shows 5 rs completed.
This is all there is to it !
If you have done TW or turn work while working with ds, this is just the same, except that one is making reverse stitches instead of normal double stitches ! Simply twist work & continue with rs chain (or ring as in folded rings!).

This is just one of the ways to hold & work twisted rs. And it was the easiest to photograph ;-) 
It is an attempt to demonstrate the principle / technique & like all things tatting, each tatter can use their own way of doing it. 
eg. one can actually 'turn' the core thread, along with the previous work tatting, & work the rs just as one normally would. In that case, the previously made rs caps would be turned upward for a short span, till the TwW rs chain is completed, then revert back to original position.


                                           Comparison of ds, rs, TwW rs


1st Half St

2nd Half St

Cap facing

Core thread
(hidden)

Working
Thread (visible)


  ds
chain

under-over
wrap/loop ;
flipped ;
FHS


over-under
wrap ;
flipped ;
SHS

Up

Sh 2

Sh1

  rs
chain
over-under
wrap ;
unflipped ;
USHS

under-over
wrap/loop ;
unflipped ;
UFHS
Down
Sh1
Sh2

TwW 
in rs


”

”

Up

Sh1

Sh2


A final word :

This (or a similar) technique was used by Usha for the specific objective of changing direction of rs while weaving the bracelet.
However, as I became more & more familiar, through tatting & then while writing out the post, I kind of see an immense potential for easing tatting. It may actually eliminate the SLT (shoe lace trick) which is used when switching shuttle positions in 2-color tatting. Hence this detailed tutorial in a post all by itself.
One can continue working in any direction, in any color as need arises, and tat any element, even though there are 2 different colors in the shuttles !

It is very much possible that this is not something new; may be FS/BS tatters already use this technique. My only excuse, then, is that for Me it is a journey of discovery & sharing. And just as I am learning from the challenges & information passed on by our superior & more experienced tatters, I hope someday some newbie will benefit from my shared experiences.

Happy tatting & stay tuned for the actual bracelet pattern in next post :-)

Update : Here's the mac-tatted braid/bracelet pattern 

June 20, 2017 : Twist Work in Reverse Stitch is also how we wrap stitches in Daisy Picot !


Saturday, 28 June 2014

Interlaced Rings - II

Pin It now!
Tatting Tutorial
Part 2 : Under & Over Rings : Back to Front Shuttle Movement


Interlaced Rings make such an elegant braid, using 4 shuttles ! Judith Connors shared her beautiful braid on InTatters in a thread titled “Reverse Stitch”, which I have elaborated on in my previous post on Front to Back movement.
In a gist,
The overlap of rings depends on the movement of the 3rd shuttle. If it is passed front to back, then the 2nd ring (on right side of braid) will lie over & under the 1st ring.
If the 3rd shuttle is passed from back to front, the 2nd ring will lie under & over the 1st ring.

This post is a continuation from the previous one. Here I share how I did the Under & Over overlap of rings, by moving the shuttle back to front.

Common Details :

Thread used : Anchor Mercer Cotton size 20.
Lemon Yellow – 4054-0293  &  Mehandi Green – 4054-0256
Length of braid : 13 pair repeats = 5 inches.
It took less than half a bobbin of each shuttle to tat this length. So fully wound shuttles should give you a length of anywhere from 12-15 inches.
Abbreviations used :
CTM – continuous thread method
Sh – shuttle. Each shuttle is numbered from 1 to 4 : Sh1, Sh2 form one pair ; Sh3 & Sh4 form 2nd pair.
SR – Split Ring
RS – Reverse stitch (used in some pictures to indicate 2nd half of split ring stitches)
DNCR – Do not close ring.

Directions :
Start with 4 shuttles & wind threads :
1st pair - Sh1 & Sh2 : Wind yellow thread CTM
2nd pair – Sh3 & Sh4 : Wind green thread CTM
Each Split Ring : 9/9

A Short Note :

Please disregard the 1st pair of rings as seen in Figure 1 below. This was done front to back (tutorial in previous post) as per the photo that Judith had posted. This pair will, however, serve as an immediate comparison for outcome of the two directional movements of Sh3 : front to back & back to front. Notice how in the 1st pair, the green ring goes over & under the yellow ring . However, for back to front movement, the green ring goes under & over the yellow ring !
Update :  Here is the detailed step-by-step tutorial for how to begin the 1st pair of interlaced rings.

Secondly, many images do not show the shuttle 1 thread clearly; it is outside the frame of the picture on the left side. Mea culpa. I wanted to focus more on the green ring being made for a clear visual of Sh3 thread in relation to others. If you have gone through the Front to Back tutorial &/or tried it yourself, you will have got the hang of it already.

                                                     
BACK TO FRONT 
INTERLACED  RINGS

   
1. Make Split ring (9/9) with 1st pair of shuttles (Sh1 & Sh2) in yellow thread, but Do Not Close Ring (DNCR) !
It is through this unclosed loop that the adjoining SR will be interlaced.


2. Pass Sh3 through the unclosed yellow ring from back to front. Fig 1.


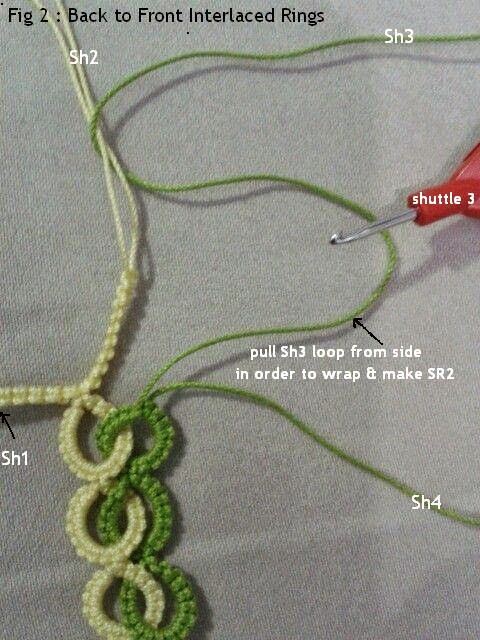
3. Insert your index finger between the right side of SR1 (yellow ring) & the Sh3 (green) thread. Pull a length of the Sh3 thread from the outside. (The shuttle hook points to which thread needs to be pulled in Fig 2.) This loop will be wrapped in order to start the green ring. Wrap & hold the thread in a pinch to form the core thread of the new ring with Sh3.

UPDATE :  See how to pick up and wrap the loop around the hand to start tatting this ring in this pictorial.


4. Make 9ds with Sh3 – 1st half of SR2 completed.  Fig 3.


5. 2nd half of SR2 (9ds or RS) are completed using Sh4. Fig 4.
Please Note : Needle points to how the SR2 loop & Sh4 thread are on one side (above or on top of) the yellow SR1 ring, while Sh3 thread is on the opposite side viz. under SR1 yellow ring.
If rings are closed at this stage, Sh3 & Sh4 threads will not be adjacent to each other & will mar the next green SR. Hence they need to be on the same side viz., on top. This is accomplished in next step.


6. Pass Sh3 back to front a second time in order to bring all components of SR2 in line/on same side, adjacent to each other. This is an important step as explained above. Fig 5.


7. Now that everything is aligned, start closing the rings. 
Figs 6 & 7.


(While notating the images, I noticed that Sh3 thread seems to be emerging from within SR2. This could be due to a bad photography angle or an inadvertent mistake. 
However, so as to avoid all confusion, for this step,  simply close the SR2 as you would Normally do with any ring.)


8. Both rings are closed & all 4 shuttles are now ready to start the next pair of rings. Fig 8.


Continue in similar fashion, starting with SR1, for as long as you would like the braid.


A Variation

Judith, in the 'Reverse Stitch' thread, has spelled out her variation, where the back to front movement is done twice together Before making SR2 (unlike mine where I pass it once, make SR2, then pass it back to front a second time)  :
* Take #1-B shuttle through the opening from back to front (twice) to form the wrap for the B split ring.
* Tat the B ring.
* Close both rings A and B.
* Tat a second ring with pair A, but leave it open slightly.
* Take the #1-B thread behind this ring and pass it back to front through the A ring (twice) to tat the B split ring.
* Close both split rings.
(Note: here #1-B refers to Sh3; B ring is SR2;  & A ring is SR1)


If you follow my instructions above, then Judith's method requires the Sh3 movement in Step #2; and Step #6 can be skipped since it has already been incorporated in Step #2.
Hence, the logic & basic technique is similar. Only the timing of Sh3 movement differs.
Yet I could not get it right, try as I might. I just could not figure out which loop to pull & how to wrap it in order to make SR2 !!!
Sometimes a mental block prevents us from accomplishing a task; but at a future date, this same daunting task comes almost naturally, like ‘what was the big deal’! So patience. Maybe an excuse for a 3rd pictorial post in the making when that happens ?!

My hearty thanks to Judith Connors, for this wonderful learning opportunity.


That's it for the present.
I continued on to make 1+9+3 pairs of interlaced rings (where only the 9 centre rings were done Back to Front) & since I was running out of thread in one of the shuttles, I closed off with an encapsulated cord, hiding the 4 shuttle threads. I used alternating ds & RS to encapsulate 3 threads at a time.  

Check out the TIPS on working with 4 shuttles & applications of the braid.

UPDATE : Patterns using interlaced rings have also been uploaded in 2020. Click to see all posts with interlaced rings.


Happy Tatting :-))

Thursday, 26 June 2014

Interlaced Rings - I

Pin It now!
Tatting Tutorial
Part 1 : Over & Under Rings : Front to Back Shuttle Movement


Judith Connors shared a beautiful Interlaced Rings Braid in a thread she had started on InTatters : Reverse Stitch.
The photograph revealed a braid consisting of 2 columns of  interlinked split rings.
All She revealed was that it was made using 4 shuttles ! Yup, that was our only clue .

I have been trying out Interlocking Rings using shuttles . So I jumped right in, in order to assess how much I had learned, how much I could apply, how much I could transfer, … 
I did not refer to any tutorial this time ( a self-imposed challenge).

What started out as personal memory aid to refer back to in future, has now been converted into a tutorial that I'd like to share with you in the hopes that it may help some new tatters. If there are already some tutorials out there, I’d be happy to include the link(s) in my Resources page. Please leave a comment with any details you may have. 


A Brief Note :
Firstly, when asked about designer & credits, Judith wrote : “They were illustrated in four colours (one for each shuttle) in the mid-1990s in an IOLI Bulletin. It is an advanced braid which anyone could devise, so there is really no designer to credit.”

Secondly, there are 2 ways the rings can overlap:
Each ring in Column 2 can go over & under the corresponding ring in Column 1 (Front to Back movement of shuttle #3).
Or,
Each ring in Column 2 can go under & over the corresponding ring in Column 1 (Back to Front movement of shuttle #3).

Thirdly, the major part of the tatting process remains the same; it is only while interlacing, that either of the 2 movements mentioned above, come into the picture. And this one step determines how the rings will lie in relation to each other.
And there is no right or wrong side in the braid; it is reversible – the relative overlap direction remains the same from both views. (Compare Figs. 7 & 8 below)

To avoid confusion, I am posting the tutorial in 2 parts, each part tackling one overlap direction.

Common Details :
Thread used : Anchor Mercer Cotton size 20.
Lemon Yellow – 4054-0293  &  Mehandi Green – 4054-0256
Length of braid : 13 pair repeats = 5 inches.
It took less than half a bobbin of each shuttle to tat this length. So fully wound shuttles should give you a length of anywhere from 12-15 inches.
Abbreviations used :
CTM – continuous thread method
Sh – shuttle. Each shuttle is numbered from 1 to 4 : Sh1, Sh2 form one pair ; Sh3 & Sh4 form 2nd pair.
SR – Split Ring
RS – Reverse stitch (used in some pictures to indicate 2nd half of split ring stitches)
DNCR – Do not close ring.

Directions/Preparations :
Start with 4 shuttles & wind threads :
1st pair - Sh1 & Sh2 : Wind yellow thread CTM
2nd pair – Sh3 & Sh4 : Wind green thread CTM
Each Split Ring : 9/9
                                                     
FRONT  TO  BACK 
INTERLACED  RINGS 
Update : Step-by-step tutorial on how to make the 1st pair of Interlaced rings is here.


1. Make Split Ring (9/9) with 1st pair of shuttles (Sh1 & Sh2) in yellow thread, but Do Not Close Ring (DNCR) !
It is through this unclosed loop that the adjoining SR will be interlaced.


2. Pass Sh3 through the unclosed yellow ring from front to back. Fig. 1.


3. Wrap this Sh3 thread to start the green split ring & tat SR2. Figs 2, 3, & 4 show the SR2 being completed. 

UPDATE :  See how to pick up and wrap the loop around the hand to start tatting this ring in this pictorial.


4. Both rings now have their complete count of ds, but before starting to close, Pass the Sh3 through SR1 from front to back again !  Fig. 5 
This is an important step as explained & shown at the end *


5. Now close both rings. Pull on Sh 1 to close SR1, the yellow ring; and pull on Sh3 to close SR2, the green ring.  Figs 6 & 7.


Fig. 7 : Notice that both pairs of shuttle threads are in opposite directions from each other : both the yellow threads are in front (above), while both the green threads are at the back (behind).


Continue in similar fashion, starting with SR1, for as long as you would like the braid. 


*  Step #4 : This is an important step because you want both Sh3 & Sh4 threads to lay side by side together. If one forgets to pass the shuttle a second time, then the Sh3 & Sh4 threads will lie in opposite directions, as seen in image below, & will interfere when making the next green SR. (I made this mistake on my very first attempt & had to unwind Sh3, manually pull that long thread through the ring front to back, & then rewind again).


TIPS : Working with 4 shuttles 
Working with 4 shuttles can be quite fiddly with tangled threads to track !
I find that laying the 3 unused shuttles in proper sequence, on a flat surface such as table top or bed, keeps the threads untangled & also helps maintain even tension while working. Simply pull out a comfortable length of thread from the 3 ‘non-working’ shuttles so that they lie separately on the table, without getting in the way of tatting.
Judith has another useful tip : To save the shuttles tangling, use a piece of BlueTak (modelling clay) to stick the unused shuttles together. Then swap it over as you change shuttles.


TIPS : Applications of Interlaced Rings Braid
There are loads of possibilities for Interlaced Split Rings.
* Edgings, Bracelets, Braids, etc.
* Use single color, 2 colors, 3 colors, 4 colors for variety
* Placement of colors can alter the look & focus of the pattern. eg. Sh1 & Sh4 with same color while the 2 center shuttles are of a different color. Thus one will have overlap in centre, and a kind of outline at the sides, all along the length.
* Add picots, thrown rings, Josephine knots/rings, etc. etc. to make it more interesting.
* Add beads along the edges or in the center !

These are only a few that come to my mind.  
What would You Creative Tatters do ?
Love to read your ideas & see your projects :-))


Part 2 of tutorial has been posted : Back to Front movement for Under & Over Interlaced Rings