Tatting over tails is a common method of hiding ends when we
start a project or when we add new thread.
Continuing from the previous post where stepwise and
comparative visuals demonstrated where to leave off the tail when hiding it
within double stitches.
Part 2 demonstrates the same principle but in case of
directional tatting, when we are working stitches from backside – where half
stitches are in reverse order or sequence.
Since tail was hidden in a ring in Part 1, this time we
show it on a chain.
RW – reverse work
DS – double stitch ;
FHS – first half stitch ;
SHS – second half stitch.
RODS – reverse order DS, where sequence of half stitches
is reversed.
Tatting over Tails
Part 2 - backside
This time I chose to tat a chain, working from the
backside with RODS (reverse order of stitch). Here, SHS is made first, then FHS
1RODS = (1SHS,1FHS)
1RODS = (1SHS,1FHS)
RW after ring made previously. We are now working from the
back/wrong side.
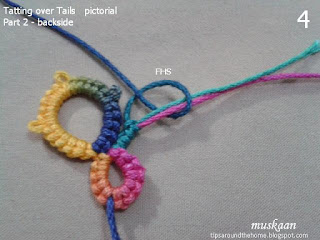
1. Joining new thread (green/blue).
2. Start chain. 2 stitches (RODS) already made,
encapsulating the tail.
Starting the 3rd stitch with a SHS.
Notice the position of tail – it lies to the ‘front’ of
the stitch being formed.
3. SHS snugged
4. FHS being made. Notice position of tail – it tends to
lie ‘behind’ the half stitch
5. FHS snugged.
3 RODS completed
6. Continue till 4 RODS and 1 SHS made. Then leave tail
and tat 1FHS normally.
7. Continue chain - more stitches made after leaving the
tail
This is how it looks from the backside of work
8. View from the frontside of work
9. Snip the extra tail lengths as close to work as
possible. Arrows show where each tail was snipped
NOTE : It is advisable to defer this
step till a few more elements have been worked. Then pull the tails one last
time and snip.
10. Tatting over tails frontside for ring and backside for
chain, and leaving the tail in middle of a stitch, completed.
So, here is the simple mantra to remember ...
the middle path mantra
leave tail in the middle of a
stitch !
Stop tatting over tail between 1st & 2nd
half stitch when tatting a double stitch
(frontside tatting);
Stop tatting over tail between 2nd & 1st
stitch when working a reverse order double stitch (backside tatting).
This mantra also holds true for the
reverse stitch (unflipped),
as in 2nd side of a split ring or direct
tatting.
♡♡♡♡♡♡♡♡♡♡♡♡♡♡♡♡♡♡♡
happy tatting always J


I don't do fs/bs tatting, but this is interesting anyway. I'm interested that you cut the thread after a few more stitches. I cut the thread after the half stitch and then make sure the next half covers over the end.
ReplyDeleteI do what Jane does a above and some times I pull the stitches down towards the start with extra tention snip and then loosen tention so that snippet is covered completely inside.
ReplyDeleteI cut off any threads when I have finished the round or motif.
ReplyDeleteLike Jane, I don't do FS/BS tatting but I do tat over tails and join thread similar to the way you do it. I do the middle path sometimes. I must admit I am not consistent where I stop hiding. Thanks again for a great post.
ReplyDeleteThank you so much everybody for sharing your own processes :-)
ReplyDeleteJane, I am always paranoid that the tail may slip away, hence wait till a few more elements are tatted, before I snip it off. But will give your way a try.
Ah, another good tip, Carollyn.
I also generally do the same, Margaret. In case the tatting has to join back at the exact same point later, I prefer to leave the tails hanging. Otherwise I snip them off after a couple of elements.
Tatting over tails reduces half the ends one needs to take care of later, so I'm always game, Bernice ;-D
Excellent photographs and instructions! Thanks for this great tutorial. (Pretty thread, too!)
ReplyDeleteI'm thrilled that you like it, Marilee :-)
DeleteThe thread (from a set of 5 different variegates) is excellent, but too thick for normal tatting - a size 3 probably. A sorry substitute for your hand-dyed skeins ;-D