Saturday, 30 April 2016

pin pricks for this pin chick !

Pin It now!

A bit dramatic, but fairly true.
This month’s choice for our pinterest challenge was an idea I derived 5-6 years back & have shared it many times on Yahoo!Answers back in the day. It remained a want-to-make idea till this challenge challenged me to get on and make it ! I really want to thank the pin chicks for starting this challenge – so many of my old pins are now coming to life.

After the bedroom, kitchen, & bathroom, this time it’s the turn of the dining room! This pin has been a longtime resident at my DIY Crafts board.

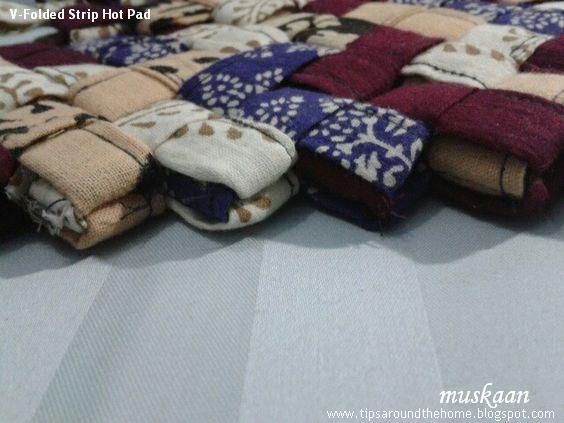
A V-FOLD STRIP HOT PAD
For the dining table

The intention had been to use up my plain rubia 2x2 cotton scraps, but those went into deep storage last year after a bout of rigorous housecleaning. Instead of pulling out the carton, I choose what scraps I had on hand. They are all cotton though of differing thickness & texture. I also got to use my new rotary cutter !
I first checked whether the dimensions in the video would work on cloth. Yes, they did! After sewing the folded strip lengthwise, 3 more folds are required. Paper holds it's folds, but had to use pins to keep the interlinked fabric pieces in place, resulting in a free-for-all pin prick contest !
Some modification & adaptation was called for….

Scraps were collected & cut & folded while machine-sewing the edge in long strings (too lazy to change threads, black/dark grey was used throughout). Forgot to take a pic of this stage.  This is fold #1 in above pic : the lengthwise fold is sewn down with machine. 

Keeping breadth same, I increased the length of each strip by ½cm, and machine-sewed the centre of the folded strip. Now all that was needed was to insert the folded strips to each other to create rows. And this time it worked splendidly; the pieces stayed in place and the short sewing line was not visible in the V-folds.
This is fold #4 in earlier pic, where the extra 1/2 cm is overlapped & sewn all through.

Strong blunt-edged Tweezers helped to pull the strips through the slots.

I chose to align the rows in a zig zag fashion rather than all rectangles facing same direction. 
Thus each alternate row faces opposite to the adjacent rows.

7 rows ; 15 strips for each row ; 105 strips in all.
2 strips create 1 slanting rectangle; the last rectangle is a single strip.
Final measurement of hot pad : approx 6” x 6½” x ¼” . Thickness depends on material used.

To Join The Rows, I chose to hand sew the thick mat. Here was another Major needle prick, with quite some bleeding. Decided to switch to the long sturdy sharp-pointed Sail needle, which worked great with due care. I’d had a vague idea of inserting wooden beads at the intersection points to both sew in the rows, as well as add interest. But it was a non-starter.
I used a combo of hem, whip, and running stitches, passing the needle through the middle folds/layers. 
After every 4-5 stitches, pull the thread (double thread used) taut to tension & hide the stitches; 
then make a kind of back stitch to secure them in place.
All this hand sewing was done from the back side.
I left the end strips to be sewn in last, since the single strips required sewing the flaps together too. For this, a normal needle was used (both needles shown in pic for comparison) and some sewing had to be done from front side as well.
My initial idea of basting a linen cloth base was not required. This pic is  the front view.
This mat is thick & sturdy enough and can be used from both sides. Above is the back view.
One corner of the single strip (top or bottom corner in above pic) can be left open to be 
used as a slot for hanging.
The pics are taken fresh off the needles, with no time to iron. 
However, it lays flat and compact.

This is a fun & playful stash-buster project (except for the hand-sewing)! Remember making these V fold garlands, buntings, bracelets at school ? Here’s another pictorial I found on how to make paper bracelets

There are many steps where I wanted to or could’ve made it prettier.
Eg. use matching thread for sewing (which meant straining my vision & time-guzzler) ;
hide the black sewing line (which meant trips to the ironing board) ;
make parallel sewing lines (meaning more work) ;
hiding the raw edges of the fold more neatly while sewing (too fidgety on the machine) ;

In the toss-up, practical reasoning won in this first attempt. It looks pretty enough & very functional in reality, & my DH liked it ! Each time he’d ask whether I was done sewing (the sewing room becomes a mess when I take up a sewing project & therefore try to combine multiple sewing projects adding to the mess) & what was I sewing … for all that 3rd degree, he could only extract an impish smile from me ;-D . I didn’t want him to prejudge (he is Not a labour-intensive person!). But the hot pad has been passed with flying colours – soon I will hunt out my old scrap stash & change all the store-bought hot pads - I want a woven one too ! 
Unless you insist on distracting me ;-P

Speaking of distractions, check out what the other talented pin chicks have hatched !!!
Margaret , Suzanne & Carollyn have already posted their challenges; Imoshen’s is an ongoing process this month, with 2 posts already uploaded. But I’m not telling – you’ll have to click on the respective names for an eye-candy tour :-)
I’m the last to post this month - you gals keep me on pins & needles ;-P


Happy pinning & join us anytime you wish
(all you need is to contact Suzanne)


Wednesday, 27 April 2016

trials and tribulations

Pin It now!

WARNING : Dear seekers of beauty & tatting purists, peruse at own risk. The blogger takes no responsibility for hurt eyes & sentiments.

My tatting is not always up to the mark. But even I am ashamed to show these pictures in public. Yet it is all part of the learning process, and each step helps as we comprehend & practice a new technique.


These are Ninetta’s latest Alternate Method of Curling Rings, especially small rings. I had the good fortune of getting first peek into her brilliant tatting brain. However, when Georgia announced the class for April 25, I scrambled to try them all out during the weekend. This time, curling the small rings were a bit tougher than when I did the Curled Rings series. Curling itself is easy. It’s just that I could not always get them to face in the right direction :-( . So I stopped jotting down notes & focused on the why & why not. You can see all the failed as well as successful attempts interspersed throughout the chains.

Trial 1: My first mistake was to try to tat the chains from frontside going in clockwise direction, thus keeping the curled rings in front.
In clockwise direction : 1st chain has the FR & CR,
2nd  chain - half moon curls,
3rd chain - heart curls ,
4th chain - button curls
Some ‘succeeded’ in wrong direction, some failed, some simply twisted around & curled over the chain refusing to budge !!!
Lesson – apply scientific method and change only one factor at a time. Also, use a size 10 thread when learning (Thanks, Mel)!

Trial 2 : Much better , yet many were still ashamed to face me ;-p. Ninetta came to the rescue & sent me this video and Then it Finally clicked !!! An Important point, which is clear in the stepwise tutorial pics, but didn’t register in my dense brain : turn the small ring at an angle of 180° before pulling the encapsulated thread to curl !!! The curling picot/space in the small ring should face down. Now I get it ! I was more focused on the instructions & not enough on the pics.
Lesson – read & look, look, look, and follow !!! That is what pictures are there for.  

Small Curled Rings (sCR) on Ring
Besides sCR on a chain, there are numerous ways to curl small rings on/through/over rings ! These are also included in the same pdf.
These Curled Onion Rings were made way back when Ninetta sent me her very first draft. I was very happy with the way the second one turned out.

Now I felt confident enough to tackle her beautiful bracelets, which incorporate many of curling effects of small rings.
I opted to do all 4 in one continuous braid, with about 4 repeats each.
Anchor size 20 thread used (SH1- brown; SH2- cream) & wooden beads.

1. Version with balanced sCR
I reduced the stitch count here, to better enclose the bead. But more practice needed. Ninetta shared this video in class.

2. Version with unbalanced sCR
I like this pattern the best.

3. Version with sCR over a chain
The second  brown chain & sCR turned/twisted for some reason ; the cream ones came out fine. But I should've reduced the stitchcount for chains.

4. Version with CR
First ring came out wrong. Thought & thought, then pulled a down loop through the CR from below the split ring to curl it. It worked (this was my AHA moment). But Ninetta demonstrates a better method of pulling the to-be-curled ring through the split ring and then securing it with a picot join.


I still have a lot of practice to do on these whimsical curls, but am more confident now. This exercise & interaction, and then the videos, also taught me how a set of instructions &/or format can be read/understood/perceived differently by individual tatters because each of us has a different way of tatting – slight nuances in ways of holding, making the formations, tensioning, and myriad other details. What seems ‘easy’ to a writer or designer may be very difficult to a reader. I will no longer call any of my patterns or tutorials ‘easy’. Major lesson learned.

UPDATE : All videos have been uploaded to Georgia Seitz's Online Advanced Class videos

Many thanks, Ninetta, for sharing your immense talent . 
Hopefully goofs in my trials will be rectified in future :-)
*************************************

Practice Doodle – What technique ?!
And to end on another note of whimsy – here’s a doodle I made a year back while learning another new technique. Using 2 shuttles, I went where my shuttles took me. Can you guess which technique I was practicing (there is a ‘tell’ if you look closely)? Can you trace the path ? 
And a lucky coincidence - in the left Ninetta’s Quad 13 I made just before.


happy tatting and curling :-))


Related posts : What are Curled Rings

Friday, 22 April 2016

keeping it clean

Pin It now!

This post starts off with Round 4 of Renulek’s current tat-along and
lists a few ways to keep our large projects & works-in-progress (WIPs) clean till they are completed.  

Renulek’s Wiosna 2016
There’s nothing much to share at this stage. But if one is looking for options, here’s how I am doing it :
I climbed out of Round 3 with a split chain.
Round 4 can be tatted with a single shuttle and ball, although I already had 2 shuttles. I am tatting it in clockwise direction.
Continued from the split chain with Direct tatting (reverse/unflipped stitch), to make the connecting/base chain in Rnd 4;
For the floral scallops I went with Directional (fs/bs tatting) : the rings are all in RODS & chains in normal DS, with RW between each element. 
The first ring has a medium length picot to which the later 3 rings are joined. I like the slight hollow in the center, hence chose this method.
After the 4th ring is made, turn work (TW). Continue with reverse stitch for base chain and join to Rnd 3 picot, using the Split Ring join described in 1.3.a here . I kept switching between an Up loop & a Down loop, but there is not much visual difference when working with a single colour. If required in later rounds, I intend to practice the S2LHPJ.
I have a few more repeats left in Rnd 4 and will update/post future rounds only if I have something new/different to share. This is still on the shuttles & has not been ironed or blocked yet.

********************************


Keeping It Clean !

As the doily grows in size, one often comes across the problem of keeping it clean – dust & stain-free. It seems to be right time to address some of the very many options we have devised for ourselves ! There are so many really creative solutions that are made & shared by bloggers. The following is a simple run-through list

1. Prevention is better than cure !
Keep hands, tools, materials & work area clean.
A. Always wash hands before picking up the project. While traveling, use clean/wet wipes, etc.
TIP from Patti Duff :  "Regarding the wet wipes - be sure to read the ingredient list and avoid any with oil and/or lanolin. The oils will transfer to your work and show."
B. Store tools & threads in clean covered boxes or pouches.
C. Wipe the working surface clean before spreading out the lace & materials.
Layer it. Cover the work area with a clean sheet – a mat, a table cloth, etc. This sheet(s) can be earmarked for & stored with our lace projects so that we don’t have to hunt around every time. Clean this sheet(s) regularly.
 My Memory Afghan took many months to complete & the change of sheets can be seen in pic below.
Yet, after working on it for two winters, it does not need a wash.

2. Ride with Pride !
Often the only free time we get to enjoy our hobby is while traveling. But risk of dirtying the lace increases manifold. A few tips …
Use wipes to keep hands clean.
Keep all items & WIP in clean pouch, special bags with pockets, zip-lock bags, etc. that can be closed/zipped shut.
Place a clean hanky or cloth over the working surface.
Choose darker shades/colours or variegated colourways that won’t show the dust/dirt easily.
Instead of one large project, it might be easier to work on small items that get completed & packed quickly so that they do not gather too much dust.
Box it. Small motifs, snowflakes, etc. can be stored in small boxes or containers within the pouch.
These small motifs from Renulek’s Snow Doily were stored in a little plastic box till they were needed later.

3. Roll and Store !
Pillow cases can be used to store our WIPs, especially as they grow large, without having to hunt for large flat clean covered surfaces ! This is especially handy for long-forgotten WIPs, which we are all guilty of.
Roll It. Place the doily flat on the pillow case (or any other clean cloth or towel) ;
fold in half ensuring that the entire doily fits within ;
roll the pillow/towel & store in closet, drawer, or in a  pouch/bag if traveling.
This layered rolling keeps the doily fairly flat without getting squished or creased. The rolled case takes up very little space. 

Renulek's Wiosna 2015 - another doily that was in progress for many months, as it grew larger & larger in size 20 thread. But it stayed clean & cozy within the pillow covers (I had to change to a larger pillow case on the left). The shuttle & thread is deliberately left out only to photograph, otherwise it stays inside too.


4. Working on Long Edgings !
I like to sew on edgings later, not join as one tats. That means keeping the lengthening edging from entangling.
Place in a zip-lock pouch.
Wrap around a card.
Or keep it safe inside a box.
This is the Zig-Zag Lace/edging tatted in size 10 for a table-cloth, getting quite unmanageable . 
 The Belgium chocolates inside were consumed in no time & the box used to keep the ever-growing lace. 
 Fortunately, the inner lid flaps had a circular opening, which worked well for the lace to emerge 
 Of course, one can always work with the lid closed …
 When one’s tatting is done for the day, place shuttle alongside the lace & keep box & thread in clean place.
This ‘fancy’ box also had a removable container ! I’ve photographed it with the lace in the container 
& the big ball of thread inside the box. Ball in box is something many tatters do.


After trying out various methods, these 4 are my favorite. Simple & inexpensive choices using what is easily available in the house. I have not had to wash any of these projects after completion, and 2 of these were even gifted! Experience teaches us so many new tricks & ideas. What is your favorite go-to method to keep large projects clean & dust-free ? 


Related Posts : Rounds 1-3