Monday, 28 March 2016

marching along

Pin It now!


And the snowflakes march on …
My March installment of 2 snowflakes per month for the Year Long Snowflake Tat-Along on Craftree
There’s nothing much to write about these snowflakes, except for my colour adventure in one & my split chain practice in the other.

Day Four Snowflake
Pushing my colour boundaries.


Threads : Anchor variegated embroidery cotton 1325. 2 strands
Anchor Mercer Crochet Cotton size 40 pink 052
Measurements : Rnd 1 - 1.5" ; Rnd 2 - under 3"
Techniques : 2 shuttles, directional tatting, floating/thrown rings, Reverse Join, Lark's head picot joins (LHPJ), Lock Join

My go-to colour with this variegation would've revolved around blues & purples , or white, black. But pink ? Never. Hence had to give it a go.  Coz these snowflakes are also experimental ...
Rnd 2 continued clockwise after a Reverse Join to switch shuttles.
Added very small anchoring picots to a couple of outer Floating rings to stabilize, then discontinued.

LHPJ to link outer chains.

TIP : Elaine Gan's Reverse Join enables one to lock join to a point below the working element while simultaneously enabling the switching of shuttles, which is what I needed in order to change the colours. 


Day Five Snowflake
Lene Bjorn

Chaining the split chain

Threads : Anchor Mercer Cotton size 40. Aqua Blue. 4054-0185
MeasurementsRnd 1 : 1½”  ; Rnd 2 : 2¼”  ; Rnd 3 : <3½”
Techniques : 2 shuttles, directional tatting, lock join, split chain (SCh).

Started rings in Round 1 with RODS (reverse order DS) so that the chains would be normal stitches.
Climbed out of the round with a split chain.
Deliberately done in single colour because I wanted to practice SCh. I want to become comfortable working the SCh.

TIP : During the Craftree Mystery TAL, I realized that after a chain is lock joined to a picot & returns back up for another picot join, the adjacent chains lie flatter together if 1 half stitch is reduced. Or in other words, if the LJ is considered as a half stitch in the stitch count.
  

Lene’s snowflakes are much larger than I used to think before, and I’m glad I chose size 40 to work them. But each pattern has something new to learn or try out, besides being so beautifully designed.
I'm still behind by 2 snowflakes but hope to catch up soon. And I've skipped Day 3 for the present. Want to work on it at leisure.


                                               happy tatting :-)


Related Posts Mystery Doily
Day 1 and Day 2 snowflakes


Saturday, 26 March 2016

Eager to bloom

Pin It now!

It may be a bit early for the Wild Rose to bloom but flowers always bring a happy smile. 
Continuing from my last post here is Nellie’s Wild Rose. 

Abbreviations used :
DS – double stitch
FHS – 1st half stitch
SHS – 2nd half stitch
fs/bs or RODS – frontside/backside tatting or reverse order double stitch
RS – reverse stitch (unflipped)
SH – shuttle
SS – switch shuttles
TW – turn work (like pages of a book)
LJ – lock join
RW – reverse work


Original : Nellie Hall Youngburg
Modern : Farida, Melanie, Ancolie
    

This is Motif #26 from Forty Original Designs in Tatting by Nellie Hall Youngburg rewritten & model tatted by Farida, Melanie, & Ancolie for the Nellie Hall Project (2014)The tatted models shared by them inspired me to try this flower. I like the heart-shaped petals – a very pleasing minimalistic pattern.


Threads : SH1 – Anchor Mercer Cotton size 40 (white)
SH2 – Anchor Embroidery Cotton 3 strands . (variegated pink – 1320)
Measurement : 2”
Techniques I used : Fs/bs tatting (optional), Z chain, decorative picots (graduated) , folded chain , Turn work, Down join, Lock Join, RS (optional), joining in a circle.
 

It seemed like a simple pattern at first glance. Well, first glances can often deceive. My first attempt (which was all variegated) landed in the compost heap & I started afresh with a white center to resemble the Alberta wild rose or a Nootka rose. Insights from the first trial helped me.


The main steps are collaged together. But here I share each step. Refer to pattern pdf for stitchcount, & pictorial for steps & directions. For convenience, I am uploading single pics sans directions. This is merely an alternate way of tatting the rose in clockwise direction.
Fs/bs tatting (using RODS) is optional & can be ignored.
SH1 : Ring A : RODS
Chain B : DS with graduated picots. End with 2SHS to fold chain. SS.
SH2 : Floating Ring C : RODS . SS.
SH1 : Chain D : 2FHS then follow the chain DS . Join at base of Ring A.

Folding the chain makes the floating ring automatically face downwards (one may need to adjust with fingers) without using any other technique, while simultaneously creating a nice little notch.

SH1 : Z Chain E : RS
Chain F : DS. Fold with 2SHS . SS.
Chains E & F constitute a Z chain (sample #13 on page 1 here) with 2 colours by first not flipping the stitches (E), then flipping the stitches (F). This gives a pointed/sharp turn to the chain. (Refer to pic #5 below)
One can achieve this result without RS as follows (sample #20 on page 2 here) :
After Chain D, Lock Join to base of Ring A, reverse work (RW) , SS, tat E (RODS) using SH2, RW, SS, tat F using SH1, SS.


SH2 : Floating Ring G : RODS . SS.
SH1 : Chain H : Fold Chain with 2FHS, complete chain, TW.
SH1: Ring I : RODS. LJ to angle of Z Chain E-F.
Repeat till 5 petals are tatted, joining back to 1st petal.


What I shared is nothing out of the ordinary. It is only my way of keeping track of what I have done.
I am not sure whether anyone will be interested, but just to get it over & done with, I have converted the pictorial into a pdf file which can be downloaded by clicking Nellie's Wild Rose Pictorial

Many thanks to the lovely tatters & Georgia Seitz for sharing the pattern 

Related Posts : Chains in Shuttle Tatting


Thursday, 24 March 2016

The advent of Spring

Pin It now!
Spring heralds activity in all living forms. Sharing some happy life here ... Two patterns are from Georgia’s Nellie Hall Project (2014) where volunteers have rewritten/converted Nellie’s motifs into modern format and one is Jane Eborall’s latest flower motif where she went crazy trying to name it.
This was intended as a composite post of 3 patterns, but length dictates that I save at least one for the next post. After all, we are only just opening our doors to lovely spring !

Abbreviations used :
CTM – continuous thread method
DS – double stitch
LCh – lock chain
RODS or fs/bs – reverse order double stitch or frontside/backside tatting 
RS – reverse stitch (unflipped)
SCh – split chain
SCMR – self closing mock ring
SH - shuttle
SLT – shoe lace trick / overhand knot
SR – split ring


Original : Nellie Hall Youngburg (1916)
Modern : Wally Sosa, Jane Eborall (2001)


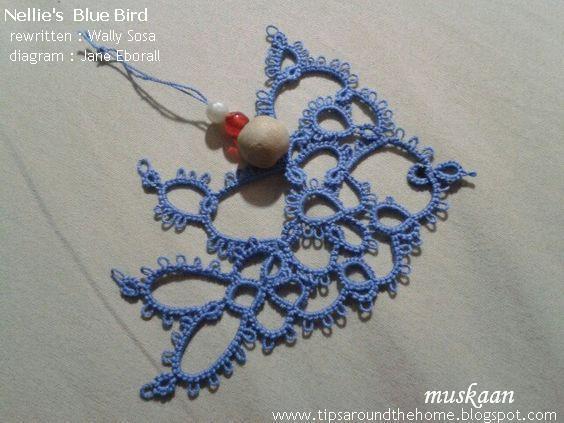
Motif #28 from “Forty Original Designs in Tatting” by Nellie Hall Youngburg rewritten & model tatted by Wally Sosa and diagrammed by Jane Eborall
Materials : Anchor Mercer size 40 – 4054-0131 (blue) ; 1 black seed bead ; a few beads to finish ;
Measurements : 2¾” long & 2½” tall 
Techniques I used : 2 shuttles, CTM, floating rings, SCMR, SCh, Twisted picot (floating)

Detailed pattern instructions and diagrams are provided to suit tatter preference .
I decided to use a single colour & tat it in one pass.


Since this was in one pass, I started with Ring K & went in anti-clockwise direction to complete the 1st wing by joining J to base of K & proceeding with ring aa to tat the tail portion, working my way to the head, with a black seed bead for the eye. The last part of head is a SCh to bridge the distance, then continued with the 2nd wing.

Some of the rings in this pattern can be tatted as SCMRs, including the rings at the tips of tail & wings.
My Notes
  • Ring aa is exactly as stated in the text (5-5-5) with only 2 picots. Ring jj is linked to the aa picot closest to it; then chain kk; Ring ll is again linked to that same aa picot; thus 1 picot is “shared” by 3 rings (this is sometimes shown as a triangle in some diagrams). Continue working Ring ll & join to the only free picot of Ring aa. Thus both picots of aa have been linked – one shared by jj & ll, & one by ll only.
  • RW after Ch ii.
  • rr – R 5+5+5+5-5 clr
  • Remember to switch shuttles when working the floating rings & switch back when continuing with the chain.
  • A few picots are drawn extra in some diagrams; follow the written text in such cases.
As it neared completion, I decided to continue with the 2nd wing (as in original motif). It was only then that I noticed the 2nd large central rings in original pattern diagram. These could’ve been worked as SCMRs, too.
To continue with 2nd wing in one pass, chain vv was tatted as a SCh from the 4th picot point. Continued with ring ‘x’ as an SCMR to which the large central ring A was tatted after leaving a mock picot space. I decreased the chain stitches by 2DS on both ends between rings.
Instead of sewing in the ends, I continued with a LCh for a bit, but being the same colour, I have hidden it with beads to make a hanging ornament.

I like this pattern & plan on tatting Jane’s Robin to give this bird company :-)

For twig
The bird needed a dash of Spring colour to woo his mate & taking a cue from Wally’s cute flower, I went freeform.
Materials : Silk/rayon threads (2 strands each) in red, chrome yellow, & variegated green.
Techniques : 4 shuttles, Pearl tatting, Josephine rings, half-closed rings, long picots, floating/thrown dots, bullion knot.

2 shuttles were loaded with green thread CTM. I made one stitch, then joined in the red & yellow threads through their loops (doubled up threads), thus freeing myself from the prospect of hiding tails at this end completely!
Stem is pearl tatted with single stitches on either side; 
leaves are floating dots (R of 4 DS) ; 
red & yellow flowers are a mix of Josephine rings, dots, bullion knot, and one dot with long picots that were cut later to represent a flower in bloom (actually the thread broke at this point & it was my way of attaching new thread without having to hide ends).


Jane Eborall

Threads : Anchor embroidery cotton 2 strands  1305 in SH1
Anchor size 40 – 0300 (cream) in SH2
Measurements : Rnd 1 - < 1½” ; Rnd 2 – 2¼”
Techniques I used : SR, SCMR, LCh, SCh, SLT, RS

What was I thinking, tatting those teeny tiny rings with fine thread ?! I could barely see the rings in the center. Oh, but as the flower came together, it all looked so pretty & worth it. A fun tat & finished in one evening. As usual, the motif lay flat !
Tatted in one pass without any cuts, ties & hiding until the very end. In order to keep the SCh chain colour same in both halves, I made a kind of loose SLT with SH1, thus bringing SH2 in position to make the split chain. This was easier than trying to encapsulate SH1 thread within the SCh segment.
While writing this post, I remembered some tutorial where colour positioning was an issue & scrolled through my pinterest board. Voila there it was. Tatting Chic’s solution to a single colour SCh though one is working with 2 colours. Very clear pictorial.
What we familiarly call the Split Chain was Dora Young’s Knotless Technique or Dora Young Knot (DYK). 
Just goes to show it is so essential to read all one can. I had read & pinned this SLT trick over a year back, and it stayed somewhere at the back of my mind, which probably came to the fore here (you never know what will stick ;-p).
Round 2 was continued with SH2, and instead of RW after SR1 & SR2, I simply made a 1RS chain (unflipped stitch) like Frivole had explained in detail recently.
Check out the doily Jane made with these flower motifs. Her patterns are always a learning experience !

Hope you have lots of cheerful colours & pleasant chirping in days to come .

In the next post I will share a short pictorial on how I tatted Nellie's Wild Rose.


Thanks to all mentioned for sharing these lovely patterns with us !

Happy tatting :-)

Related Posts : Nellie's Wild Rose